Laminate Flooring Transition Strips: A Comprehensive Guide
Transition strips are essential for creating smooth transitions between different types of flooring, particularly when moving from laminate to another surface like concrete. Understanding the various types and uses of transition strips can help you achieve a seamless and professional-looking floor. Here’s a comprehensive guide to laminate flooring transition strips:
- Purpose of Transition Strips: Transition strips serve multiple purposes. They provide a safe and smooth transition between different flooring materials, protect the edges of the laminate from damage, and allow for the natural expansion and contraction of the laminate due to changes in temperature and humidity. Without these strips, the edges of your laminate flooring can become uneven, creating tripping hazards and unsightly gaps.
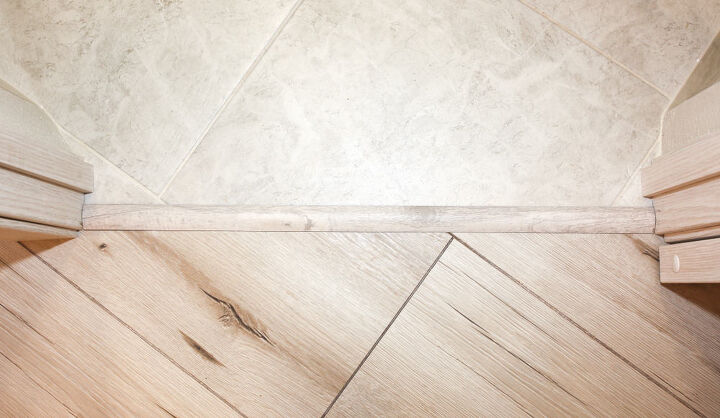
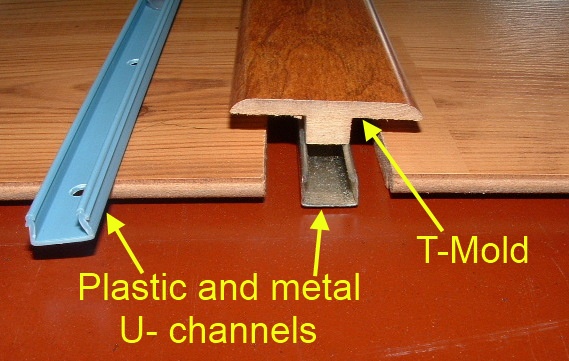
- Types of Transition Strips: There are several types of transition strips available for laminate flooring. T-molding is used to transition between two floors of the same height, while reducer strips help bridge the gap between laminate and a lower surface like concrete. End molding or threshold strips are used where the laminate meets a door or step. Each type of strip serves a specific purpose, ensuring a neat and functional transition.
- Materials and Finishes: Transition strips come in various materials, including wood, metal, vinyl, and laminate. The choice of material often depends on the aesthetic preferences and the type of flooring. Wood and laminate strips blend seamlessly with laminate floors, while metal strips provide a modern, durable option. Finishes can vary from matching the color of the laminate to contrasting hues for a decorative touch.
- Sizing and Measurement: Proper sizing is crucial for effective transition strip installation. Measure the gap between the laminate and concrete accurately to choose the right width and height of the strip. Transition strips typically come in standard lengths, but they can be cut to fit your specific needs. Ensuring the correct size will help in maintaining the stability and appearance of the floor.
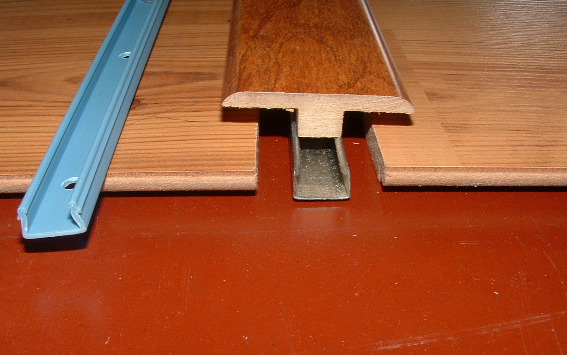
- Installation Methods: Transition strips can be installed using adhesive, screws, or tracks. The adhesive is commonly used for concrete surfaces, providing a strong bond. Some transition strips come with pre-attached adhesive strips for easy installation. Alternatively, metal tracks can be screwed into the concrete, and the transition strip is then snapped into place. Each method has its advantages, and the choice depends on the specific requirements of your flooring.
- Maintenance and Durability: Once installed, transition strips require minimal maintenance. Regular cleaning to remove dust and debris will keep them looking new. The durability of transition strips depends on the material; metal and vinyl strips tend to last longer and withstand heavy traffic better than wood or laminate strips. Periodically check for any loosening or damage to ensure the strips continue to function effectively.

Choosing the Right Transition Strips for Laminate to Concrete
Selecting the appropriate transition strip for your laminate to concrete flooring is crucial for both functionality and aesthetics. Here’s a detailed guide to help you make the right choice:
Assessing the Height Difference: The first step in choosing the right transition strip is to assess the height difference between the laminate and concrete floors. If the heights are nearly equal, a T-molding strip is ideal. For larger height differences, a reducer strip or an end molding might be necessary. Proper assessment ensures a smooth transition and prevents tripping hazards.
Material Selection: Transition strips come in a variety of materials, each with its own set of benefits. Laminate transition strips offer a consistent look with your flooring, while metal strips provide durability and a modern appearance. Vinyl strips are flexible and moisture-resistant, making them suitable for areas prone to humidity. Consider the specific needs of your space when selecting the material.
Color and Finish: Matching the color and finish of the transition strip with your laminate flooring can enhance the overall aesthetic of your room. Many manufacturers offer strips in colors that complement their flooring products. Alternatively, contrasting colors can create a bold, decorative statement. The choice of finish can also impact the look, with options ranging from matte to high-gloss.
Ease of Installation: Consider the installation process when choosing transition strips. Some strips are easier to install than others, depending on the method required. Adhesive-backed strips or click-in systems can simplify the installation process, especially for DIY projects. If you prefer a more secure attachment, look for strips that can be screwed into the concrete.
Durability and Maintenance: The durability of the transition strip is an important factor, especially in high-traffic areas. Metal strips are highly durable and resistant to wear, while wood and laminate strips might require more frequent maintenance. Consider how much foot traffic the area will receive and choose a strip that can withstand the wear and tear. Additionally, think about the maintenance needs of each material to ensure long-term performance.
Budget Considerations: Transition strips come in a range of prices, from budget-friendly options to high-end finishes. Determine your budget beforehand and find a balance between cost and quality. While it might be tempting to opt for the cheapest option, investing in a higher-quality strip can save money in the long run by reducing the need for replacements and repairs.

Installation Tips for Laminate Flooring Transition Strips on Concrete
Installing transition strips between laminate and concrete flooring can be straightforward with the right preparation and tools. Here are some expert tips to ensure a successful installation:
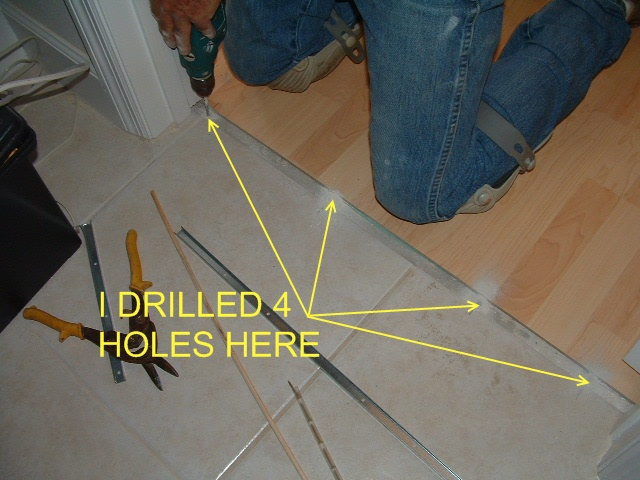
Preparation and Planning: Start by thoroughly cleaning the area where the transition strip will be installed. Remove any debris, dust, or old adhesive that could interfere with the new installation. Measure the length of the gap between the laminate and concrete to cut the transition strip to the correct size. Planning ensures a smoother installation process.
Cutting the Transition Strip: Use a fine-toothed saw to cut the transition strip to the required length. For precise cuts, consider using a miter saw, which can provide clean and accurate edges. After cutting, sand down any rough edges to prevent splinters and ensure a smooth fit. Always measure twice before cutting to avoid any mistakes.
Choosing the Right Adhesive: For concrete surfaces, a strong construction adhesive is usually the best choice. Apply the adhesive evenly along the bottom of the transition strip. Ensure that the adhesive is suitable for both laminate and concrete to provide a secure bond. Follow the manufacturer’s instructions for drying times and application techniques.
Aligning the Transition Strip: Carefully place the transition strip into position, aligning it with the edge of the laminate flooring and the concrete. Press down firmly to ensure a good bond. Use a level to check that the strip is straight and even. If necessary, adjust the strip before the adhesive sets to achieve the perfect alignment.
Securing the Strip: Depending on the type of transition strip, you might need to secure it further with screws or nails. If using a track system, screw the track into the concrete first, then snap the transition strip into place. For adhesive-only installations, allow the adhesive to cure fully as per the manufacturer’s recommendations before walking on the strip.
Finishing Touches: Once the transition strip is securely in place, clean any excess adhesive that might have squeezed out. Use a damp cloth to wipe it away before it dries. If necessary, apply a sealant around the edges of the strip to protect against moisture and ensure a neat finish. Regularly check the strip for stability, especially in high-traffic areas, to maintain its functionality and appearance.
Benefits of Using Transition Strips Between Laminate and Concrete Floors
Transition strips offer numerous benefits when used between laminate and concrete floors. Here’s why they are an essential component of any flooring project:
Smooth Transitions: Transition strips provide a smooth transition between laminate and concrete floors, reducing the risk of tripping and ensuring safety. They cover the gaps between different flooring types, creating a seamless and aesthetically pleasing transition that enhances the overall look of the space.
Protection for Flooring Edges: The edges of laminate flooring can be vulnerable to damage without proper protection. Transition strips safeguard these edges from chipping, cracking, or lifting. This protection extends the lifespan of your laminate flooring, keeping it looking new and well-maintained for longer.
Accommodation of Expansion and Contraction: Laminate flooring expands and contracts with changes in temperature and humidity. Transition strips allow for this natural movement by providing a buffer zone. This flexibility prevents buckling or warping, ensuring the laminate floor remains flat and secure throughout its lifespan.
Versatile Design Options: Transition strips come in various designs, materials, and finishes, allowing you to choose an option that complements your flooring and enhances the overall aesthetic of your space. Whether you prefer a subtle transition that blends seamlessly with the flooring or a decorative strip that makes a statement, there’s a wide range of options available to suit your style and preferences.
Enhanced Safety: Properly installed transition strips contribute to a safer environment by eliminating tripping hazards and preventing accidents. By covering the edges of the flooring and creating a level transition, transition strips help maintain a smooth and even surface, reducing the risk of slips and falls, particularly in high-traffic areas.
Moisture Protection: Transition strips act as a barrier against moisture infiltration, particularly in areas where laminate meets concrete. Moisture can seep into the gaps between flooring materials, leading to damage such as swelling, warping, or mold growth. Transition strips help seal these gaps, protecting both the laminate and concrete from moisture-related issues.
Ease of Installation: Installing transition strips is a relatively simple process, making it an accessible DIY project for homeowners. With basic tools and some adhesive or screws, you can achieve professional-looking results in no time. This ease of installation saves both time and money compared to more complex flooring solutions.
Long-Term Cost Savings: While transition strips may require an initial investment, their long-term benefits outweigh the upfront cost. By protecting the edges of your laminate flooring and preventing damage, transition strips help prolong the lifespan of your floor, reducing the need for costly repairs or replacements down the line. Additionally, their ability to accommodate expansion and contraction minimizes the risk of structural issues, further saving you money on maintenance.

Common Challenges and Solutions in Installing Transition Strips on Concrete
Installing transition strips on concrete surfaces presents unique challenges that require careful consideration and planning. Here are some common issues you may encounter and how to address them:
Uneven Concrete Surface: One of the most common challenges when installing transition strips on concrete is dealing with an uneven surface. Uneven concrete can prevent the transition strip from sitting flush and may result in gaps or instability. To address this issue, use a leveling compound to smooth out any imperfections before installing the transition strip.
Moisture and Humidity: Concrete surfaces are prone to moisture and humidity, which can affect the adhesive used to install transition strips. To prevent issues such as adhesive failure or mold growth, ensure the concrete is thoroughly dry before applying adhesive. Consider using a moisture barrier or sealant to protect the transition strip and underlying flooring from moisture damage.
Limited Attachment Options: Unlike wood or other materials, concrete does not provide a surface suitable for traditional fastening methods like nails or screws. This limitation can make it challenging to securely attach transition strips to concrete. To overcome this challenge, opt for adhesive-backed transition strips designed specifically for concrete surfaces. These strips provide a strong and durable bond without the need for drilling or fasteners.
Expansion and Contraction: Concrete undergoes minimal expansion and contraction compared to other flooring materials like laminate. This difference in movement can create tension between the transition strip and the concrete, leading to buckling or detachment. To mitigate this issue, choose transition strips with flexible designs that can accommodate slight shifts in the concrete without compromising stability.
Choosing the Right Adhesive: Selecting the appropriate adhesive is crucial for ensuring a secure bond between the transition strip and the concrete surface. However, not all adhesives are suitable for use on concrete. Opt for a high-quality construction adhesive specifically formulated for bonding to concrete. Follow the manufacturer’s instructions carefully to achieve optimal adhesion and prevent issues such as delamination or separation.
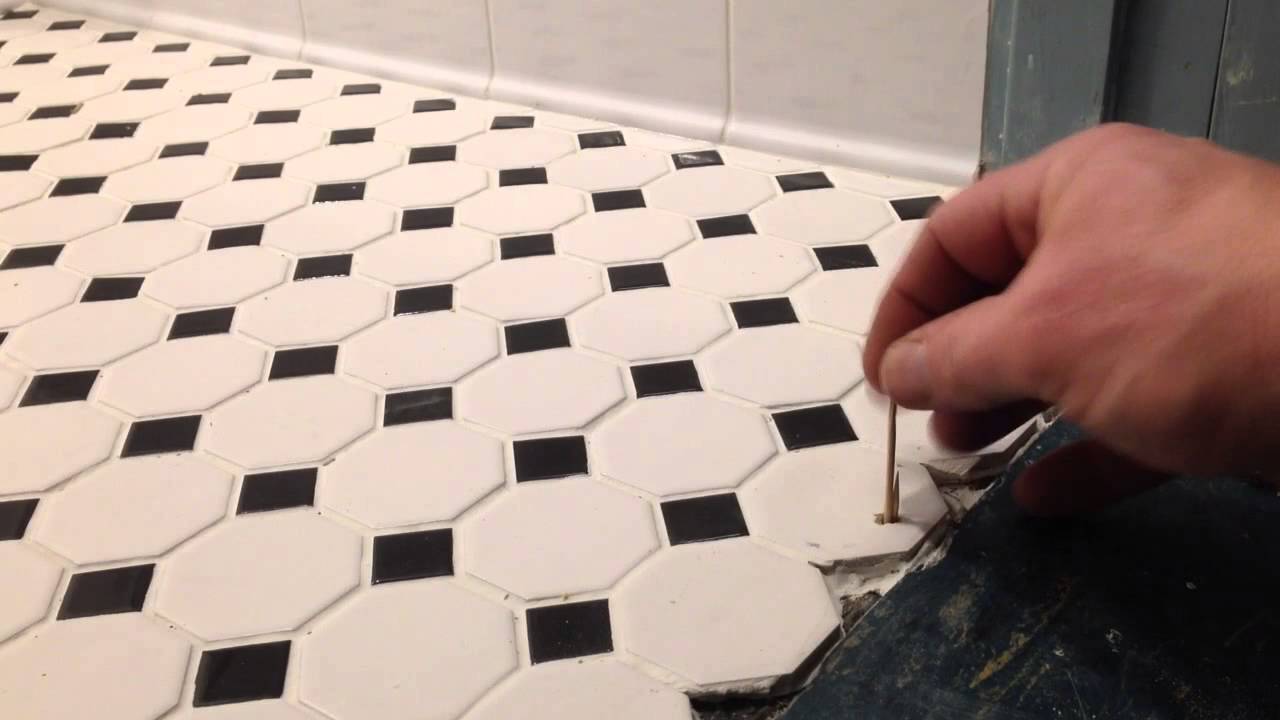
Surface Preparation: Proper surface preparation is essential for a successful transition strip installation on concrete. Thoroughly clean the concrete surface to remove any dirt, dust, or debris that could interfere with adhesion. Additionally, roughen the surface slightly with sandpaper to improve bonding. Taking the time to prepare the surface adequately will ensure a strong and lasting bond between the transition strip and the concrete.

Installing a transition strip into concrete
Laminate flooring transition strips
![]()
Installing Laminate Transitions, Step by Step Instructions
Where To Place Transition Strips In A Doorway (Picture Tutorial

How To Install Transition Strip On Vinyl Plank Flooring – Home
![]()
Vinyl Flooring Transition On Concrete Subfloor

Installing Laminate Transitions, Step by Step Instructions
Where To Place Transition Strips In A Doorway (Picture Tutorial

Installing Laminate Transitions, Step by Step Instructions
Installing Laminate Flooring : Finishing Trim and Choosing
![]()
Related Posts:
- Laying Laminate Flooring Over Hardwood
- Homemade Laminate Floor Cleaner
- Laminate Flooring Ideas For Kitchen
- Installing Laminate Flooring On Stairs
- How To Shine Laminate Floors Naturally
- Rustic Pine Laminate Flooring
- Mosaic Tile Effect Laminate Flooring
- Laminate Flooring For Commercial Use
- Laminate Floor Around Toilet
- Laminate Flooring Transition Strips Concrete