Why Choose Epoxy Flooring Over Plywood?
When I was looking for a durable and attractive flooring solution for a space with a plywood subfloor, epoxy flooring quickly became a top contender. Epoxy has a lot going for it, especially when applied over plywood. It’s a choice that not only looks great but also offers a range of practical benefits that can’t be ignored. Here’s why I decided that epoxy flooring was the best option for my plywood surface.
- Durability and Longevity One of the main reasons I chose epoxy flooring over plywood is its incredible durability. Plywood, while sturdy, can wear down over time, especially in high-traffic areas. Epoxy forms a hard, protective layer that can withstand heavy use, making it ideal for spaces like garages, workshops, or even home gyms. Once applied, epoxy flooring can last for years without showing signs of wear and tear, which means fewer repairs and less maintenance in the long run.
- Moisture Resistance Plywood is particularly susceptible to moisture, which can cause it to warp, swell, or rot if not properly protected. By applying epoxy, I was able to create a moisture-resistant barrier that protects the plywood underneath. This is especially important in areas that may be exposed to water or humidity, such as basements or kitchens. The epoxy coating seals the plywood, preventing any water from seeping in and causing damage.
- Aesthetic Appeal Beyond its practical benefits, epoxy flooring simply looks fantastic. It provides a sleek, glossy finish that can transform the appearance of any room. I was able to customize the color and finish to match my style, and the result was a floor that not only looks clean and modern but also enhances the overall aesthetic of the space. The reflective quality of epoxy also brightens up the room, making it feel larger and more open.
- Easy to Clean and Maintain One of the things I love most about my epoxy floor is how easy it is to keep clean. Plywood on its own can be difficult to maintain, as it absorbs spills and stains. With epoxy, cleaning is as simple as sweeping away dust and wiping up spills with a damp cloth. The smooth surface doesn’t trap dirt, making it perfect for areas that need to be kept clean and hygienic. This is a major advantage if you’re using the space for a workshop or a garage where spills and messes are common.
- Chemical and Stain Resistance Another benefit of epoxy flooring is its resistance to chemicals and stains. Whether it’s oil spills in a garage or paint splatters in a workshop, epoxy can handle it all without staining or deteriorating. This was a big selling point for me, as I wanted a floor that could stand up to the various substances I use in my DIY projects. The protective layer provided by the epoxy means that even harsh chemicals won’t damage the surface, keeping the floor looking great for years to come.
- Cost-Effective Solution Finally, epoxy flooring over plywood is a cost-effective option compared to other flooring solutions. While there is an upfront cost for the materials and application, the long-term savings in maintenance and durability make it a worthwhile investment. I found that the cost was far less than replacing the plywood with a more expensive flooring material, and the results were just as impressive. Plus, the added protection for the plywood means that I won’t have to worry about costly repairs down the line.

Preparing Your Plywood Surface for Epoxy Application
Before diving into the epoxy application process, I quickly realized that preparation is key. Plywood may seem like a simple surface to work with, but getting it ready for epoxy involves a few crucial steps. By taking the time to properly prepare the plywood, I was able to ensure a smooth, long-lasting finish that adhered perfectly. Here’s how I got my plywood surface ready for epoxy application.
Clean and Clear the Area The first step in preparing the plywood was to thoroughly clean the area. I started by removing any furniture, tools, or debris that could get in the way during the application process. It’s important to have a clean and clear workspace so you can move freely and apply the epoxy evenly. Once the space was clear, I swept and vacuumed the plywood to remove any dust or dirt. Any particles left on the surface can affect the adhesion of the epoxy, so it’s essential to get the plywood as clean as possible.
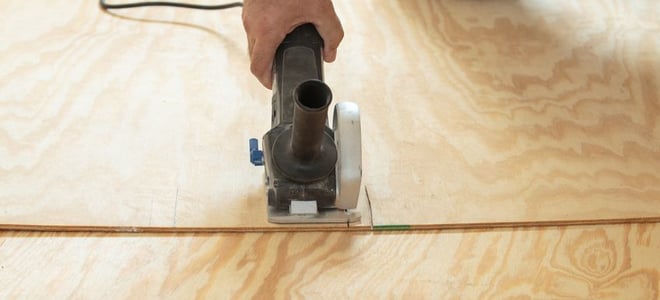
Sand the Plywood Surface Next, I sanded the plywood to create a smooth, even surface. Plywood can have rough spots, splinters, or imperfections that need to be addressed before applying epoxy. Using medium-grit sandpaper, I sanded the entire surface, paying extra attention to any rough or uneven areas. Sanding not only smooths out the plywood but also helps the epoxy adhere better by creating a slightly rough texture for the epoxy to grip onto. After sanding, I vacuumed the surface again to remove any sanding dust.
Fill Gaps and Holes Plywood can have gaps, seams, or small holes that need to be filled before applying epoxy. I used wood filler to fill in any imperfections, making sure to smooth out the filler with a putty knife. This step is crucial because any gaps or holes left unfilled can cause the epoxy to pool or create an uneven finish. Once the filler dried, I sanded it down to ensure the surface was completely smooth and even. This preparation step is key to achieving a professional-looking result.
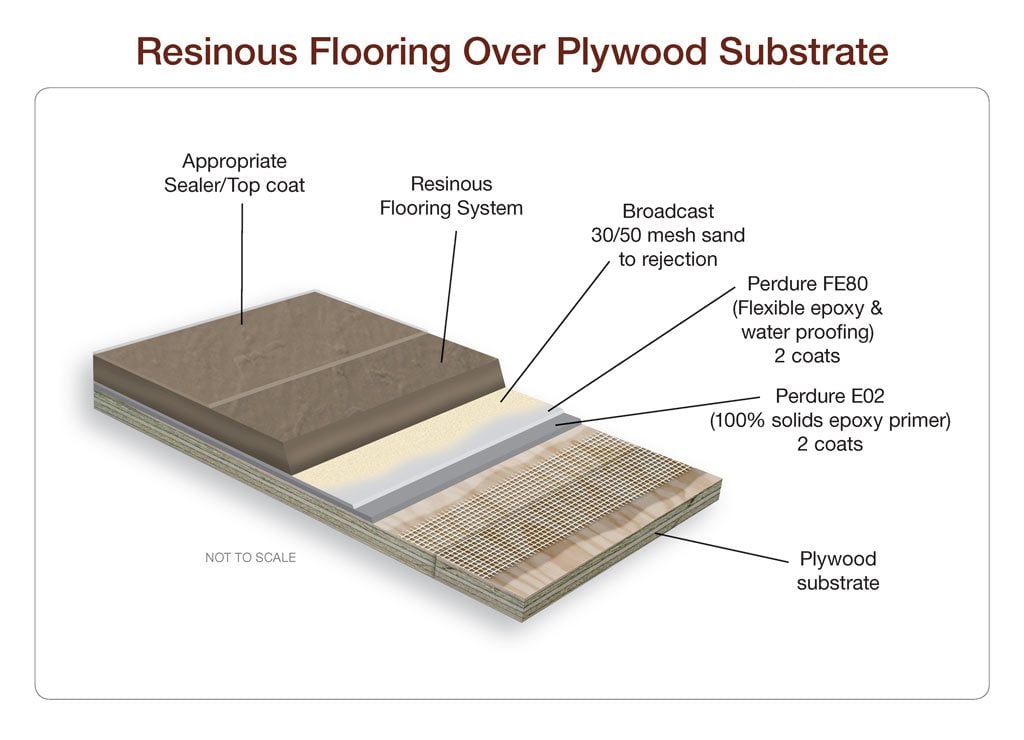
Prime the Plywood Surface Priming the plywood is an important step that should not be skipped. I used a high-quality primer designed for use with epoxy. The primer helps seal the plywood, preventing it from absorbing too much of the epoxy and ensuring an even application. It also enhances the adhesion of the epoxy, making the final result more durable and long-lasting. I applied the primer with a roller, making sure to cover the entire surface evenly. After the primer dried, I lightly sanded the surface to remove any brush or roller marks, then wiped it down with a tack cloth.
Check for Moisture Content Before applying the epoxy, I checked the moisture content of the plywood. Plywood that’s too moist can cause the epoxy to bubble or not adhere properly. Using a moisture meter, I made sure the plywood was dry enough for the epoxy application. If the plywood is too moist, it’s important to allow it to dry out completely before proceeding. This step is crucial for ensuring a smooth and durable finish.
Protect the Surrounding Area Finally, I took the time to protect the surrounding area from potential epoxy spills or drips. I used painter’s tape to cover the edges of the plywood where it meets the walls or other surfaces. I also laid down plastic sheeting or drop cloths to protect the floor and any nearby furniture or tools. Epoxy can be messy, and it’s difficult to remove once it hardens, so taking these precautions is essential. With the plywood surface fully prepped and the surrounding area protected, I was ready to move on to the epoxy application.
Step-by-Step Guide to Applying Epoxy Over Plywood
Applying epoxy over plywood might seem like a daunting task, but with the right steps, it’s something you can tackle with confidence. I remember feeling a bit overwhelmed at first, but once I broke down the process into manageable steps, it became much easier. Here’s a detailed guide to help you achieve a flawless epoxy finish on your plywood surface.
Gather Your Materials and Tools Before starting, I made sure I had all the necessary materials and tools on hand. This included epoxy resin and hardener, mixing buckets, a mixing drill attachment, a roller and brush, painter’s tape, and protective gear like gloves and a mask. Having everything ready before you begin is crucial, as the epoxy can start to set quickly once it’s mixed.
Mixing the Epoxy The first step in applying epoxy is mixing the resin and hardener. It’s important to follow the manufacturer’s instructions carefully to get the right ratio, as incorrect mixing can affect the epoxy’s curing process. I used a clean bucket and a mixing drill attachment to thoroughly mix the two components. It’s essential to mix slowly to avoid introducing too many air bubbles, which can affect the finish. Once the epoxy was mixed, I had a limited working time before it started to harden, so I made sure to work efficiently.
Applying the First Coat I started by applying the first coat of epoxy, known as the seal coat. This coat is thinner and helps to seal the plywood, preventing air bubbles from forming in the final finish. Using a roller, I applied the epoxy evenly across the entire surface, making sure to cover all areas thoroughly. For the edges and corners, I used a brush to ensure a smooth application. The key is to work quickly and methodically, as the epoxy can begin to set within minutes. After applying the seal coat, I allowed it to cure according to the manufacturer’s instructions.
Applying the Flood Coat Once the seal coat was fully cured, I moved on to the flood coat, which is the thicker, final layer that creates the smooth, glossy finish. I mixed a new batch of epoxy and poured it onto the plywood surface. Starting in the center, I spread the epoxy outwards using a notched trowel, ensuring an even distribution. The epoxy is self-leveling, so it naturally smooths out, but it’s important to work out any air bubbles using a heat gun or propane torch. I carefully passed the torch over the surface to release trapped air and create a flawless finish.
Allowing the Epoxy to Cure After applying the flood coat, I allowed the epoxy to cure undisturbed. Curing time can vary depending on the temperature and humidity, but I made sure to follow the manufacturer’s guidelines closely. It’s important to keep the area dust-free during this time to avoid any particles settling into the epoxy. I found that the curing process is where patience pays off—rushing it can lead to imperfections that are difficult to fix later.
Final Touches and Inspection Once the epoxy was fully cured, I inspected the surface for any imperfections or areas that needed touch-ups. If any air bubbles or uneven spots were present, I sanded them down gently and applied a thin layer of epoxy to smooth them out. Finally, I removed the painter’s tape and protective coverings from the surrounding area. The result was a beautifully smooth and glossy epoxy floor that not only looked great but was also incredibly durable.
Common Challenges When Working with Epoxy and Plywood
While epoxy flooring over plywood has its advantages, I learned that several challenges can arise during the process. From my own experience, I’ve found that being aware of these potential issues can help you address them more effectively. Here are some common challenges I encountered and how I overcame them.
Dealing with Air Bubbles One of the most frustrating challenges when working with epoxy is the appearance of air bubbles in the final finish. Plywood is a porous material, and if not properly sealed, air can escape from the wood and get trapped in the epoxy. I found that applying a seal coat before the final flood coat can help minimize this issue. Additionally, using a heat gun or propane torch to pass over the surface after applying the epoxy helps to release any trapped air bubbles, leaving a smooth finish.
Managing Working Time Epoxy has a limited working time, which means you need to work quickly and efficiently. I found that mixing smaller batches of epoxy at a time helped me manage this challenge better. It’s important to plan out your application process before you start mixing to avoid running out of time. If you’re applying epoxy over a large area, consider having an extra set of hands to help with the mixing and application process.
Ensuring Proper Adhesion Getting the epoxy to adhere properly to the plywood can be tricky, especially if the surface isn’t prepared correctly. I made sure to sand the plywood thoroughly and apply a primer to enhance adhesion. However, even with proper preparation, there can still be issues with peeling or delamination if the epoxy isn’t applied correctly. Ensuring that the plywood is completely dry and clean before application is key to preventing adhesion problems.
Controlling the Curing Environment The environment in which the epoxy cures can have a significant impact on the final result. Temperature and humidity play a big role in how the epoxy sets. I found that working in a controlled environment with stable temperatures between 70-80°F (21-27°C) and low humidity gave the best results. If the temperature is too low, the epoxy may not cure properly, leading to a tacky or uneven finish. On the other hand, high humidity can introduce moisture into the epoxy, causing it to cloud or blush.
Avoiding Dust and Debris Keeping dust and debris out of the epoxy while it cures is another challenge. Even the smallest particles can create imperfections in the finish. I made sure to thoroughly clean the workspace before starting and used plastic sheeting to cover the area to prevent dust from settling on the epoxy. Additionally, I wore clean, lint-free clothing to avoid introducing any fibers or particles into the work area. It’s also a good idea to close windows and doors to minimize airflow that could carry dust.
Addressing Surface Imperfections Despite your best efforts, surface imperfections like fisheyes, craters, or streaks can still occur. These are often caused by contamination on the plywood surface or uneven application of the epoxy. I learned that careful surface preparation, including cleaning and sanding, is crucial to preventing these issues. If imperfections do appear, they can often be sanded out once the epoxy is fully cured, and a fresh coat can be applied to achieve a smoother finish.
Maintenance Tips for Epoxy Floors on Plywood
After successfully installing epoxy flooring over plywood, I realized that maintaining it properly was essential to preserving its appearance and durability. Epoxy floors are generally low-maintenance, but there are still a few key steps I take to keep mine looking its best. Here are some maintenance tips I’ve found helpful for keeping epoxy floors on plywood in top condition.
Regular Cleaning Routine The first step in maintaining an epoxy floor is establishing a regular cleaning routine. I make it a habit to sweep the floor regularly to remove dust and debris that can accumulate. This is especially important in high-traffic areas or spaces where the floor is exposed to dirt and grime, such as a garage or workshop. For deeper cleaning, I use a mop with a mild, non-abrasive cleaner that’s safe for epoxy surfaces. Avoiding harsh chemicals ensures that the epoxy remains in good condition and doesn’t lose its shine.
Prompt Spill Cleanup One of the benefits of epoxy flooring is its resistance to stains, but it’s still important to clean up spills as soon as they occur. Whether it’s oil, paint, or any other substance, prompt cleanup prevents stains from setting and keeps the surface looking clean and pristine. I keep a supply of clean rags or paper towels handy for quick spill cleanup. For tougher stains, a gentle scrub with a soft-bristle brush usually does the trick without damaging the epoxy.
Protective Measures To extend the life of my epoxy floor, I take a few protective measures. In areas where heavy furniture or equipment is used, I place mats or pads under the legs to prevent scratches or dents. I also use floor mats at entry points to trap dirt and moisture before it can reach the epoxy surface. If the floor is in a garage, parking mats can be placed under vehicles to catch any oil drips or tire marks. These simple precautions help to prevent damage and keep the epoxy looking like new.
Avoiding Harsh Chemicals When cleaning or working in a space with epoxy flooring, I make sure to avoid using harsh chemicals that could damage the surface. Solvents like acetone or paint thinner can eat away at the epoxy and cause it to deteriorate. Instead, I stick to gentle, pH-neutral cleaners that are safe for epoxy. If a stronger cleaner is needed, I test it on a small, inconspicuous area first to ensure it won’t harm the floor.
Periodic Resealing Over time, the epoxy finish can start to dull, especially in areas with heavy foot traffic or frequent use. To keep the floor looking fresh and shiny, I plan to reseal it periodically. Resealing involves applying a new top coat of epoxy or a compatible sealer that restores the gloss and provides additional protection. Depending on the level of use, this might need to be done every few years. Resealing not only enhances the appearance but also extends the overall lifespan of the flooring.
Inspecting for Damage Regularly inspecting the epoxy floor for signs of damage is another important part of maintenance. I keep an eye out for any cracks, chips, or areas where the epoxy may be lifting. If I notice any issues, I address them promptly to prevent further damage. Small cracks or chips can often be repaired with a patch kit or a fresh coat of epoxy. By catching and fixing problems early, I avoid more extensive repairs down the line and keep the floor in top condition.
Benefits and Drawbacks of Epoxy Flooring on Plywood
When I was deciding whether to go with epoxy flooring over plywood, I weighed the benefits and drawbacks carefully. While epoxy offers many advantages, it’s important to consider the potential downsides as well. Based on my experience and research, here’s a detailed look at the pros and cons of epoxy flooring on plywood.
Durability and Strength One of the biggest benefits of epoxy flooring is its durability. Epoxy forms a hard, resilient surface that can withstand heavy foot traffic, impacts, and even the weight of vehicles. This makes it an excellent choice for garages, workshops, and other high-use areas. When applied over plywood, epoxy adds an extra layer of protection, extending the life of the wood and reducing the need for repairs. However, if not applied correctly, epoxy can crack or peel, especially if the plywood underneath isn’t properly prepared or if it shifts over time.
Moisture and Stain Resistance Another advantage of epoxy flooring is its resistance to moisture and stains. This is particularly important when dealing with plywood, which can be vulnerable to water damage. Epoxy creates a seamless, non-porous surface that prevents water from seeping in and damaging the plywood underneath. It also resists stains from oil, chemicals, and other substances, making it easy to clean and maintain. On the downside, if the epoxy coating is compromised or if moisture gets trapped underneath, it can lead to problems like mold or rot.
Aesthetic Appeal Epoxy flooring offers a sleek, modern look that can enhance the appearance of any space. It’s available in a variety of colors and finishes, allowing for customization to match your style. The glossy finish also reflects light, brightening up the room and making it feel more open. However, the high-gloss finish can also highlight imperfections in the plywood or application process, so careful preparation and application are crucial to achieving the desired look.
Cost-Effectiveness Compared to other flooring options, epoxy is relatively cost-effective, especially when applied over an existing plywood surface. The initial investment is reasonable, and the long-term savings in maintenance and durability make it a smart choice for budget-conscious homeowners. However, epoxy can be costly if you need to hire professionals for the installation, especially if the job requires extensive surface preparation or multiple coats.
Ease of Maintenance One of the reasons I chose epoxy flooring is its low-maintenance nature. Once installed, epoxy requires minimal upkeep compared to other flooring materials. Regular sweeping and occasional mopping are usually all that’s needed to keep it looking great. The downside is that if the epoxy does get damaged, repairs can be more challenging and may require reapplying a new coat to the entire floor.
Environmental and Safety Considerations While epoxy flooring has many benefits, it’s important to consider the environmental and safety aspects as well. Some epoxy products contain volatile organic compounds (VOCs) that can be harmful to indoor air quality during application. Proper ventilation and choosing low-VOC or VOC-free products can mitigate this issue. Additionally, the smooth surface of epoxy can be slippery when wet, so it’s essential to use anti-slip additives if the floor is in an area prone to moisture.
Cost Comparison: Epoxy Flooring Over Plywood vs. Other Flooring Options
When I was planning my flooring project, cost was a major factor in my decision-making process. I wanted to find a solution that was both affordable and durable, and epoxy flooring over plywood seemed to fit the bill. However, I also considered other flooring options before making my final decision. Here’s a breakdown of how epoxy flooring compares in cost to some other common flooring options.
Epoxy Flooring Over Plywood Epoxy flooring over plywood is generally more affordable than many other options. The cost primarily depends on the type and quality of epoxy used, as well as the size of the area to be covered. For a DIY project, the costs can be kept relatively low, especially if you already have the necessary tools and equipment. Professional installation will increase the cost, but it can still be more budget-friendly compared to other flooring types. The long-term durability and low maintenance of epoxy make it a cost-effective choice in the long run.
Tile Flooring Tile is another popular flooring option, but it can be more expensive than epoxy, especially when considering materials and installation. Tile flooring offers a wide range of styles and designs, but it also requires more maintenance, such as regular grout cleaning and sealing. Additionally, tiles can crack or chip over time, leading to repair costs. While tile may offer a more traditional look, the higher cost and maintenance requirements were factors that led me to choose epoxy instead.
Hardwood Flooring Hardwood flooring is known for its beauty and timeless appeal, but it comes with a higher price tag. The cost of hardwood materials, combined with professional installation, can make it one of the most expensive flooring options. Hardwood also requires regular maintenance, such as sanding, staining, and sealing, to keep it in good condition. While hardwood floors can add value to a home, the initial investment and ongoing maintenance costs were more than I was willing to take on.
Vinyl Flooring Vinyl flooring is a more affordable option, similar in price to epoxy flooring. It’s available in a variety of styles, including those that mimic the look of wood or tile. Vinyl is easy to install and maintain, but it doesn’t offer the same durability as epoxy. Over time, vinyl can wear down, especially in high-traffic areas, and may need to be replaced. While vinyl was a tempting option due to its lower cost, I ultimately chose epoxy for its superior durability and longevity.
Carpet Flooring Carpet is often one of the least expensive flooring options upfront, but it requires regular maintenance, such as vacuuming and occasional deep cleaning. Carpets can stain easily and may need to be replaced more frequently than other flooring types. Additionally, carpets are not as durable as epoxy and may not be suitable for areas with heavy use or moisture. While carpet might be a good choice for bedrooms or living areas, it wasn’t the right fit for my needs.
Concrete Flooring Concrete flooring is another durable option, but it can be more expensive than epoxy, especially if you opt for decorative finishes like staining or polishing. Concrete is also a good choice for high-traffic areas, but it can be cold and hard underfoot, making it less comfortable for residential spaces. The installation of concrete flooring requires professional expertise, adding to the overall cost. While concrete offers durability similar to epoxy, the higher cost and less comfortable feel were factors that influenced my decision to go with epoxy.
How to Apply a Decorative Finish to Plywood Sub-Floors
Rustic Wood Flooring Concrete Wood Flooring Contractor
Flex Epoxy Flooring Solution for California Dispensary
Preparing Plywood Substrates for the Application of Resinous
Epoxy Floor Coating Over Wood Subfloor ideas epoxy floor
Epoxy Paint for Wood – Your Complete Guide for Epoxy Coating for Wood
How to Prep a Wood Surface for Epoxy Floor Installation
How to Pick the Right Epoxy Color For Your Garage or Bas
Related Posts:
