A dry basement is crucial for maintaining the structural integrity of your home and protecting your investment. One often overlooked aspect of basement maintenance is floor edging. Floor edging plays a critical role in preventing water damage, controlling moisture, and enhancing the overall durability of your basement. Let’s discuss the importance of floor edging in dry basements and how it can safeguard your investment.
Preventing Water Damage: Floor edging acts as a barrier between the basement floor and any potential water sources, such as leaks or floods. By creating a seal, it prevents water from seeping into the basement, protecting the foundation and preventing costly water damage repairs. The edging also helps redirect any water that enters the basement, ensuring it flows towards a drainage system or sump pump, keeping the area dry.
Controlling Moisture: Basements are prone to high levels of moisture, which can lead to mold growth, unpleasant odors, and even structural issues. Floor edging with moisture-resistant materials, such as PVC or rubber, helps create a moisture barrier, reducing the risk of excess moisture seeping into the basement. This not only improves the air quality but also prevents the growth of mold and mildew, promoting a healthier living environment.
Enhancing Durability: Basement floors are often subjected to heavy foot traffic, furniture movement, and other activities. Floor edging provides an additional layer of protection, preventing wear and tear on the edges of the floor. It helps reinforce the structural integrity of the basement floor, reducing the risk of cracks, chips, and other damage. By extending the lifespan of your basement floor, floor edging ultimately protects your investment.
Improving Insulation: Proper insulation is essential for maintaining a comfortable temperature in your basement. Floor edging acts as a thermal barrier, preventing heat loss through the edges of the floor. This helps maintain a more consistent temperature in the basement, reducing energy consumption and lowering heating costs. Additionally, the insulation provided by floor edging can also help reduce noise transmission between floors, creating a quieter living environment.
Enhancing Aesthetics: While the primary purpose of floor edging is functionality, it also contributes to the overall aesthetics of your basement. With a wide range of materials, colors, and styles available, you can choose floor edging that complements your basement decor. This adds a finishing touch to the space, creating a polished and cohesive look.
Types of Floor Edging for Dry Basements: Exploring the Options
When it comes to floor edging for dry basements, there are various options available to suit different needs and preferences. Each type of floor edging offers unique features and benefits, ranging from durability and moisture resistance to aesthetic appeal. Below are the different types of floor edging options for dry basements, helping you make an informed decision for your basement project.
PVC Floor Edging: PVC (polyvinyl chloride) floor edging is a popular choice for dry basements due to its durability and moisture resistance. PVC edging is easy to install and provides a seamless, watertight seal along the edges of the floor. It is highly resistant to moisture, making it ideal for basements prone to water-related issues. PVC floor edging is available in various colors and styles, allowing you to find an option that matches your basement decor.
Rubber Floor Edging: Rubber floor edging is another excellent choice for dry basements, especially in areas with high foot traffic. Rubber edging is highly durable and can withstand heavy use without showing signs of wear and tear. It provides an effective seal against moisture, preventing water from seeping into the basement. Additionally, rubber floor edging offers excellent noise reduction properties, making it a suitable option for basements that double as entertainment or living spaces.
Metal Floor Edging: For a sleek and modern look, metal floor edging is a popular choice. Metal edging, such as aluminum or stainless steel, adds a touch of elegance to your basement while providing durability and moisture resistance. Metal edging is particularly suitable for basements with a contemporary or industrial design aesthetic. It is available in various finishes, including brushed, polished, or anodized, allowing you to achieve the desired look for your basement.
Wood Floor Edging: Wood floor edging, such as baseboards or quarter rounds, offers a classic and timeless look for dry basements. While wood is not naturally moisture-resistant, it can be treated with sealants or primers to enhance its resistance to moisture. Wood edging adds warmth and natural beauty to the basement, creating a cozy and inviting atmosphere. It is important to note that regular maintenance and proper sealing are necessary to prevent water damage and maintain the longevity of wood floor edging in a basement environment.
Composite Floor Edging: Composite floor edging combines the best features of different materials, such as PVC and wood, to create a versatile and durable option for dry basements. Composite edging offers the moisture resistance of PVC and the aesthetic appeal of wood. It is available in various finishes and colors, allowing you to achieve the desired look without compromising functionality. Composite floor edging is a low-maintenance option that withstands moisture, temperature changes, and wear and tear.
Step-by-Step Guide to Installing Floor Edging in Dry Basements
Installing floor edging in a dry basement is a straightforward process that can be completed with a few basic tools and materials. Proper installation of floor edging is essential to ensure a seamless and watertight seal, providing protection against moisture and enhancing the overall durability of your basement. Below we provide a step-by-step guide to help you install floor edging in your dry basement.
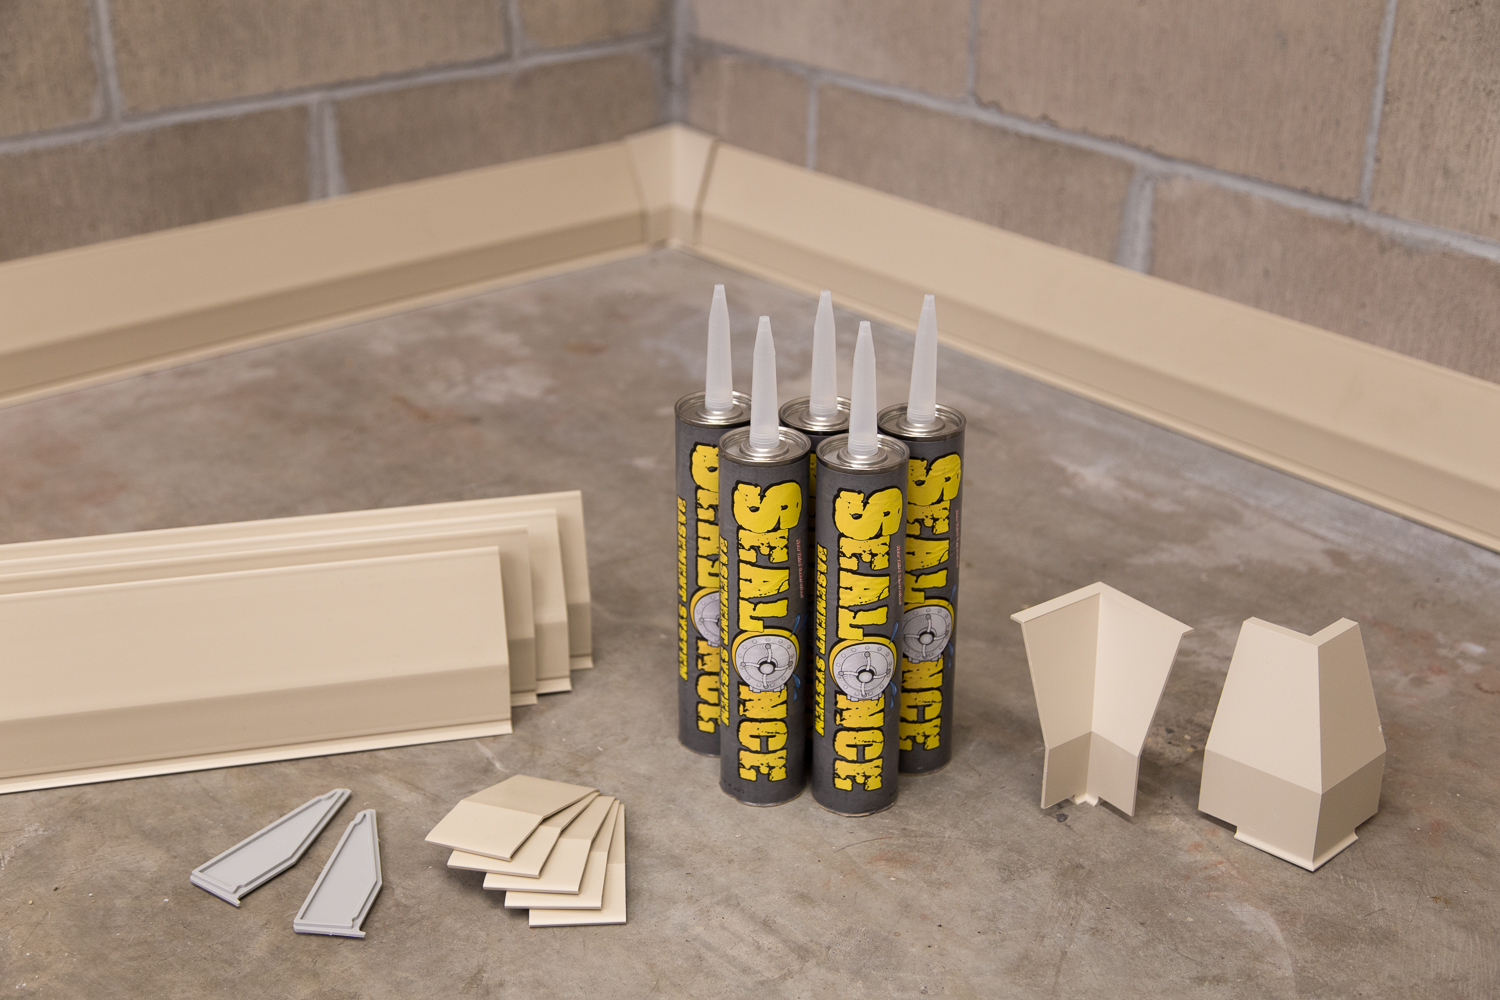
Gather the Necessary Tools and Materials: Before starting the installation process, gather all the necessary tools and materials. This typically includes a measuring tape, miter saw or hacksaw, adhesive or nails, a caulking gun, and the chosen floor edging material. Make sure you have a clean and dry surface to work on.
Measure and Cut the Edging: Measure the length of each wall where you plan to install the floor edging. Use a measuring tape to obtain accurate measurements. Transfer these measurements onto the chosen floor edging material, and carefully cut the edging to the appropriate lengths using a miter saw or hacksaw. Ensure the cuts are clean and straight.
Prep the Surface: Before installing the floor edging, ensure that the surface is clean and dry. Remove any debris or dust, and ensure there are no obstructions that may hinder the installation. If needed, use a damp cloth to wipe down the surface and allow it to dry completely before proceeding.
Apply Adhesive or Nail the Edging: Depending on the type of floor edging material you are using, you will either apply adhesive or use nails to secure the edging to the floor. Follow the manufacturer’s instructions for the specific adhesive or nail type recommended for your chosen material. Apply the adhesive along the backside of the edging or use nails to secure it to the wall, ensuring it is positioned straight and flush against the floor.
Secure the Edging in Place: Once the adhesive or nails are in place, press the floor edging firmly against the wall, ensuring it aligns with the edge of the floor. Use a rubber mallet or a block of wood to tap gently on the top of the edging to secure it in place. Check for any gaps or unevenness and make any necessary adjustments to ensure a seamless installation.
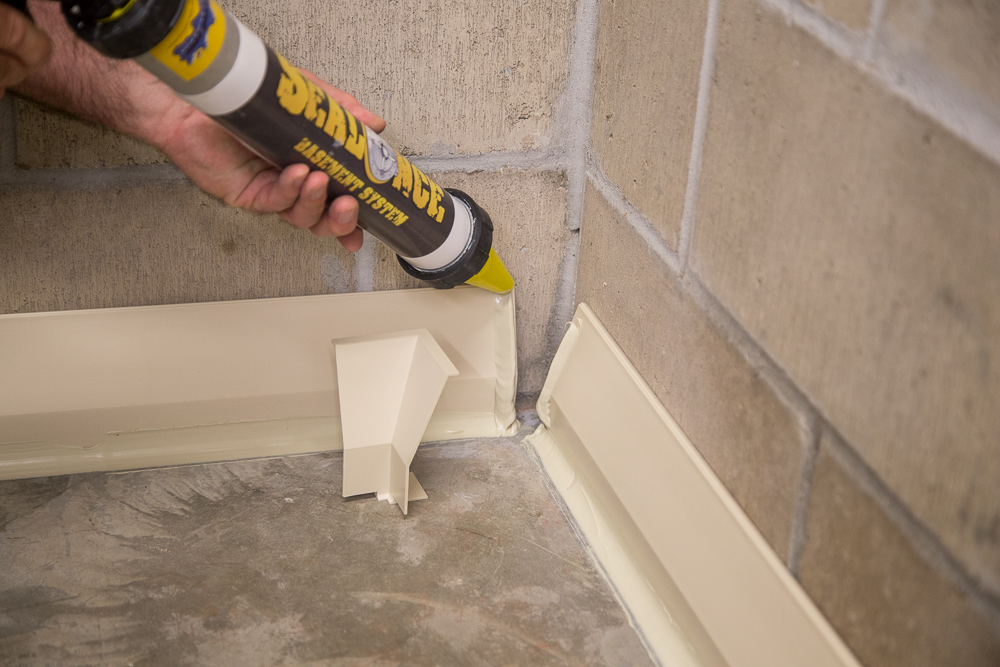
Caulk the Edges: To create a watertight seal and prevent moisture from seeping under the floor edging, apply a bead of caulk along the top edge where the edging meets the wall. Use a caulking gun to apply a consistent and even line of caulk. Smooth out the caulk using a caulk smoothing tool or a damp cloth to create a neat finish. Allow the caulk to dry completely according to the manufacturer’s instructions.
Clean and Inspect: Once the installation is complete, clean up any excess adhesive, caulk, or debris from the floor and surrounding areas. Inspect the installed floor edging to ensure it is secure, straight, and free from any gaps or damage. Make any necessary adjustments or repairs if needed.
Benefits of Floor Edging for Dry Basements: Beyond Aesthetics
While floor edging in dry basements may seem like a purely aesthetic choice, it offers numerous benefits beyond just enhancing the overall appearance of the space. Floor edging plays a crucial role in maintaining the integrity of the basement, preventing water damage, ensuring proper insulation, and improving safety. Below are the benefits of floor edging for dry basements, highlighting its importance beyond aesthetics.
Protection Against Water Damage: One of the primary benefits of floor edging in dry basements is its ability to protect against water damage. By creating a barrier between the floor and potential sources of water, such as leaks or floods, floor edging helps prevent moisture from seeping into the basement. This protection is especially important in areas prone to water-related issues, as it helps safeguard the structural integrity of the basement and prevents costly water damage repairs.
Enhanced Durability: Floor edging adds an extra layer of protection to the edges of the basement floor, ensuring its durability and longevity. It acts as a buffer against wear and tear caused by foot traffic, furniture movement, and other activities that typically occur in basements. The edging helps prevent cracks, chips, and other damage, thus extending the lifespan of the basement floor and reducing the need for frequent repairs or replacements.
Improved Insulation: Proper insulation is crucial for maintaining a comfortable and energy-efficient basement. Floor edging contributes to insulation by creating a thermal barrier between the floor and the walls. This helps prevent heat loss during colder months, ensuring a more consistent temperature in the basement. By reducing energy consumption and lowering heating costs, proper insulation provided by floor edging offers long-term financial benefits.
Safety and Trip Hazard Prevention: Floor edging helps improve safety in the basement by reducing the risk of tripping or stumbling. The edging acts as a visual marker, clearly defining the edge of the floor and preventing accidents caused by uneven surfaces or transitions. Additionally, floor edging can provide a smooth transition between different flooring materials, such as carpet and tile, minimizing the chances of tripping or falling.
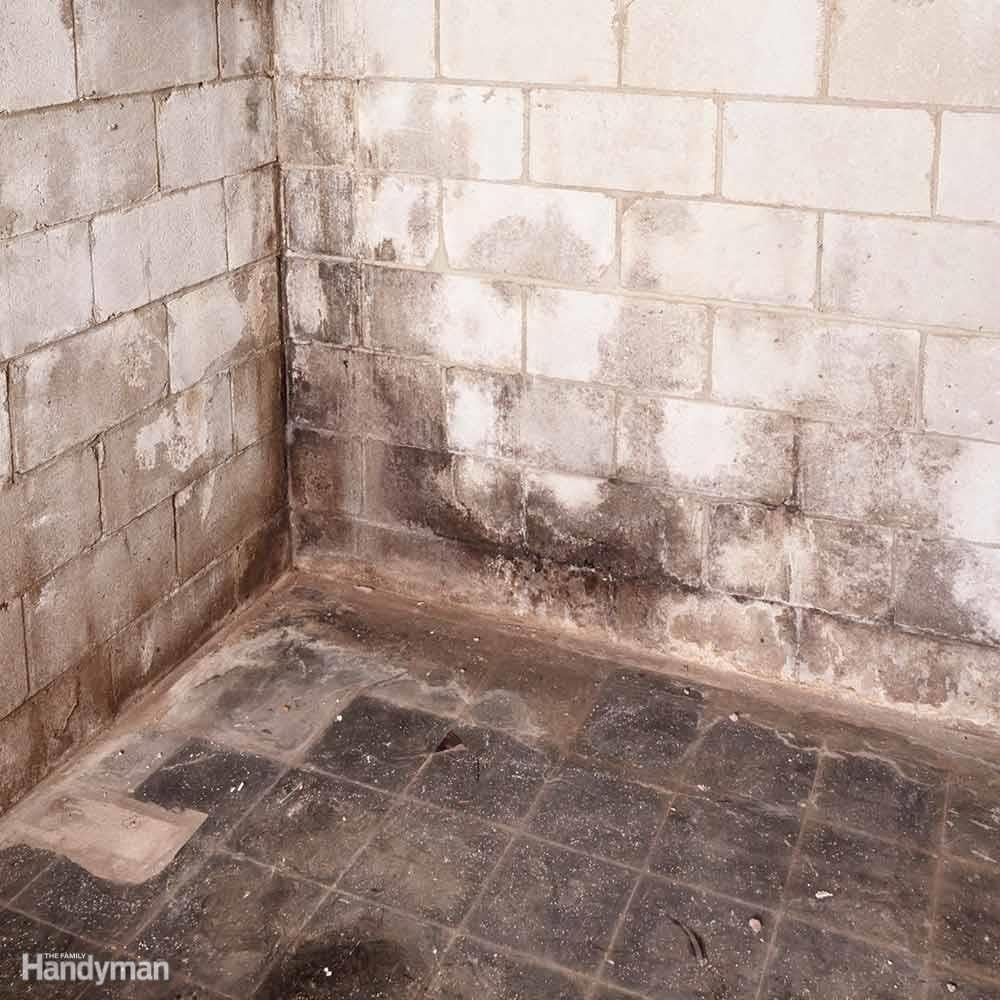
Moisture Control and Mold Prevention: Basements are prone to high levels of moisture, which can lead to mold growth and unpleasant odors. Floor edging with moisture-resistant materials helps control moisture levels by creating a barrier against water infiltration. This reduces the risk of mold and mildew growth, improves air quality, and creates a healthier living environment in the basement.
Aesthetics and Visual Appeal: While the benefits of floor edging extend beyond aesthetics, it still plays a vital role in enhancing the overall visual appeal of the basement. With a wide range of materials, colors, and styles available, floor edging allows you to customize the look of your basement, complementing the existing decor and creating a cohesive and polished appearance.
Common Mistakes to Avoid When Installing Floor Edging in Dry Basements
Installing floor edging in a dry basement is a relatively simple task, but it’s important to be aware of common mistakes that can compromise the effectiveness and appearance of the installation. By avoiding these mistakes, you can ensure a seamless and long-lasting floor edging that protects your basement and enhances its overall aesthetics. We will discuss some common mistakes to avoid when installing floor edging in dry basements.
Incorrect Measurement and Cutting: One of the most common mistakes during floor edging installation is inaccurate measurement and cutting. Failing to measure the length of the walls accurately or making uneven cuts can result in ill-fitting and unsightly floor edging. Take the time to measure carefully and use a miter saw or hacksaw to make clean and precise cuts. Double-check the measurements before cutting to avoid wasting material and ensure a proper fit.
Failure to Prep the Surface: A crucial step often overlooked is properly prepping the surface before installing floor edging. Ensure that the surface is clean, dry, and free from any debris or obstructions. If the surface is not adequately prepared, it can affect the adhesion of the floor edging or create unevenness. Clean the surface thoroughly and allow it to dry completely before proceeding with the installation.
Poor Adhesive Application: Using the wrong type of adhesive or applying it incorrectly can lead to floor edging that doesn’t adhere properly. Follow the manufacturer’s instructions for the specific adhesive recommended for your chosen floor edging material. Apply the adhesive evenly and in the right amount, ensuring full coverage along the backside of the edging. Avoid using excessive adhesive, as it can ooze out and create a messy appearance.
Inadequate Securing of the Edging: Properly securing the floor edging is essential to ensure its stability and longevity. Whether using adhesive or nails, ensure that the edging is firmly attached to the floor and aligned with the edges. If using nails, make sure they are spaced appropriately and driven in securely. Avoid leaving gaps or loose sections, as they can collect dirt and moisture and compromise the effectiveness of the floor edging.
Neglecting to Caulk the Edges: Caulking the edges of the floor edging is a critical step that is often overlooked. Failing to apply caulk along the top edge where the edging meets the wall can allow moisture to seep underneath, potentially causing damage or mold growth. Use a high-quality caulk that is specifically designed for use in wet areas. Apply a smooth and continuous bead of caulk, and use a caulk smoothing tool or a damp cloth to create a neat finish.
Lack of Regular Maintenance: After installing floor edging, it’s important to maintain it regularly to ensure its effectiveness and longevity. Clean the floor edging regularly to remove any dirt, debris, or moisture that may accumulate. Inspect the edging periodically for any signs of damage, such as cracks or loose sections, and make any necessary repairs promptly. Regular maintenance will help preserve the integrity and appearance of the floor edging.
Ventilation at Soffits with Floor Edging Floor edging
Waterproofing Basements With Dirt Floors
Effective Basement Waterproofing Products
Drain Field – Drain Tile Installation with MTI Floor Edging and Control Cavity
DIY Basement Waterproofing – SealOnce Basement System – Easy
Basement Moisture Existing Construction
Basement Subfloor Material
What Should Your Basement Waterproofing Budget Include?
Tips for Drying Up and Finishing Your Basement Family Handyman
We use cookies on our website to give you the most relevant experience by remembering your preferences and repeat visits. By clicking “Accept All”, you consent to the use of ALL the cookies. However, you may visit "Cookie Settings" to provide a controlled consent.
This website uses cookies to improve your experience while you navigate through the website. Out of these, the cookies that are categorized as necessary are stored on your browser as they are essential for the working of basic functionalities of the website. We also use third-party cookies that help us analyze and understand how you use this website. These cookies will be stored in your browser only with your consent. You also have the option to opt-out of these cookies. But opting out of some of these cookies may affect your browsing experience.
Necessary cookies are absolutely essential for the website to function properly. These cookies ensure basic functionalities and security features of the website, anonymously.
Cookie
Duration
Description
cookielawinfo-checkbox-analytics
11 months
This cookie is set by GDPR Cookie Consent plugin. The cookie is used to store the user consent for the cookies in the category "Analytics".
cookielawinfo-checkbox-functional
11 months
The cookie is set by GDPR cookie consent to record the user consent for the cookies in the category "Functional".
cookielawinfo-checkbox-necessary
11 months
This cookie is set by GDPR Cookie Consent plugin. The cookies is used to store the user consent for the cookies in the category "Necessary".
cookielawinfo-checkbox-others
11 months
This cookie is set by GDPR Cookie Consent plugin. The cookie is used to store the user consent for the cookies in the category "Other.
cookielawinfo-checkbox-performance
11 months
This cookie is set by GDPR Cookie Consent plugin. The cookie is used to store the user consent for the cookies in the category "Performance".
viewed_cookie_policy
11 months
The cookie is set by the GDPR Cookie Consent plugin and is used to store whether or not user has consented to the use of cookies. It does not store any personal data.
Functional cookies help to perform certain functionalities like sharing the content of the website on social media platforms, collect feedbacks, and other third-party features.
Performance cookies are used to understand and analyze the key performance indexes of the website which helps in delivering a better user experience for the visitors.
Analytical cookies are used to understand how visitors interact with the website. These cookies help provide information on metrics the number of visitors, bounce rate, traffic source, etc.
Advertisement cookies are used to provide visitors with relevant ads and marketing campaigns. These cookies track visitors across websites and collect information to provide customized ads.


 Related Posts: