Choosing the Right Materials and Tools
Achieving a stunning faux marble floor starts with selecting the right materials and tools. With careful consideration, you can ensure that your project turns out beautifully. We will list the essential materials and tools needed for a successful faux marble floor painting project.
- Quality Paints and Brushes: Investing in high-quality paints and brushes is crucial for achieving a realistic marble effect. Look for paints specifically designed for faux finishes, as they offer better adhesion and durability. Brushes with fine bristles and various sizes will help you create intricate patterns and details.
- Faux Marble Pattern Stencils: Using stencils can simplify the process of creating a marble pattern. Look for stencils that mimic different types of marble veining and patterns. These stencils will guide your brush strokes and help you achieve a more consistent and professional-looking finish.
- Painter’s Tape and Drop Cloths: To protect areas that should not be painted, such as walls or baseboards, use painter’s tape. It provides clean edges and prevents accidental paint spills. Additionally, cover the surrounding area with drop cloths to protect your floors and furniture from paint splatters and drips.
- Sealer and Topcoat: Once the faux marble floor is painted, applying a sealer is essential for protecting the finish from wear and tear. Opt for a clear, water-based sealer designed for faux finishes. A topcoat can also enhance the shine and durability of the painted surface, giving it a more realistic marble appearance.
- Other Tools: Don’t forget to gather other necessary tools, such as a paint tray, mixing sticks, and a roller for applying the base coat. A small artist’s palette knife can be handy for creating intricate veining effects. Additionally, have a damp cloth or sponge nearby for any mistakes or smudges that need to be corrected.
Preparing the Surface for Faux Marble Painting
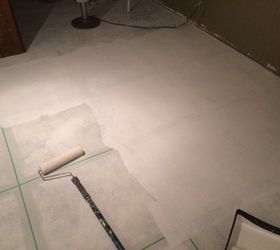
Properly preparing the surface is crucial to achieve a flawless faux marble floor. Below are the essential steps to prepare the surface before beginning the painting process. Let’s dive in!
- Cleaning and Removing Debris: Start by thoroughly cleaning the floor surface. Remove any dust, dirt, or debris using a broom, vacuum, or mop. Additionally, remove any loose paint or previous coatings, as they can affect the adhesion of the new paint.
- Repairing Imperfections: Inspect the floor for any cracks, holes, or uneven areas. Fill these imperfections with a suitable filler or patching compound. Once the filler dries, sand it down to create a smooth and even surface.
- Sanding the Surface: To ensure proper paint adhesion, lightly sand the entire floor surface. Use a fine-grit sandpaper or a sanding block to create a slightly rough texture. This step will help the paint adhere better and prevent peeling or chipping in the future.
- Applying a Primer: Before painting, apply a primer specifically designed for the type of surface you are working on. A primer creates a smooth and uniform base, helping the paint adhere better and ensuring a long-lasting finish. Follow the manufacturer’s instructions for proper application and drying time.
- Taping Off Edges: To achieve clean and crisp edges, use painter’s tape to outline the area you want to paint. Apply the tape along the edges of walls, baseboards, or any other areas that should not be painted. Press the tape firmly to prevent the paint from bleeding underneath.
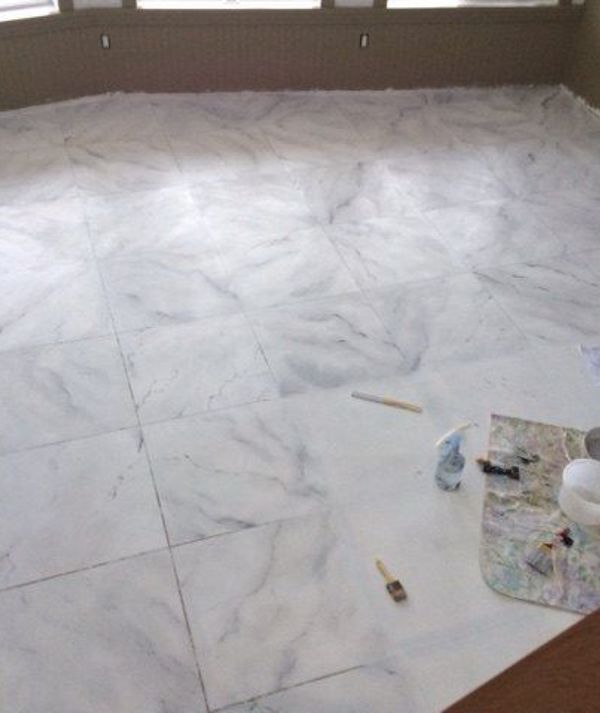
Creating a Realistic Marble Pattern
The key to achieving a realistic faux marble floor lies in creating a convincing marble pattern. Follow this step-by-step instructions to help you create a stunning marble effect. Let’s get started!
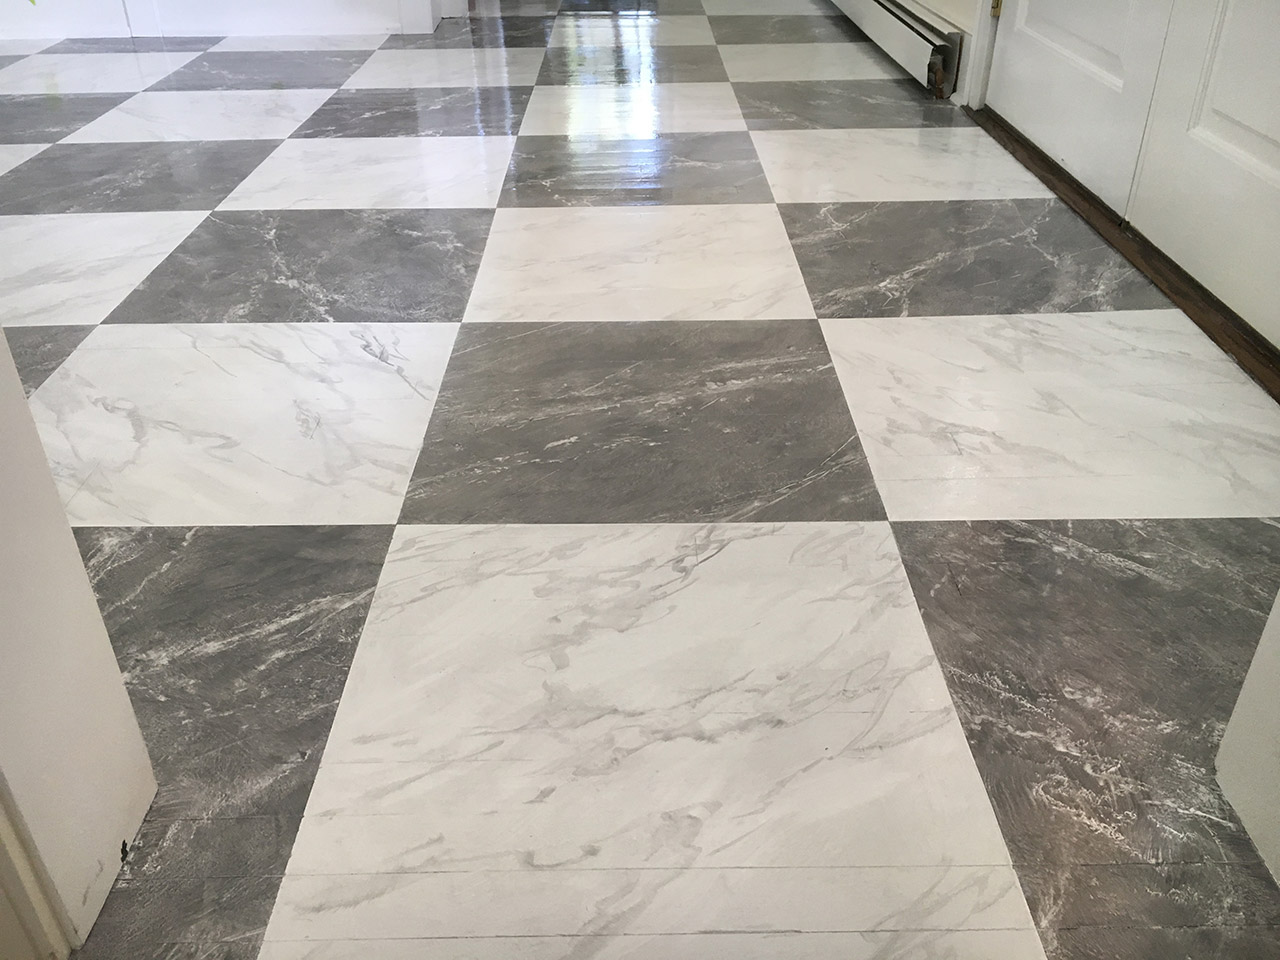
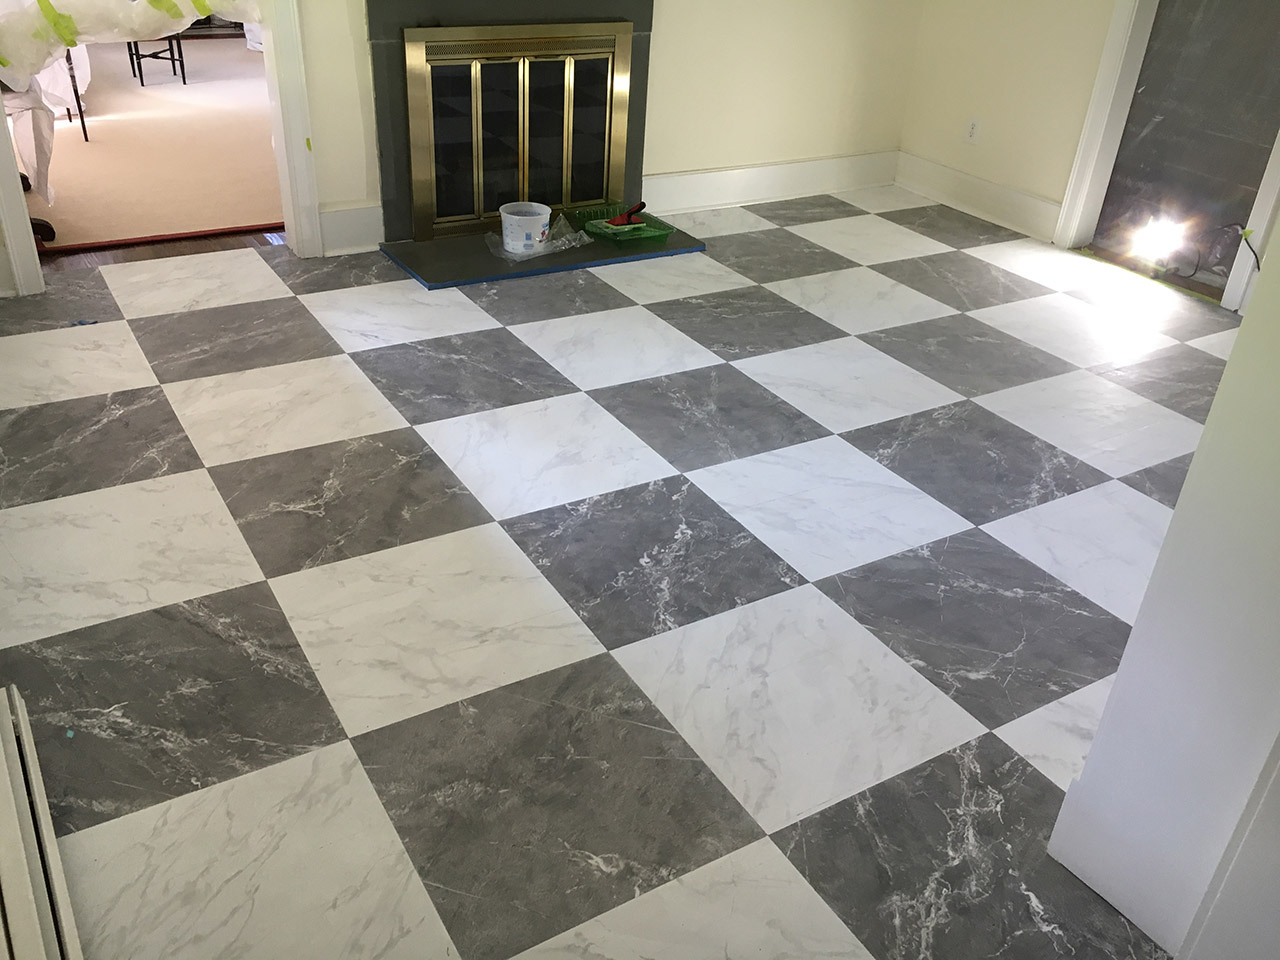
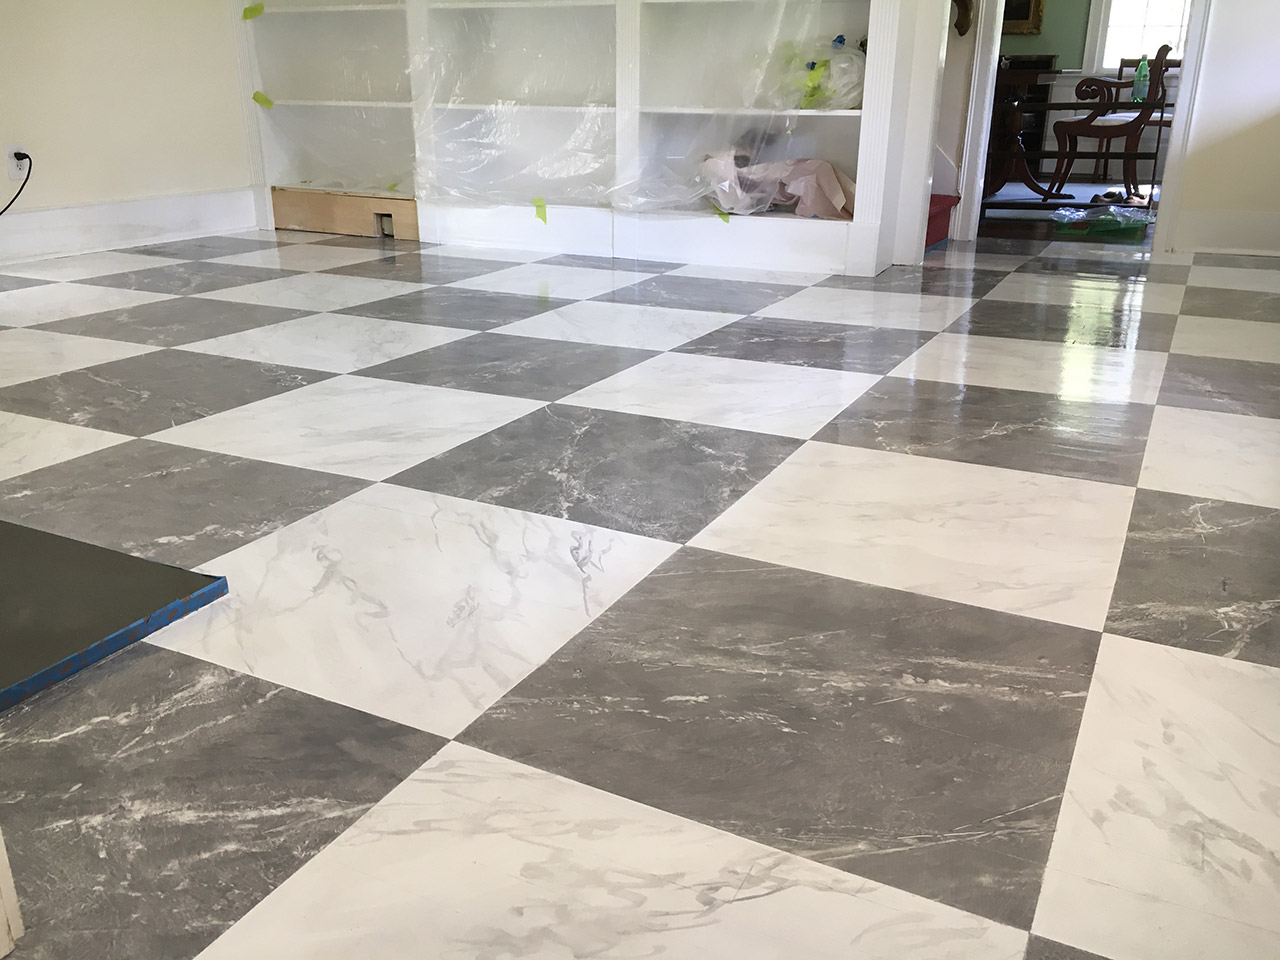
- Choose Your Marble Style: Start by deciding on the type of marble you want to replicate. Research different marble patterns and colors to find inspiration. Common options include Carrara, Calacatta, and Emperador marble. Consider the color scheme and veining patterns that best suit your space.
- Base Coat Application: Apply a base coat of paint that closely resembles the background color of your chosen marble. Use a roller or brush to cover the entire floor surface evenly. Allow the base coat to dry completely before moving on to the next step.
- Mixing Paint Colors: Mix different shades of paint to create variations in color and depth. Marble typically has veins of contrasting colors running through it. Experiment with different combinations to achieve the desired effect. Use small amounts of paint and gradually build up the layers for a more realistic appearance.
- Creating Veining Effects: Using a fine brush or an artist’s palette knife, carefully create veining effects on the floor surface. Follow the natural flow of marble veins, keeping in mind that they are irregular and unique. Practice on a scrap piece of paper or cardboard before applying the veins on the actual floor.
- Blending and Smudging: To create a more organic and realistic look, blend and smudge the veins with a soft brush or sponge. This technique helps soften hard edges and gives the veins a more natural appearance. Be gentle and work in small sections, blending the colors seamlessly.
- Adding Depth and Highlights: To enhance the three-dimensional effect of the marble, add depth and highlights. Using a lighter shade of paint, carefully apply subtle highlights along the veins and edges. This technique adds dimension and brings the faux marble to life.
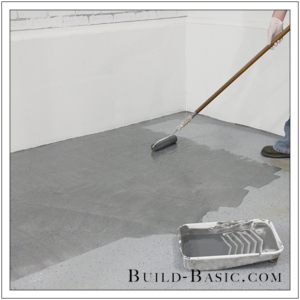
Applying the Base Coat and Veining
Once the surface is prepared, it’s time to apply the base coat and veining to create the foundation of your faux marble floor. We will guide you through the process step by step. Let’s dive in!
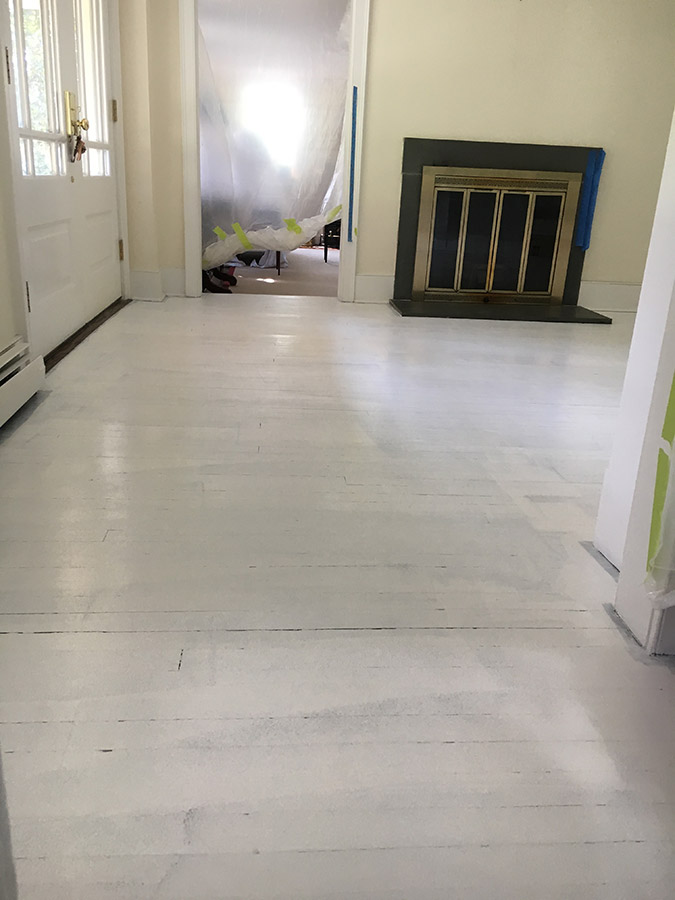
Applying the Base Coat: Start by applying the base coat of paint that closely matches the background color of your chosen marble. Use a roller or brush to cover the entire floor surface evenly. Apply the paint in thin, even coats, allowing each coat to dry completely before applying the next one. This will provide a solid base for the veining to be applied later.
Mixing Veining Colors: Mix different shades of paint to create the colors for the veins. Marble veins can vary in color, ranging from subtle to contrasting shades. Use small amounts of paint and experiment with different combinations to achieve the desired effect. Start with lighter colors and gradually add darker shades for depth and dimension.
Creating Veining Effects: Using a fine brush or an artist’s palette knife, carefully create the veining effects on the floor surface. Follow the natural flow and patterns found in marble. Keep in mind that marble veins are not perfectly straight or uniform, so embrace the organic and irregular nature of the veins. Practice on a scrap piece of paper or cardboard before applying the veins on the actual floor.
Veining Techniques: There are several techniques you can use to create realistic veining effects. One common technique is called “dry brushing,” where you lightly drag a dry brush over the surface, creating thin and subtle veins. Another technique is “feathering,” where you gently flick the brush to create feather-like veins. Experiment with different techniques to achieve the desired look.
Blending and Smudging: To create a more natural look, blend and smudge the veins using a soft brush or sponge. This technique helps soften hard edges and gives the veins a more organic appearance. Be gentle and work in small sections, blending the colors seamlessly. Step back occasionally to assess the overall effect and make adjustments as needed.
Step-by-Step Approach: To ensure a consistent and realistic veining pattern, take a step-by-step approach. Start by applying the main veins, then gradually add smaller and more intricate veins. Work in layers to build up the depth and complexity of the pattern. Remember to step back periodically to assess the overall balance and adjust as needed.

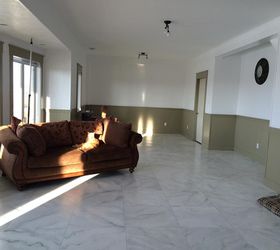
Finishing Touches and Maintenance Tips
Once you’ve completed the painting process for your faux marble floor, it’s important to add the finishing touches and learn how to properly maintain it. Here are the final steps and provide some maintenance tips to ensure your faux marble floor remains beautiful for years to come. Let’s get started!
Sealing the Surface: After the paint has dried completely, apply a clear, water-based sealer specifically designed for faux finishes. This will protect the painted surface from scratches, stains, and wear. Follow the manufacturer’s instructions for proper application and drying time. Apply multiple coats if necessary for added protection.
Applying a Topcoat: To enhance the shine and durability of your faux marble floor, consider applying a topcoat. A water-based, non-yellowing topcoat can give the painted surface a more polished and realistic appearance. Apply the topcoat according to the manufacturer’s instructions, and allow it to dry thoroughly before using the floor.
Cleaning and Maintenance: To keep your faux marble floor looking its best, it’s important to follow proper cleaning and maintenance practices. Sweep or vacuum regularly to remove dirt and debris that can scratch the surface. Avoid using abrasive cleaners or scrub brushes, as they can damage the paint. Instead, use a soft cloth or mop dampened with water and mild soap to gently clean the floor.
Preventing Damage: To prevent damage to your faux marble floor, take some precautions. Place doormats at entrances to trap dirt and prevent it from being tracked onto the floor. Use furniture pads or felt protectors under the legs of chairs, tables, and other furniture to prevent scratches. Avoid dragging heavy objects across the floor, as this can cause damage to the paint.
Touch-ups and Repairs: Over time, your faux marble floor may require touch-ups or repairs. Keep some extra paint and brushes on hand to address any chips, scratches, or areas that need to be refreshed. Follow the same techniques used during the initial painting process to seamlessly blend the touch-up paint with the existing pattern.
Regular Inspections: Perform regular inspections of your faux marble floor to identify any areas that may need attention. Look for signs of wear, chipping, or discoloration. By addressing any issues promptly, you can ensure that your faux marble floor remains in top condition.
Common FAQs
How long does it take to paint a faux marble floor?
The time it takes to paint a faux marble floor depends on various factors, including the size of the area, the complexity of the marble pattern, and your level of experience. Generally, the process can take several days to complete. Preparing the surface, applying the base coat, creating the marble pattern, and adding the finishing touches all require time and attention to detail. Additionally, drying time between coats and the application of sealers or topcoats should be considered. It’s important to allow ample time for each step to ensure a high-quality and long-lasting finish. Be patient and take your time to achieve the desired results.
Can I paint a faux marble floor on any type of surface?
While it is possible to paint a faux marble floor on various surfaces, the best results are typically achieved on smooth and properly prepared surfaces. Ideally, the surface should be clean, dry, and free from any loose paint or debris. Common surfaces suitable for faux marble floor painting include concrete, wood, and laminate flooring. However, it’s important to note that different surfaces may require specific preparation techniques and products. For example, concrete floors may require patching and sealing, while wood floors may need sanding and priming. Before starting the painting process, it’s recommended to thoroughly research and follow the manufacturer’s instructions for the specific surface you are working with to ensure optimal adhesion and longevity of the faux marble finish.
Do I need to be an experienced painter to achieve a realistic faux marble floor?
While some painting experience can be beneficial, you don’t necessarily need to be an experienced painter to achieve a realistic faux marble floor. With careful planning, patience, and attention to detail, anyone can successfully paint a faux marble floor. It’s important to thoroughly research and understand the techniques involved, such as creating the marble pattern and blending colors. Practice on a small test area or scrap piece of material before working on the actual floor to gain confidence and refine your skills. Additionally, using quality materials, following proper surface preparation steps, and taking your time during the painting process will greatly contribute to achieving a professional-looking finish. Don’t be afraid to experiment and embrace your creativity to create a unique and stunning faux marble floor.
Can I customize the color and pattern of the faux marble floor?
Absolutely! One of the advantages of painting a faux marble floor is the ability to customize the color and pattern to suit your personal preferences and the overall aesthetic of the space. Marble comes in a wide range of colors and patterns, and you can replicate various types of marble, such as Carrara, Calacatta, or Emperador. Experiment with different paint colors, mixing techniques, and veining patterns to achieve the desired effect. Use reference images of real marble to guide your color choices and pattern creation. Keep in mind that marble has natural variations and imperfections, so don’t be afraid to embrace those elements in your faux marble floor. This customization allows you to create a unique and personalized finish that adds character and charm to your space.
How do I maintain a faux marble floor after painting?
Proper maintenance is key to ensuring the longevity and beauty of your faux marble floor. To maintain the finish, regularly sweep or vacuum the floor to remove dirt and debris that can scratch the surface. Use a soft cloth or mop dampened with water and mild soap to gently clean the floor, avoiding abrasive cleaners or scrub brushes that can damage the paint. Place doormats at entrances to trap dirt and prevent it from being tracked onto the floor. Use furniture pads or felt protectors under the legs of chairs, tables, and other furniture to prevent scratches. Be cautious when moving heavy objects across the floor to prevent damage. Perform regular inspections to identify any areas that may need touch-ups or repairs. By following these maintenance tips, you can keep your faux marble floor looking its best for years to come.
Marbling Technique on Canvas – Acrylic Painting Techniques – Faux Finishes

10 Beautiful Faux Painted Marble Floors » MJP Studios
.jpg)
Faux Marble Floors
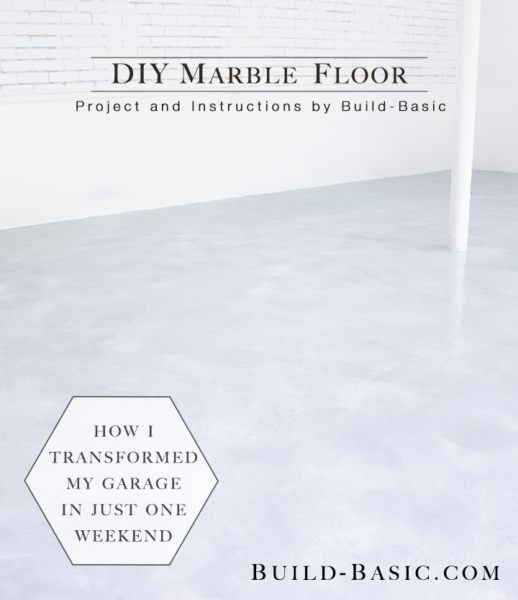
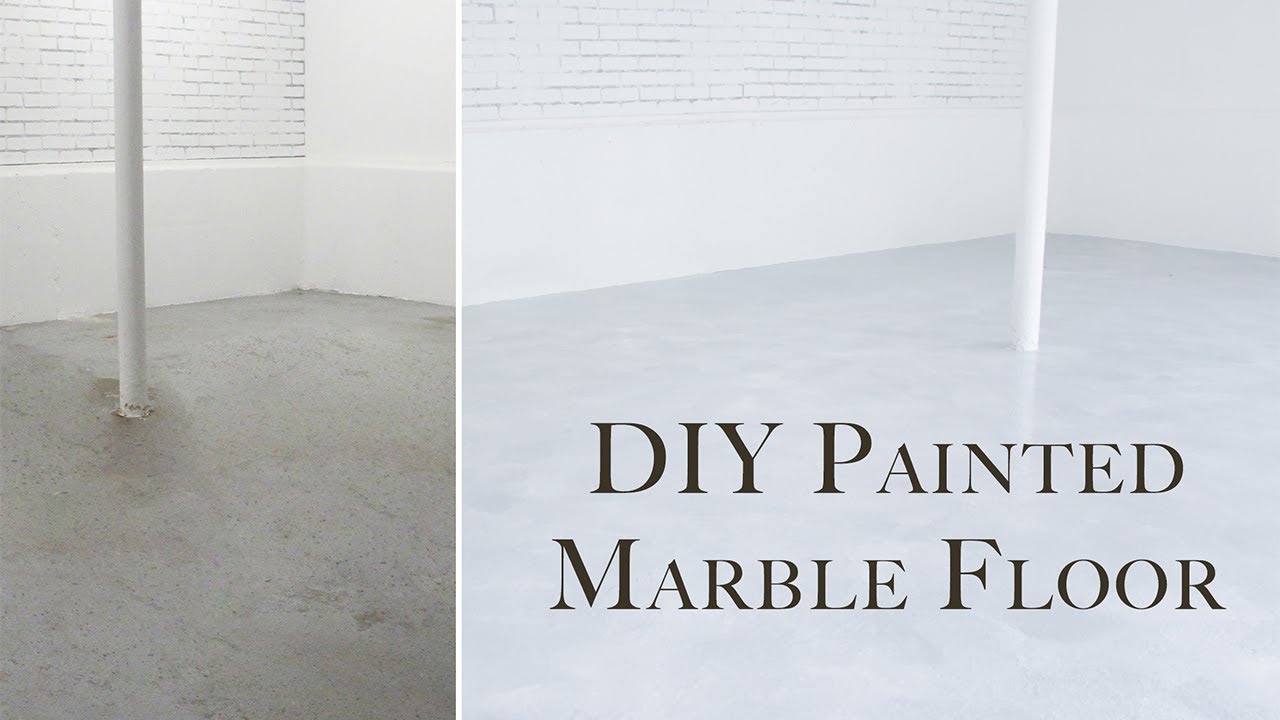
DIY Marble Floor u2039 Build Basic
Faux Marble Floors
Pin on home ideas..
How to paint faux marble on a table top – Jennifer Rizzo

DIY Marble Floor u2039 Build Basic
Related Posts: