Preparing Your Stairs for Laminate Flooring Installation
Installing laminate flooring on stairs requires careful preparation to ensure a smooth and durable finish. Properly preparing your stairs can make the installation process easier and result in a professional-looking outcome.
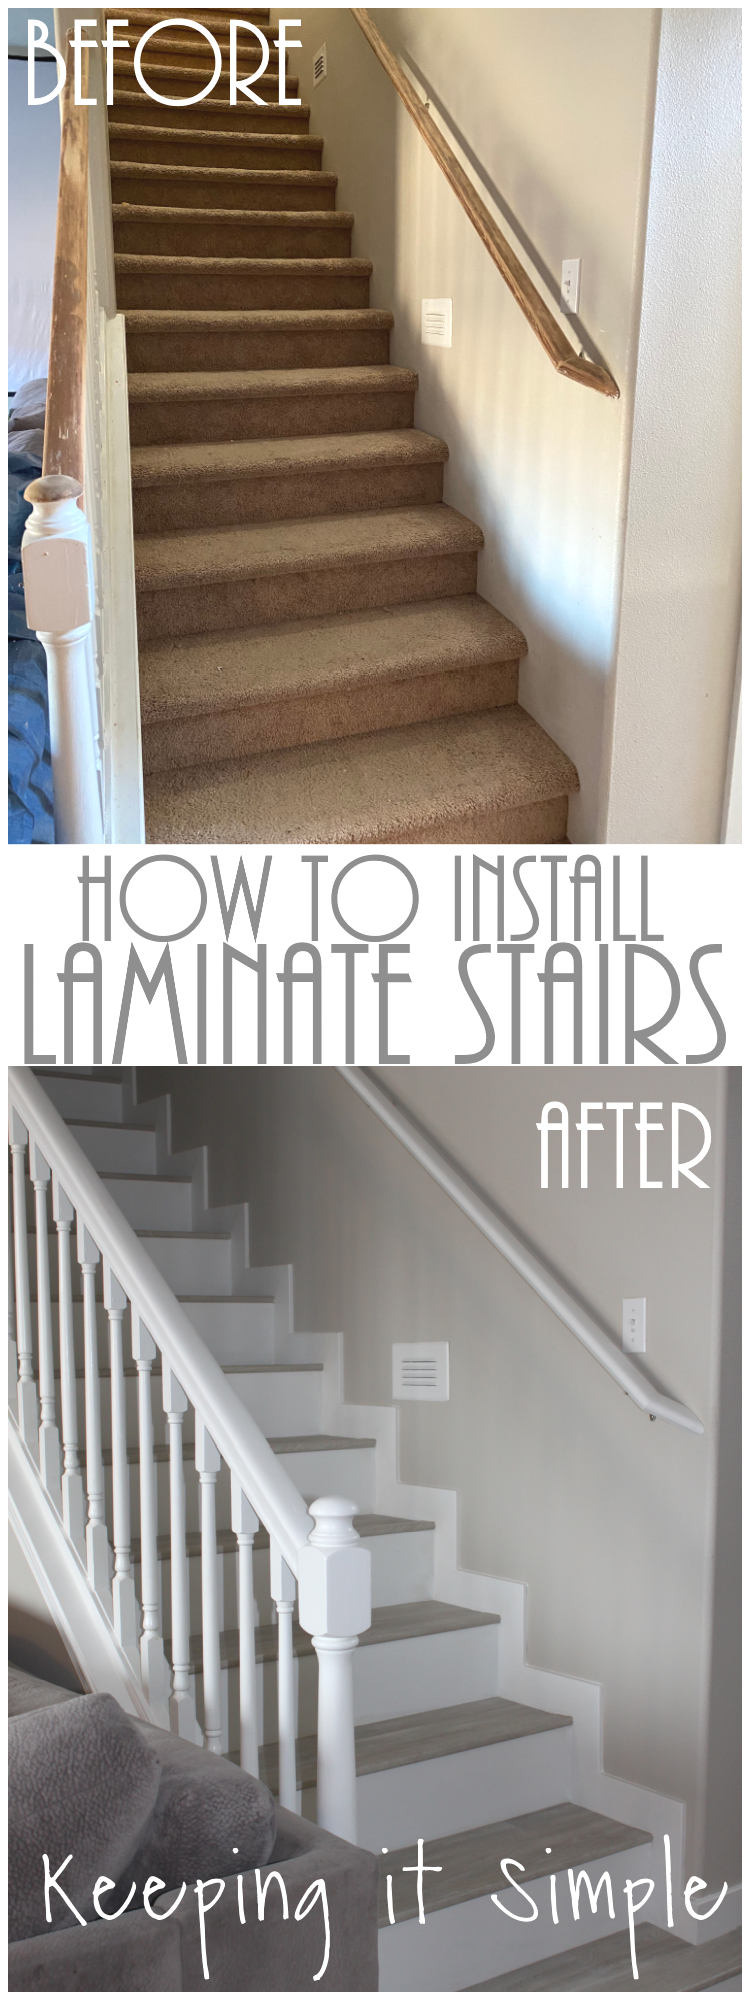
- Remove Existing Flooring: Start by removing any existing carpet, vinyl, or other flooring materials from the stairs. Use a utility knife to cut the carpet into manageable sections and a pry bar to remove any tack strips or staples. Clean up any debris to create a clean working surface.
- Inspect and Repair the Stairs: Check each step for any damage or loose boards. Secure any loose steps with screws and fill in any cracks or gaps with wood filler. Sand down any rough areas to create a smooth, even surface for the laminate flooring.
- Measure the Stairs: Measure the width, depth, and height of each step and riser. It’s important to take precise measurements to ensure the laminate planks fit correctly. Write down the measurements for each step, as they can vary slightly.
- Remove Nosing: If your stairs have a protruding nosing, it will need to be removed to create a flat surface for the laminate planks. Use a saw to carefully cut off the nosing, ensuring you don’t damage the stairs. Sand the edge to make it smooth.
- Clean and Degrease: Thoroughly clean the stairs to remove any dirt, dust, or grease. Use a degreaser if necessary to ensure the adhesive or underlayment adheres properly. A clean surface is essential for a successful installation.
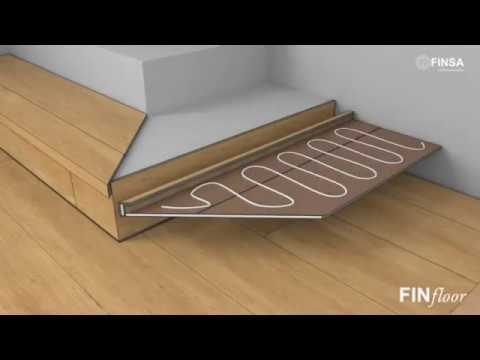
- Prepare Underlayment: Depending on the type of laminate flooring you choose, you may need to install underlayment. Cut the underlayment to fit the size of each step and riser, and secure it in place with adhesive or double-sided tape. This will help reduce noise and provide a smoother surface for the laminate.
Choosing the Right Laminate Flooring for Stairs
Selecting the appropriate laminate flooring for stairs is crucial to ensure durability, safety, and aesthetic appeal. Here are some factors to consider when choosing laminate flooring for your staircase.
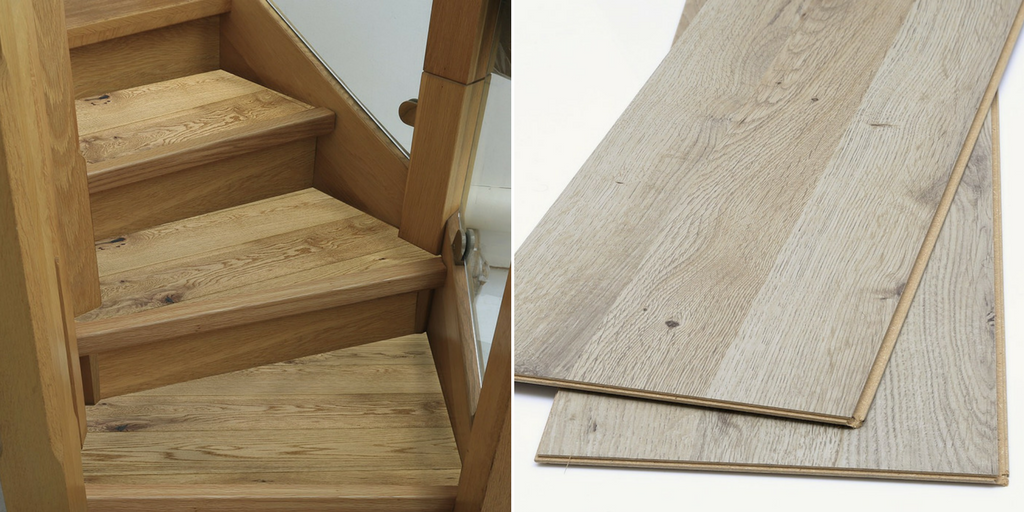
Durability and Thickness: Laminate flooring comes in various thicknesses, typically ranging from 7mm to 12mm. For stairs, choose a thicker laminate (10mm or 12mm) as it will be more durable and provide better sound insulation. Look for high-quality options with a robust wear layer to withstand heavy foot traffic.
Slip Resistance: Safety is a top priority when installing laminate flooring on stairs. Choose a laminate with a textured surface or an anti-slip coating to prevent accidents. Some laminates are specifically designed for high-traffic areas and offer enhanced slip resistance.
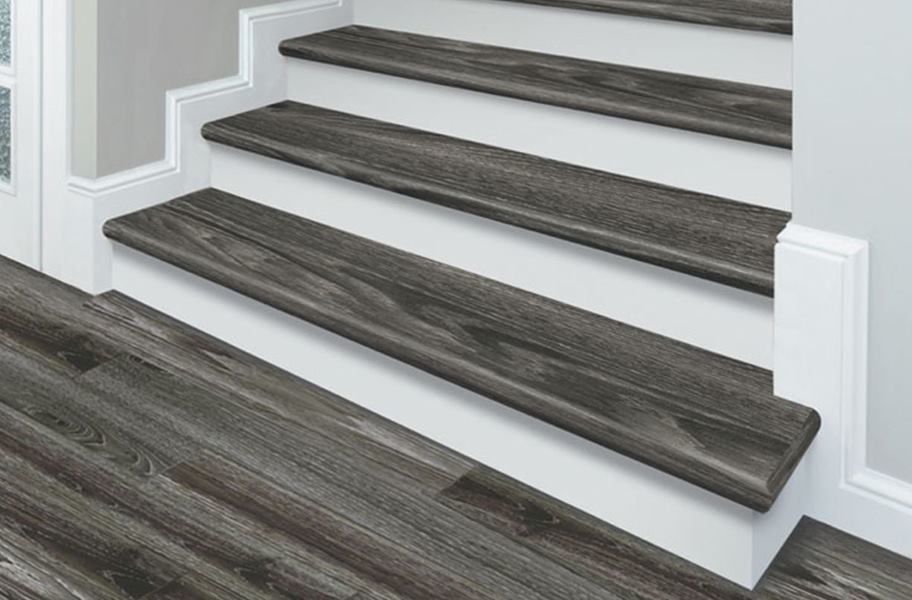
Matching Décor: Consider the overall aesthetic of your home when selecting laminate flooring. Choose a color and finish that complements your existing flooring and décor. Many manufacturers offer a wide range of styles, from traditional wood grains to modern, sleek finishes.
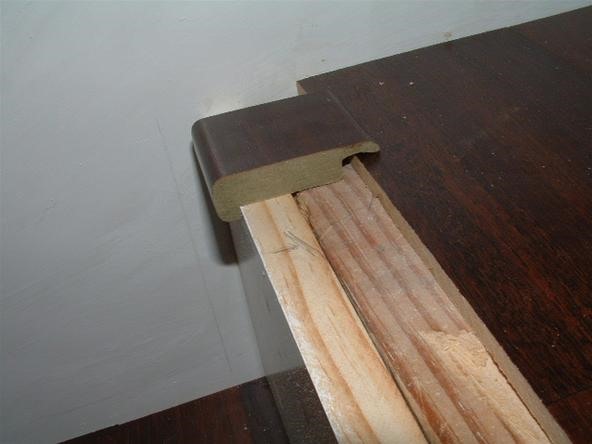
Stair Nosing Compatibility: Stair nosing is essential for providing a finished edge and additional grip on each step. Ensure the laminate flooring you choose is compatible with stair nosing. Many brands offer matching nosing pieces that seamlessly integrate with their flooring.
Ease of Installation: Some laminate flooring products are easier to install than others. Look for options with a click-lock system, which makes installation quicker and simpler. This is especially important for DIY projects, as it can save you time and effort.
Warranty and Brand Reputation: Choose laminate flooring from a reputable brand that offers a good warranty. This provides peace of mind that the product is of high quality and will stand the test of time. Read reviews and do your research to find a reliable brand with positive customer feedback.

Essential Tools and Materials for Laminate Flooring Installation
Installing laminate flooring on stairs requires a specific set of tools and materials to ensure a professional finish. Here’s a list of essential items you’ll need for the job.
Measuring Tools: Accurate measurements are crucial for a successful installation. You’ll need a tape measure, a carpenter’s square, and a level to ensure precise cuts and a level surface. A pencil and notepad will also help note down measurements.
Cutting Tools: Cutting laminate planks to fit each step and riser requires a saw. A miter saw is ideal for straight cuts, while a jigsaw is useful for intricate cuts around corners and edges. Make sure to use a fine-toothed blade to prevent chipping the laminate.
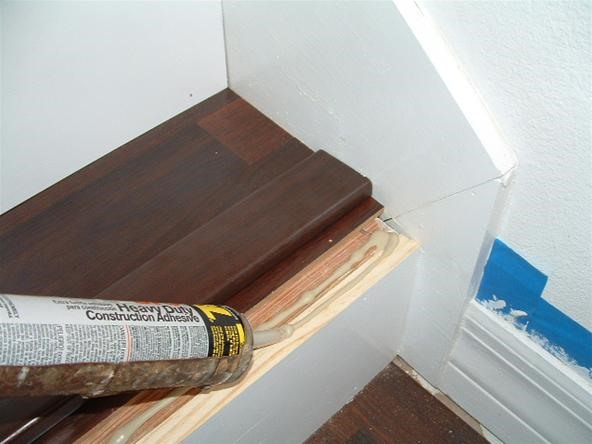
Adhesive and Fasteners: Depending on the type of laminate flooring and underlayment, you’ll need adhesive or fasteners. Construction adhesive is commonly used to secure the laminate planks to the stairs. A nail gun or screws can be used to reinforce the installation, especially on the risers.
Stair Nosing: Stair nosing is essential for a finished edge and added safety. Choose nosing that matches your laminate flooring and ensure you have enough to cover each step. Adhesive and nails or screws will be needed to secure the nosing in place.
Underlayment: Some laminate flooring requires underlayment for added cushioning and sound insulation. Choose underlayment that is compatible with your laminate flooring and cut it to fit each step and riser. Secure it in place with adhesive or double-sided tape.
Protective Gear: Safety should always be a priority when working on home improvement projects. Wear safety goggles to protect your eyes from dust and debris, and use ear protection if you’re using loud power tools. A dust mask can also be helpful to avoid inhaling any particles.

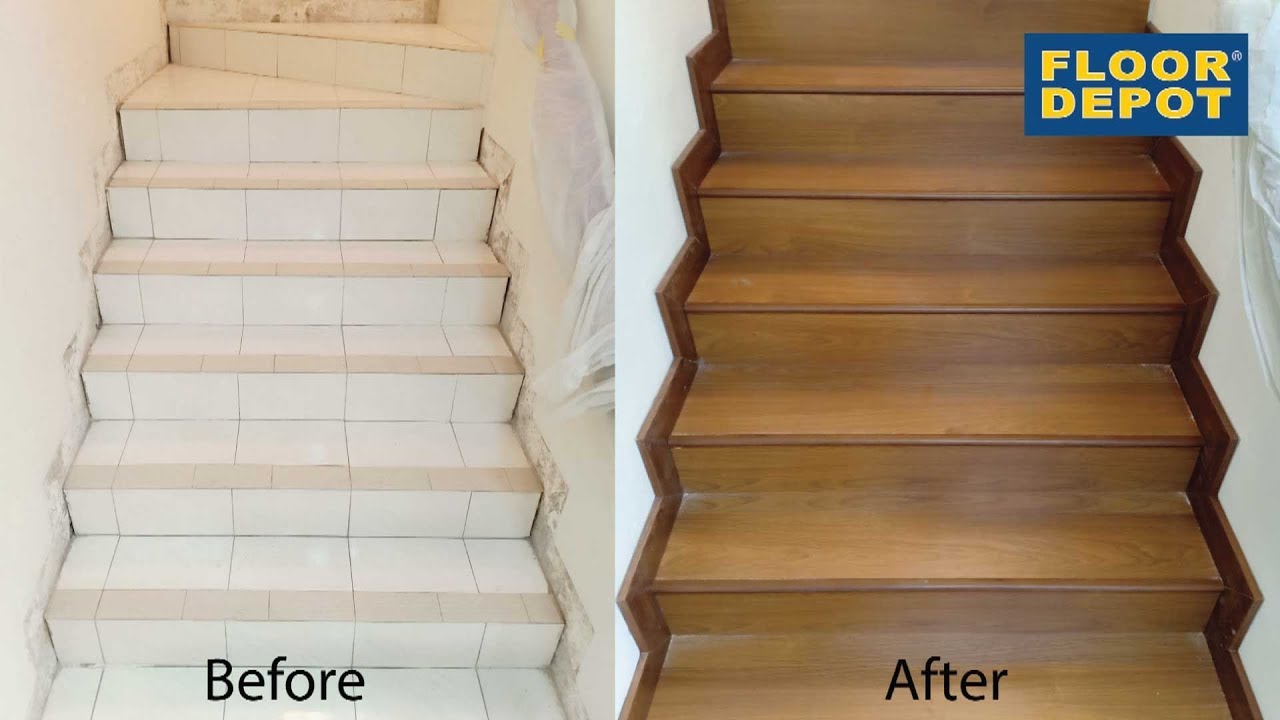
Step-by-Step Guide to Installing Laminate Flooring on Stairs
Installing laminate flooring on stairs can be a rewarding DIY project. Follow these step-by-step instructions to achieve a professional-looking finish.
Preparation: Begin by preparing your stairs as detailed in the first section. Remove any existing flooring, inspect and repair the stairs, measure each step and riser, remove nosing if necessary, clean the surface, and install underlayment if required.
Cutting the Planks: Measure and cut the laminate planks to fit each step and riser. Use a miter saw for straight cuts and a jigsaw for more intricate cuts. Make sure each plank fits snugly without any gaps. It’s better to cut slightly larger and trim down if needed.
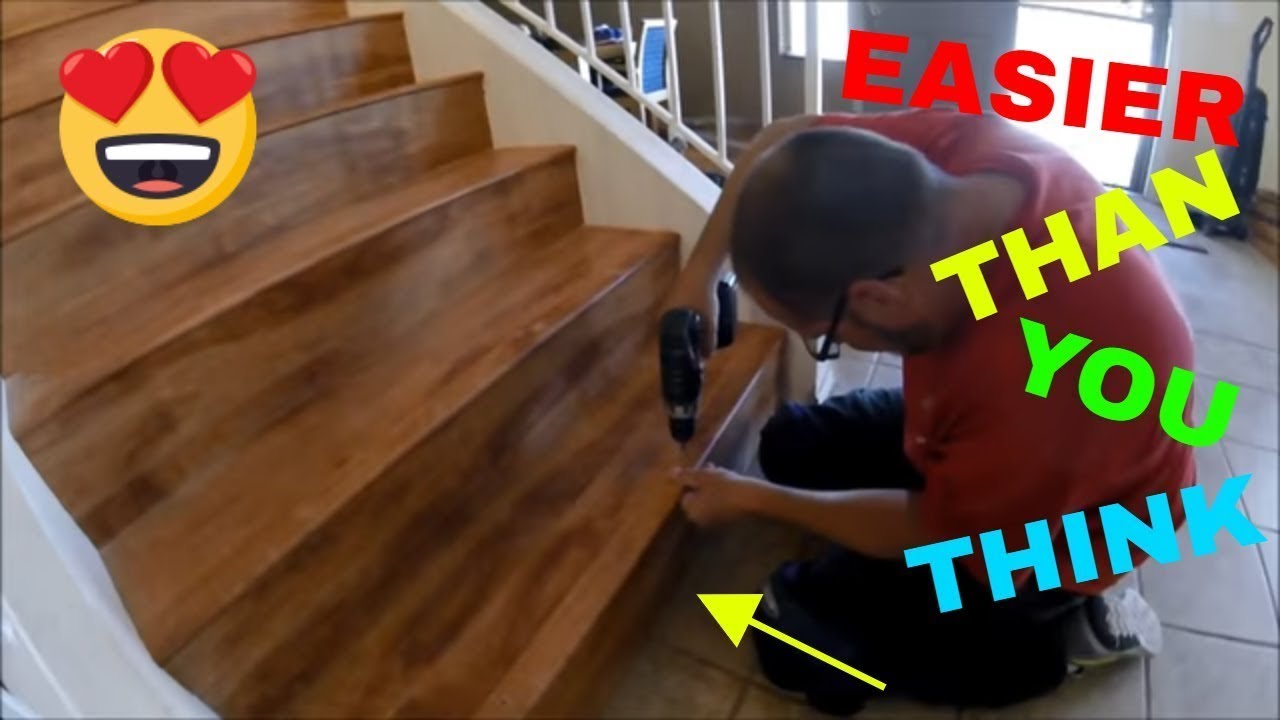
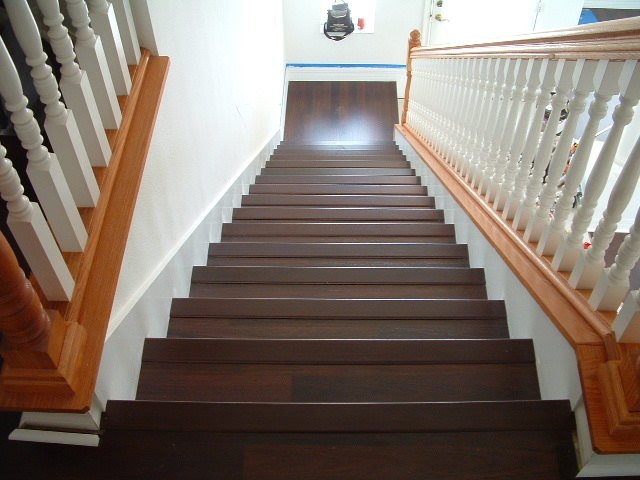
Installing the Treads: Apply construction adhesive to the back of the laminate plank for the step (tread). Press the plank firmly onto the step, ensuring it is aligned properly. Use a roller to ensure even adhesion and remove any air bubbles. Secure with nails or screws if necessary.
Installing the Risers: Measure and cut the laminate plank for the riser. Apply adhesive to the back and press it firmly onto the riser, ensuring it is aligned and covers the entire area. Secure with nails or screws as needed. Repeat for each riser.
Adding Stair Nosing: Stair nosing provides a finished edge and additional grip. Measure and cut the nosing to fit each step. Apply adhesive to the back of the nosing and press it firmly onto the edge of the step. Secure with nails or screws, ensuring it is flush with the laminate planks.
Finishing Touches: After all the planks and nosing are installed, inspect each step for any gaps or uneven areas. Fill any gaps with wood filler and sand down any rough edges. Clean the stairs to remove any dust or debris from the installation process.
Tips for Ensuring a Safe and Durable Installation
A safe and durable laminate flooring installation on stairs requires attention to detail and proper techniques. Here are some tips to ensure your installation lasts.
Use High-Quality Adhesive: Choose a high-quality construction adhesive designed for laminate flooring. This will ensure a strong bond between the planks and the stairs, preventing movement and squeaking over time.
Secure Planks Properly: In addition to adhesive, use nails or screws to secure the planks to the stairs, especially on the risers. This adds extra stability and prevents the planks from shifting or coming loose.
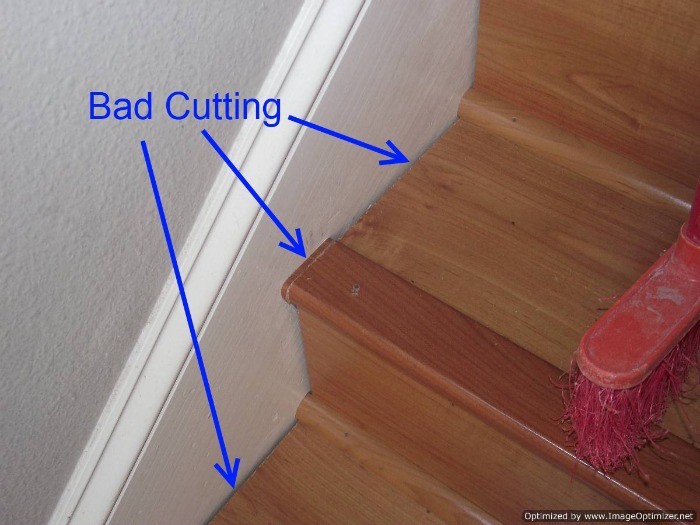
Install Stair Nosing Correctly: Properly installed stair nosing is crucial for safety and durability. Ensure the nosing is flush with the laminate planks and securely fastened. This prevents tripping hazards and protects the edges of the steps from wear and tear.
Check for Level Surface: Before installing the laminate planks, ensure each step and riser is level. Use a carpenter’s level to check for any uneven areas and sand down or fill in as needed. A level surface ensures a smooth and professional finish.
Allow for Expansion: Laminate flooring can expand and contract with changes in temperature and humidity. Leave a small gap (approximately 1/4 inch) between the laminate planks and the wall or stair stringers to allow for this movement. Use spacers to maintain a consistent gap.
Regular Maintenance: After installation, maintain your laminate stairs by regularly cleaning them with a damp cloth or mop. Avoid using excessive water, as it can damage the laminate. Use protective pads on furniture or heavy items to prevent scratching.
Finishing Touches: Trims, Nosings, and Maintenance
Once the laminate flooring is installed on your stairs, adding the finishing touches and maintaining the stairs is crucial for a polished look and long-lasting durability. Here’s how to complete your project and keep it looking great.
Installing Trim: Trim pieces, such as baseboards or quarter rounds, provide a finished look by covering gaps between the laminate flooring and the wall or stair stringers. Measure and cut the trim to fit, then attach it with finishing nails or adhesive. Choose trim that matches or complements your laminate flooring for a cohesive look.
Applying Stair Nosings: Stair nosing not only enhances the appearance of your stairs but also provides added safety. Ensure the nosing is properly aligned with the edge of the steps and securely fastened. This prevents tripping hazards and protects the edges from wear and tear.
Sealing Gaps and Edges: After installing the trim and nosing, inspect the stairs for any gaps or uneven edges. Use wood filler or caulk to fill in any gaps, ensuring a smooth and seamless finish. Sand down any rough edges to create a polished look.
Regular Cleaning: Maintain your laminate stairs by regularly cleaning them with a damp cloth or mop. Avoid using excessive water or harsh chemicals, as they can damage the laminate. Sweep or vacuum the stairs frequently to remove dirt and debris that can scratch the surface.
Protective Measures: Use protective pads on furniture or heavy items placed on or near the stairs to prevent scratching. Consider using a stair runner or carpet treads for added protection and to reduce wear on the laminate flooring.
Addressing Wear and Tear: Over time, your laminate stairs may show signs of wear and tear. Address any issues promptly to prevent further damage. Replace damaged planks or nosing as needed and reapply adhesive or fasteners if any planks become loose.
Do you want to install laminate flooring on your stairs

LAMINATE ON STAIRS HOW TO
stairs diy Stairs diy renovation, Laminate flooring on stairs

How to install laminate flooring on stairs Direct Wood Flooring
How to Install Gray Laminate Stairs with White Risers
Do you want to install laminate flooring on your stairs?
How to install Laminate Flooring on Stairs
Installing Laminate Flooring on Stairs, diy stairs
Related Posts:
- White Laminate Flooring In Living Room
- Grey Vintage Oak Laminate Flooring
- Dark Laminate Flooring Living Room
- Cheap Walnut Laminate Flooring
- Designer Choice Laminate Flooring
- Laminate Flooring Around Stairs
- Laminate Flooring Brick Pattern
- Black Gray Laminate Flooring
- Satin Walnut Laminate Flooring
- Laminate Floor Leveling