Why Choose White Vinyl Flooring for Your Kitchen?
When I was remodeling my kitchen, one of the most important decisions I faced was choosing the right flooring. The kitchen is such a central part of the home, and I wanted a floor that was not only functional but also visually appealing. After weighing all my options, I found myself leaning toward white vinyl flooring. Let me tell you why this choice stood out to me and why it might be the perfect option for your kitchen too.
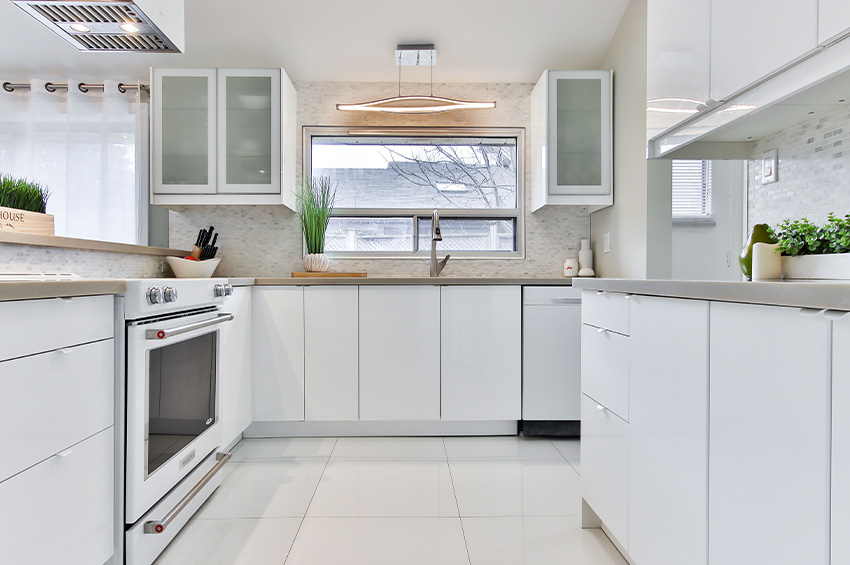
- Brightens Up the Space: One of the main reasons I chose white vinyl flooring was its ability to brighten up the entire kitchen. Kitchens can often feel a bit cramped, especially if they don’t get a lot of natural light. White floors, however, have a magical way of making the space feel bigger and more open. The light color reflects both natural and artificial light, making the room appear larger and more inviting. If you’re working with a small kitchen or a space that lacks windows, white vinyl flooring can transform it into a brighter, airier room.
- Versatility in Design: Another thing that attracted me to white vinyl flooring was its versatility. White is a neutral color that goes well with virtually any design style. Whether you’re going for a modern, minimalist look or something more traditional and cozy, white flooring will complement your vision. I’ve seen it paired beautifully with everything from sleek stainless steel appliances to warm wooden cabinets. The clean, crisp look of white vinyl provides a perfect backdrop that allows other elements of your kitchen to stand out.
- Easy to Clean and Maintain: Let’s be honest—kitchens can get messy. Between cooking, baking, and just daily use, spills and crumbs are inevitable. I was relieved to learn that white vinyl flooring is incredibly easy to clean and maintain. Unlike some other flooring options that require special cleaners or delicate care, white vinyl can usually be cleaned with just a damp mop and mild detergent. This ease of maintenance was a big plus for me, as it meant I could spend more time enjoying my kitchen and less time scrubbing floors.
- Durable and Resilient: Durability was another major factor in my decision. I wanted a floor that could withstand the daily wear and tear of a busy kitchen. White vinyl flooring is known for its resilience—it can handle heavy foot traffic, spills, and even the occasional dropped dish without showing signs of damage. This toughness is due to the way vinyl is manufactured; it often comes with a protective top layer that guards against scratches and stains. Knowing that my floor could stand up to the demands of daily life gave me peace of mind.
- Cost-Effective Choice: Budget is always a consideration when undertaking a home renovation, and I was pleasantly surprised to find that white vinyl flooring was a cost-effective option. It offers the look of more expensive materials, like hardwood or tile, but at a fraction of the cost. This affordability doesn’t mean you have to sacrifice quality, though—many vinyl flooring options are designed to last for years, making them a smart investment for any home.
- Quick and Easy Installation: Finally, I was impressed by how easy it was to install white vinyl flooring. Some flooring options require professional installation, which can add to the overall cost and time of your renovation. However, many vinyl flooring products are designed for DIY installation, with easy-to-follow instructions and click-and-lock systems. This means you can potentially save even more money by installing it yourself. Plus, the quick installation process means you’ll have your new kitchen floor ready in no time.
Advantages of White Vinyl Flooring in High-Traffic Areas
When considering flooring for high-traffic areas like the kitchen, durability and functionality are key. But who says you can’t have a floor that’s as stylish as it is practical? White vinyl flooring offers a fantastic blend of both. In my experience, it’s been an ideal solution for keeping my kitchen both beautiful and functional. Let me share some of the advantages that make white vinyl flooring a standout choice for spaces that see a lot of foot traffic.
Stain Resistance
High-traffic areas are prone to spills, and the kitchen is no exception. What I love about white vinyl flooring is its resistance to stains. Many vinyl flooring options come with a protective wear layer that makes it difficult for spills to penetrate the surface. Whether it’s a splash of tomato sauce or a drop of red wine, I’ve found that these can usually be wiped away with minimal effort. The stain-resistant properties of white vinyl flooring ensure that my kitchen floor stays fresh and clean, even with frequent use.
Scratch Resistance
Another significant advantage of white vinyl flooring in high-traffic areas is its resistance to scratches. This was particularly important to me because, with kids and pets running around, scratches seemed inevitable. However, the tough top layer of vinyl floors protects against scuffs and marks, keeping the surface smooth and unmarred. I’ve had heavy pots drop, and chairs dragged across the floor, and yet, my white vinyl flooring still looks as good as new. This resilience is one of the reasons I find it such a reliable choice for busy households.
Comfort Underfoot
If you spend a lot of time standing in the kitchen, comfort becomes a crucial factor. White vinyl flooring has a slight give underfoot, making it more comfortable to stand on for long periods compared to harder surfaces like tile or stone. I’ve noticed that my feet and legs don’t tire as quickly when I’m cooking or cleaning, which has made my time in the kitchen much more enjoyable. The cushioning effect of vinyl is an often-overlooked benefit, but it’s one that I’ve come to appreciate deeply.
Noise Reduction
High-traffic areas can also be noisy, especially with hard flooring that tends to amplify sounds. One thing I’ve appreciated about white vinyl flooring is its ability to absorb and reduce noise. The material itself is softer and less echoey than other options, which means that footsteps, dropped utensils, and other noises are less noticeable. This noise reduction is particularly beneficial in open-plan homes where the kitchen is close to living spaces, as it helps maintain a quieter and more peaceful environment.
Non-Slip Surface
Safety is another major concern in high-traffic areas, especially in a room like the kitchen where spills are common. One of the reasons I chose white vinyl flooring is because of its non-slip properties. Many vinyl options have textured surfaces that provide extra grip, reducing the risk of slips and falls. This feature is especially important in households with children, elderly family members, or anyone with mobility concerns. The added peace of mind of knowing that my flooring helps prevent accidents has been invaluable.
Easy to Replace
While vinyl flooring is incredibly durable, accidents can happen. One of the things I appreciate about white vinyl flooring is how easy it is to replace if necessary. Unlike some other flooring materials, where damage might mean replacing an entire section or even the whole floor, vinyl can often be replaced plank by plank or tile by tile. This makes it a practical choice for high-traffic areas, where the likelihood of needing a quick fix is higher. Knowing that repairs are straightforward and affordable has made white vinyl an even more attractive option for my kitchen.

Design Options: Styles and Patterns for White Vinyl Flooring
When I first started looking into white vinyl flooring for my kitchen, I was amazed by the variety of design options available. Gone are the days when vinyl was considered a bland or basic choice. Today, white vinyl flooring comes in a wide array of styles and patterns that can suit any aesthetic. Whether you’re looking for something sleek and modern or more classic and timeless, there’s a white vinyl flooring option out there that will perfectly complement your kitchen. Let me walk you through some of the design possibilities that stood out to me.
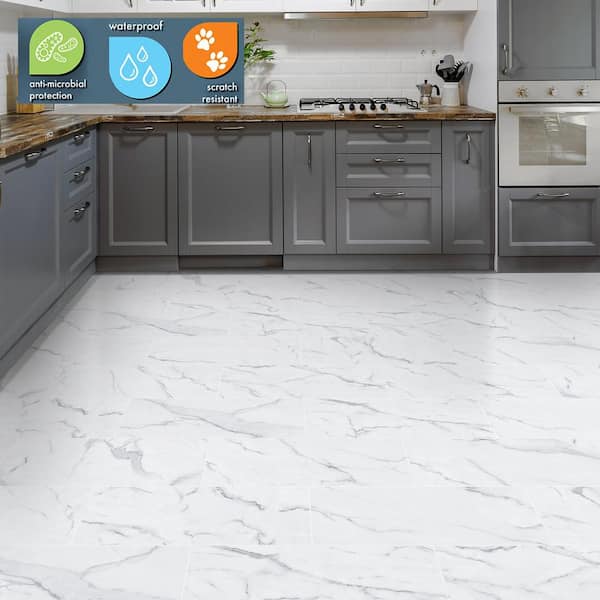
Classic Marble Look
One of the first designs that caught my eye was the classic marble look. White vinyl flooring that mimics marble is a great way to bring an air of elegance to your kitchen without the hefty price tag or maintenance of real marble. The soft veining and subtle color variations make it a beautiful choice for both modern and traditional kitchens. I love how this style adds a touch of luxury while still being practical and easy to care for. Plus, the white marble look pairs well with a wide range of cabinet colors and countertop materials, giving you plenty of flexibility in your kitchen design.
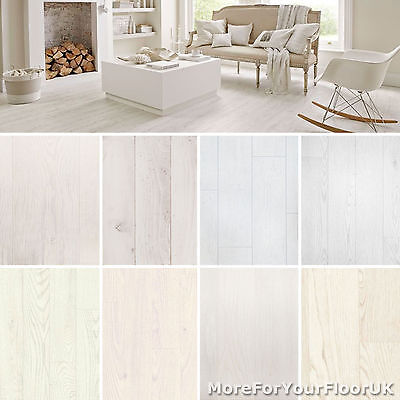
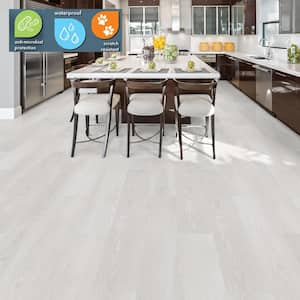
Wood-Look Vinyl
Another popular design option is wood-look vinyl flooring. I was particularly drawn to the whitewashed wood styles, which offer the warmth and texture of real wood but with the durability and ease of vinyl. This style is perfect if you’re going for a coastal or rustic vibe in your kitchen. The subtle wood grain pattern adds visual interest and depth to the floor without overwhelming the space. What’s great about this option is that you get the best of both worlds—the charm of wood with the practicality of vinyl. It’s an especially good choice if you want a floor that feels cozy and inviting.
Geometric Patterns
For those who like to make a bold statement, geometric patterns in white vinyl flooring can be a showstopper. I was intrigued by the variety of geometric designs available, from subtle hexagons to more intricate, eye-catching patterns. These designs can add a modern and artistic flair to your kitchen, turning the floor into a focal point of the room. I’ve seen kitchens where the geometric pattern is the star of the show, with simpler cabinets and countertops letting the floor take center stage. If you’re looking to infuse some personality into your kitchen, a geometric patterned white vinyl could be just the ticket.
Stone-Look Vinyl
If you’re a fan of natural stone but are concerned about the cost or upkeep, stone-look white vinyl flooring is an excellent alternative. I was impressed by how realistic some of the stone-look designs are, capturing the nuanced textures and tones of real stone like limestone or travertine. This option is fantastic if you want to bring a natural element into your kitchen while still maintaining a clean, white aesthetic. Stone-look vinyl flooring works particularly well in kitchens that blend traditional and modern elements, offering a timeless appeal that can adapt to different styles.
High-Gloss Finish
For a sleek and contemporary look, consider white vinyl flooring with a high-gloss finish. I found that this style adds a touch of sophistication to the kitchen, with its smooth, reflective surface creating a sense of openness and light. The high-gloss finish is perfect for modern kitchens, especially when paired with minimalist cabinets and stainless-steel appliances. One thing to keep in mind, though, is that high-gloss floors can show footprints and smudges more easily, so they might require a bit more upkeep to maintain that polished look. However, the visual impact they make is well worth the effort.
Textured Surfaces
Finally, I discovered that white vinyl flooring with textured surfaces offers both style and function. These designs often mimic natural materials like stone or wood but with a tactile finish that adds depth and interest. The texture not only enhances the look of the floor but also provides a bit of extra grip, which can be a practical feature in a busy kitchen. I particularly liked the subtle textures that add dimension to the floor without overpowering the space. Whether you prefer a rustic wood texture or a more refined stone feel, textured white vinyl flooring is a versatile option that can work in a variety of kitchen settings.
Durability and Maintenance
When I decided on white vinyl flooring for my kitchen, I knew I was making a choice that was both stylish and practical. However, I also knew that maintaining that fresh, new look would require a bit of care. Over time, I’ve developed some strategies to keep my white vinyl flooring looking as pristine as the day it was installed. Here’s what I’ve learned about the durability of white vinyl flooring and how to maintain it effectively.
Regular Cleaning Routine
One of the most important aspects of maintaining white vinyl flooring is establishing a regular cleaning routine. I’ve found that sweeping or vacuuming the floor daily helps to remove dust, dirt, and debris that can accumulate, especially in high-traffic areas like the kitchen. Using a soft-bristle broom or a vacuum designed for hard floors ensures that the surface remains scratch-free. For a deeper clean, I mop the floor once a week with a mild detergent and warm water. It’s amazing how just a little regular maintenance can keep the floor looking bright and fresh.
Protecting the Surface
While white vinyl flooring is quite durable, it’s still important to protect the surface from potential damage. One thing I’ve done is to place rugs or mats in high-traffic areas, such as in front of the sink and stove. This helps to reduce wear and tear on the floor and also prevents scratches from shoes or dropped utensils. I’ve also added felt pads to the bottom of chairs and tables to prevent them from scratching the vinyl when they’re moved. These small steps have gone a long way in preserving the beauty of my white vinyl flooring.
Dealing with Stains
No matter how careful you are, spills are bound to happen in the kitchen. The good news is that white vinyl flooring is relatively stain-resistant, but it’s still important to clean up spills as soon as they occur. I keep a soft cloth and a gentle cleaning solution on hand for quick clean-ups. For tougher stains, like those from red wine or tomato sauce, I’ve found that a mixture of baking soda and water works wonders. Just be sure to rinse the area thoroughly afterward to avoid leaving any residue. With prompt attention, I’ve been able to keep my floor free from stubborn stains.
Avoiding Harsh Chemicals
One thing I’ve learned the hard way is to avoid using harsh chemicals or abrasive cleaners on white vinyl flooring. These can damage the surface and cause discoloration over time. Instead, I stick to mild, pH-balanced cleaners that are specifically designed for vinyl floors. I also steer clear of steam mops, as the high heat can cause the vinyl to warp or peel. By choosing the right cleaning products, I’ve been able to maintain the integrity and appearance of my flooring, ensuring that it remains in top condition.
Addressing Scratches and Scuffs
Despite your best efforts, minor scratches and scuffs can still occur on white vinyl flooring. I’ve found that using a vinyl repair kit can help to minimize the appearance of these blemishes. These kits usually come with a filler compound that matches the color of your flooring, allowing you to fill in scratches and restore the smooth surface. For scuffs, a simple eraser or a bit of toothpaste on a soft cloth can often do the trick. By addressing these issues promptly, I’ve been able to keep my floor looking flawless.
Long-Term Maintenance
In addition to regular cleaning and minor repairs, there are some long-term maintenance steps I take to ensure the longevity of my white vinyl flooring. For example, I try to avoid exposing the floor to direct sunlight for extended periods, as this can cause the vinyl to fade or yellow. If your kitchen gets a lot of sun, consider using blinds or curtains to protect the floor. I also plan to reseal the vinyl every few years to refresh the protective layer and maintain the floor’s durability. These long-term strategies have helped me keep my white vinyl flooring looking like new, even after years of use.

Installation Tips for White Vinyl Flooring in the Kitchen
When I decided to install white vinyl flooring in my kitchen, I knew I wanted the process to be as smooth and stress-free as possible. Whether you’re a seasoned DIYer or a first-timer, installing vinyl flooring can be a manageable project with the right preparation and guidance. Here are some tips that helped me along the way, ensuring that my white vinyl flooring was installed correctly and looked flawless.
Properly Prepare the Subfloor
One of the most critical steps in the installation process is preparing the subfloor. I learned that a smooth, clean, and level subfloor is essential for a successful vinyl flooring installation. Before laying down the vinyl, I thoroughly cleaned the subfloor to remove any dust, dirt, or debris that could cause bumps or unevenness. If there were any cracks or holes, I made sure to fill them in with a leveling compound. Taking the time to properly prepare the subfloor ensured that my white vinyl flooring had a stable and even foundation, which is crucial for both the appearance and longevity of the floor.
Acclimate the Vinyl Flooring
Another important tip I picked up is to acclimate the vinyl flooring to the room’s temperature and humidity levels before installation. I brought the vinyl planks into the kitchen and let them sit for at least 48 hours before starting the installation. This step is important because vinyl can expand or contract based on the environment, and allowing it to acclimate helps to prevent issues like buckling or gaps after installation. It’s a simple step, but it can make a big difference in the final result.
Plan the Layout Carefully
Before starting the installation, I spent some time planning the layout of the vinyl flooring. This included deciding on the direction in which to lay the planks or tiles, as well as determining the starting point. I found that laying the planks parallel to the longest wall in the kitchen created a more visually appealing flow. I also made sure to stagger the seams, which not only adds to the aesthetic but also increases the stability of the floor. Taking the time to plan the layout helped me avoid any last-minute surprises and ensured a professional-looking finish.
Use the Right Tools
Having the right tools on hand made the installation process much easier. I made sure to have a tape measure, utility knife, straightedge, and a vinyl flooring roller ready before I began. The tape measure and straightedge were essential for making precise cuts, while the utility knife allowed me to cut the vinyl planks cleanly. The flooring roller was particularly useful for ensuring that the vinyl adhered properly to the subfloor, especially around the edges and seams. With the right tools, I was able to complete the installation efficiently and with confidence.
Pay Attention to Edges and Seams
During installation, I paid special attention to the edges and seams of the vinyl flooring. I made sure that each plank was properly aligned and tightly fitted to the next, as gaps can lead to issues like water seepage or peeling over time. For the edges, I used a transition strip or quarter-round molding to create a clean, finished look and to protect the edges from wear and tear. This attention to detail helped to ensure that my white vinyl flooring looked seamless and professional once the installation was complete.
Clean Up and Enjoy Your New Floor
After the installation was complete, I made sure to thoroughly clean the floor to remove any dust or debris that might have accumulated during the process. I also gave the floor a light mopping to remove any residue from the adhesive. Finally, I took a moment to step back and admire the transformation. Installing white vinyl flooring in my kitchen was a rewarding project that not only improved the look of the space but also increased its functionality. With these tips in mind, I was able to achieve a beautiful, durable floor that I’m proud to show off.

Comparing White Vinyl to Other Flooring Options: What Sets It Apart?
When I was researching flooring options for my kitchen, I found myself overwhelmed by the choices. From hardwood to tile, laminate to vinyl, each material seemed to have its own set of advantages and drawbacks. After much consideration, I chose white vinyl flooring, and I’ve been thrilled with the decision. Here’s how white vinyl flooring compares to other popular options and what sets it apart as a top choice for the kitchen.
Vinyl vs. Hardwood
One of the first comparisons I made was between vinyl and hardwood flooring. Hardwood is often praised for its natural beauty and longevity, but it also comes with a hefty price tag and requires regular maintenance to keep it looking its best. In contrast, white vinyl flooring offers a similar aesthetic—especially in wood-look designs—but at a fraction of the cost. Additionally, vinyl is more resistant to moisture and spills, which is crucial in a kitchen environment. While hardwood can warp or stain if not properly cared for, vinyl’s water resistance makes it a more practical choice for busy households.
Vinyl vs. Tile
Tile was another strong contender when I was choosing my kitchen flooring. Tile is incredibly durable and comes in a wide range of styles, including natural stone and ceramic. However, tile can be cold and hard underfoot, which isn’t always comfortable if you spend a lot of time in the kitchen. White vinyl flooring, on the other hand, provides a warmer, more cushioned surface that’s easier on the feet and joints. Plus, vinyl is less likely to crack or chip compared to tile, making it a more resilient option for high-traffic areas. I also found that vinyl was easier to install, especially as a DIY project, whereas tile often requires professional installation.
Vinyl vs. Laminate
Laminate flooring was another option I considered, as it’s known for being affordable and relatively easy to install. However, I ultimately chose white vinyl flooring because of its superior water resistance. Laminate can swell or warp when exposed to moisture, which is a common concern in the kitchen. Vinyl, on the other hand, is fully waterproof, making it a better choice for areas prone to spills or humidity. I also appreciated that vinyl tends to be quieter underfoot than laminate, which can sometimes sound hollow or noisy. This made my kitchen feel more serene and comfortable.
Vinyl vs. Linoleum
Linoleum is another resilient flooring option that’s often compared to vinyl. Both materials are durable, eco-friendly, and available in a wide range of styles. However, I found that white vinyl flooring offered a more modern and polished look, with designs that better suited my kitchen’s aesthetic. Additionally, vinyl is generally easier to clean and maintain than linoleum, which can require regular sealing to protect against stains and moisture. The low-maintenance aspect of vinyl was a major selling point for me, as I wanted a floor that looked great with minimal effort.
Vinyl vs. Cork
Cork flooring intrigued me because of its eco-friendly properties and unique texture. It’s soft underfoot, warm, and provides excellent sound insulation. However, cork is also susceptible to water damage and can be easily scratched or dented. In contrast, white vinyl flooring offered similar comfort and warmth but with much greater durability. I didn’t have to worry about water damage or the floor showing signs of wear over time. While cork has its merits, especially for those looking for a sustainable option, vinyl was a more practical choice for my kitchen’s needs.
Vinyl’s Unique Appeal
Ultimately, what set white vinyl flooring apart for me was its combination of style, durability, and affordability. It offered the look of more expensive materials without the high cost or intensive upkeep. The wide range of design options allowed me to find a style that perfectly matched my vision for the kitchen, while the practical benefits—like water resistance and ease of installation—made it a smart choice for my home. After living with white vinyl flooring for a while now, I’m convinced that it’s one of the best choices I could have made for my kitchen.

Budget Considerations: Is White Vinyl Flooring a Cost-Effective Choice?
When it comes to home renovations, budget is always a major consideration. As much as I wanted my kitchen to look beautiful, I also needed to ensure that the choices I made were financially sound. White vinyl flooring caught my eye not just for its aesthetic appeal but also for its affordability. Here’s why I believe white vinyl flooring is a cost-effective choice and how it helped me stay within my budget without compromising on quality or style.
Lower Material Costs
One of the biggest advantages of white vinyl flooring is its lower material cost compared to other flooring options like hardwood, tile, or natural stone. I was pleasantly surprised to find that vinyl offers the look of these more expensive materials at a fraction of the price. This meant that I could achieve a high-end look for my kitchen without breaking the bank. The cost savings on materials allowed me to allocate more of my budget to other areas of the renovation, such as new appliances or upgraded countertops.
DIY Installation Saves on Labor
Another way white vinyl flooring proved to be cost-effective was through its easy installation process. Many vinyl flooring options are designed for DIY installation, with click-and-lock systems that don’t require professional expertise. I was able to install the flooring myself, which saved a significant amount of labor costs. Even if you choose to hire a professional, the installation process for vinyl is generally quicker and less labor-intensive than for other flooring materials, which can still translate to lower costs.
Long-Term Durability
While the initial cost of white vinyl flooring is certainly appealing, it’s also important to consider the long-term value. Vinyl is known for its durability and resistance to wear and tear, especially in high-traffic areas like the kitchen. I knew that investing in a floor that would last for years without needing frequent repairs or replacement would save me money in the long run. The durability of vinyl means that I won’t have to worry about costly maintenance or early replacement, making it a smart investment for the future.
Minimal Maintenance Costs
Another budget-friendly aspect of white vinyl flooring is its minimal maintenance requirements. Unlike materials like hardwood or natural stone, which may require regular sealing, polishing, or refinishing, vinyl flooring is incredibly low maintenance. I’ve found that a simple cleaning routine is all it takes to keep the floor looking new. This not only saves me time but also eliminates the need for expensive cleaning products or professional services. The ease of maintenance is one of the reasons I’ve found vinyl to be such a cost-effective choice.
Energy Efficiency
White vinyl flooring can also contribute to energy savings in your home. Its light color helps reflect natural light, which can reduce the need for additional lighting during the day. Additionally, vinyl has insulating properties that help maintain a comfortable temperature in the room, potentially lowering heating and cooling costs. While these savings might not be immediately obvious, they can add up over time, contributing to the overall cost-effectiveness of the flooring.
Resale Value
Finally, it’s worth considering how white vinyl flooring can impact the resale value of your home. A well-maintained, stylish kitchen floor can be a significant selling point for potential buyers. While vinyl flooring might not have the same cachet as hardwood, its modern designs and practical benefits are increasingly recognized as valuable by homebuyers. By choosing a high-quality vinyl floor, I’ve not only enhanced my kitchen’s appeal but also potentially increased the value of my home, making it a smart financial decision overall.
I don’t want this after all. Just don’t care for it

White – Vinyl Plank Flooring – Vinyl Flooring
Vinyl Floor Kitchen with White Cabinets Ideas

Pin on floors, kitchen flooring

Related Posts: