Mold on Wood Floors: Signs and Symptoms of Mold Infestation
Discovering mold on your wood floors can be alarming, as it not only affects the aesthetics of your home but also poses potential health risks. Recognizing the signs and symptoms of mold infestation is crucial for prompt identification and remediation. Here are some common indicators of mold on wood floors:
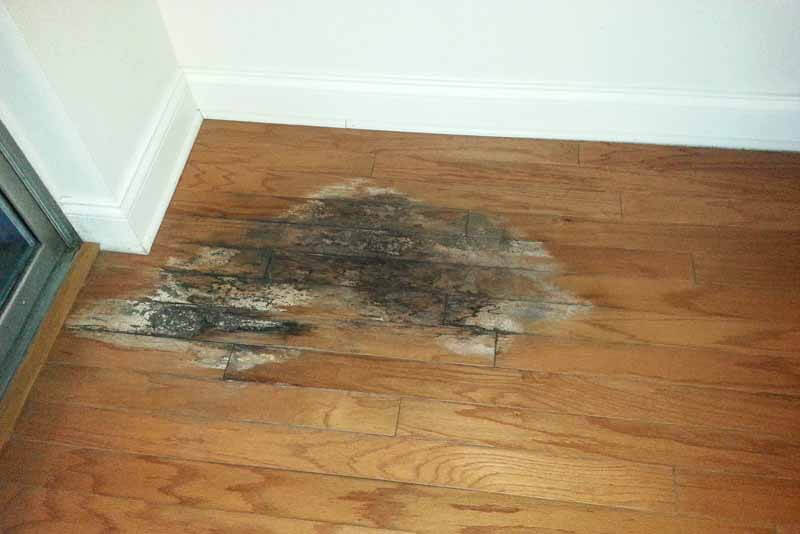
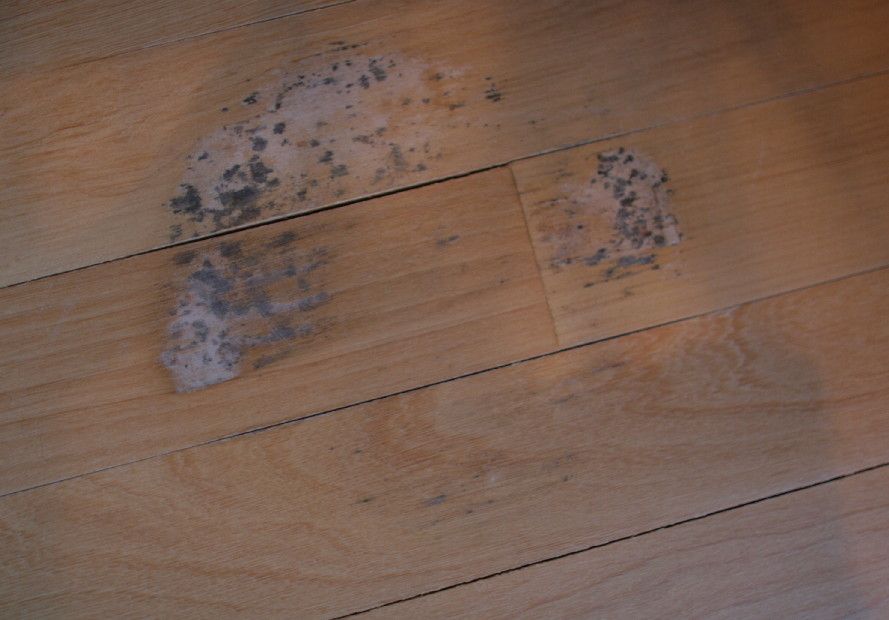
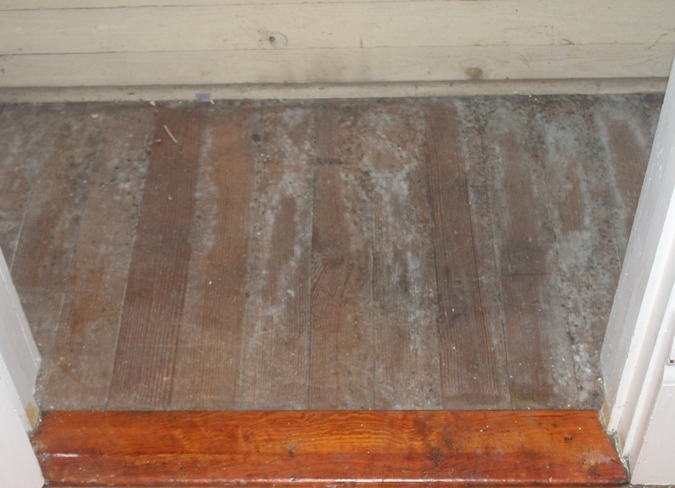
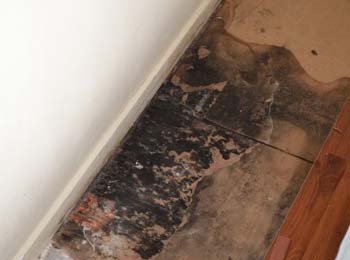
- Visible Mold Growth: The most obvious sign of mold infestation is the presence of visible mold growth on the surface of the wood floors. Mold can appear as fuzzy patches, black spots, or discolored areas, and it may spread quickly if left untreated.
- Musty Odor: Mold often emits a musty, earthy odor that becomes more pronounced in areas with high humidity or moisture levels. If you notice a lingering musty smell in your home, particularly near the wood floors, it could indicate the presence of mold.
- Warped or Buckled Floorboards: Mold thrives in moist environments, and prolonged exposure to moisture can cause wood floors to warp, buckle, or bow. If you observe any changes in the texture or appearance of your wood floors, such as uneven surfaces or gaps between boards, it may be a sign of underlying mold growth.
- Discoloration or Staining: Mold can cause discoloration or staining on wood surfaces, ranging from dark spots to green, blue, or yellow hues. These stains may appear on the surface of the wood or penetrate deeper into the material, depending on the severity of the mold infestation.
- Allergic Reactions: For individuals sensitive to mold spores, exposure to mold on wood floors can trigger allergic reactions such as coughing, sneezing, wheezing, nasal congestion, skin irritation, or eye irritation. If you or your family members experience unexplained allergy symptoms, mold exposure could be the culprit.
- Water Damage: Mold thrives in damp, moist environments, so water damage or leaks in the home can provide ideal conditions for mold growth on wood floors. If you’ve experienced water damage from flooding, leaks, or plumbing issues, it’s essential to inspect your wood floors for signs of mold infestation.

Causes of Mold on Wood Floors
Mold growth on wood floors can be attributed to various factors, including moisture, humidity, poor ventilation, and organic matter. Understanding the underlying causes of mold infestation is essential for effective prevention and remediation. Here are some common causes of mold on wood floors:
Excess Moisture: Moisture is the primary catalyst for mold growth on wood floors. Common sources of excess moisture include water leaks, spills, flooding, high humidity levels, or inadequate ventilation. Even minor moisture issues can create ideal conditions for mold to thrive on wood surfaces.
Water Damage: Water damage from leaks, plumbing issues, or flooding can penetrate wood floors, saturating the material and providing a breeding ground for mold spores. If not addressed promptly, water damage can lead to mold infestation and structural damage to the wood flooring.
Poor Ventilation: Inadequate ventilation in the home can trap moisture indoors, creating a humid environment conducive to mold growth. Areas with poor air circulation, such as basements, bathrooms, and crawl spaces, are particularly susceptible to mold infestation on wood floors.
Organic Matter: Mold requires organic matter to grow and thrive, and wood floors provide an ideal substrate for mold spores to colonize. Dust, dirt, pet dander, or other organic debris can accumulate on wood surfaces, providing nutrients for mold growth.
Condensation: Condensation occurs when warm, humid air comes into contact with cooler surfaces, leading to moisture buildup. Condensation can occur on wood floors in areas with temperature differentials, such as near windows, doors, or air conditioning vents, creating conditions conducive to mold growth.
Subfloor Issues: Mold can also originate from the subfloor beneath the wood flooring. If the subfloor is compromised due to water damage, leaks, or inadequate moisture barriers, moisture can seep upward into the wood flooring, promoting mold growth from below.
Step-by-Step Guide to Removing Mold from Wood Floors
Removing mold from wood floors requires careful attention to detail and adherence to proper safety precautions. While severe mold infestations may require professional intervention, minor mold growth can often be addressed using DIY methods. Here’s a step-by-step guide to removing mold from wood floors:
Assess the Extent of Mold Damage: Before beginning the mold removal process, assess the extent of mold damage on your wood floors. Determine the size of the affected area and whether the mold has penetrated the surface or is confined to the top layer.
Gather Your Supplies: Gather the necessary supplies for mold removal, including protective equipment such as gloves, goggles, and a mask, as well as cleaning supplies such as a scrub brush, detergent, vinegar, hydrogen peroxide, or a commercial mold remover.
Containment: To prevent the spread of mold spores to other areas of the home, create a containment zone around the affected area using plastic sheeting or tarps. Seal off doors, vents, and windows with plastic sheeting and duct tape to contain the mold.
Ventilation: Ensure adequate ventilation in the work area by opening windows and doors and using fans or dehumidifiers to promote airflow and reduce humidity levels. Proper ventilation helps dry out the wood flooring and prevents moisture buildup during the mold removal process.
Cleaning: Scrub the mold-infested wood floors thoroughly with a mixture of warm water and detergent or a solution of vinegar and water. Use a scrub brush or sponge to scrub away surface mold and stains, working in small sections at a time.
Disinfection: After cleaning the wood floors, disinfect the surfaces with a solution of hydrogen peroxide or a commercial mold remover. Apply the disinfectant according to the manufacturer’s instructions and allow it to penetrate the wood surface to kill any remaining mold spores.
Drying: Once the mold has been removed and the wood floors have been disinfected, allow the surfaces to dry completely. Use fans, dehumidifiers, or natural ventilation to speed up the drying process and prevent moisture buildup, which can promote mold regrowth.
Sealing: For added protection against mold growth, consider applying a mold-resistant sealant or coating to the wood floors after they have dried completely. Follow the manufacturer’s instructions for application and allow the sealant to cure fully before resuming normal use of the floors.

Protecting Yourself During Mold Removal from Wood Floors
Mold removal from wood floors can expose you to potentially harmful mold spores and mycotoxins, so it’s essential to take proper safety precautions to protect yourself during the remediation process. Here are some safety tips to follow when removing mold from wood floors:
Wear Protective Equipment: Before starting the mold removal process, put on appropriate protective equipment, including gloves, goggles, and a mask or respirator. These items will help protect you from exposure to mold spores and other airborne contaminants.
Containment: Create a containment zone around the affected area using plastic sheeting or tarps to prevent the spread of mold spores to other parts of the home. Seal off doors, vents, and windows with plastic sheeting and duct tape to contain the mold.
Ventilation: Ensure adequate ventilation in the work area by opening windows and doors and using fans or dehumidifiers to promote airflow and reduce humidity levels. Proper ventilation helps remove airborne mold spores and prevent respiratory irritation.
Avoid Agitation: Minimize agitation of mold-infested materials to prevent the release of mold spores into the air. Avoid sweeping, vacuuming, or using high-pressure sprays, as these activities can disperse mold spores and exacerbate respiratory symptoms.
Dispose of Contaminated Materials Properly: Dispose of mold-infested materials, such as cleaning rags, brushes, or protective equipment, in sealed plastic bags to prevent further contamination. Dispose of contaminated materials according to local regulations and guidelines.
Clean Up Thoroughly: After completing the mold removal process, clean up the work area thoroughly to remove any remaining mold spores or debris. Use a HEPA vacuum or damp cloth to clean surfaces and remove visible mold growth.
Monitor Your Health: Pay attention to any symptoms of mold exposure, such as coughing, wheezing, nasal congestion, or skin irritation, and seek medical attention if you experience persistent or severe symptoms. Mold exposure can exacerbate respiratory conditions and allergies, so it’s essential to monitor your health closely during and after mold removal.

When to Seek Professional Help for Mold Removal
While DIY mold removal methods can be effective for minor mold infestations, severe or extensive mold growth on wood floors may require professional intervention. Professional mold remediation specialists have the expertise, equipment, and training to safely and effectively remove mold from wood floors and restore a clean and healthy indoor environment. Here are some situations where it’s advisable to seek professional help for mold removal:
Extensive Mold Growth: If the mold infestation on your wood floors covers a large area or extends beyond the surface layer, professional mold remediation may be necessary to ensure thorough treatment.
Hidden Mold: Mold can hide beneath the surface of wood floors or within wall cavities, subflooring, or insulation, making it difficult to detect and remove with DIY methods. Professional mold remediation specialists have the tools and expertise to identify hidden mold and address the underlying causes of mold growth.
Health Concerns: If you or your family members experience persistent or severe symptoms of mold exposure, such as respiratory irritation, allergies, or asthma attacks, it’s essential to prioritize your health and seek professional help for mold removal. Professional mold remediation can minimize your risk of further exposure and ensure a safe and thorough cleanup.
Structural Damage: Mold growth on wood floors can compromise the structural integrity of the flooring material and underlying subflooring. If you notice signs of structural damage, such as warped or buckled floorboards, it’s crucial to address the issue promptly with professional mold remediation to prevent further deterioration and costly repairs.
Recurring Mold Problems: If mold growth on your wood floors persists despite repeated attempts at DIY removal, it may indicate underlying issues such as hidden moisture sources or inadequate ventilation. Professional mold remediation specialists can conduct a thorough inspection, identify the root causes of mold growth, and implement effective solutions to prevent recurrence.
Insurance Coverage: In some cases, homeowners insurance policies may cover the cost of professional mold remediation services, especially if the mold infestation is the result of a covered peril such as water damage from a burst pipe or natural disaster. Check your insurance policy and consult with your provider to determine your coverage options for mold remediation.
Maintaining a Mold-Free Environment on Wood Floors
Prevention is key when it comes to mold growth on wood floors. By implementing proactive measures to control moisture, promote ventilation, and maintain cleanliness, you can minimize the risk of mold infestation and preserve the integrity of your flooring surfaces. Here are some tips for preventing mold growth on wood floors:
Control Moisture Levels: Keep moisture levels in check by promptly repairing leaks, addressing water damage, and maintaining proper humidity levels in the home. Use a dehumidifier or air conditioner to reduce humidity levels to below 60% in high-humidity areas such as basements, bathrooms, and crawl spaces.
Promptly Clean Spills and Leaks: Clean up spills, leaks, or standing water on wood floors promptly to prevent moisture from seeping into the material and promoting mold growth. Use a clean, dry cloth or mop to soak up excess moisture and thoroughly dry the affected area.
Promote Ventilation: Ensure adequate ventilation in the home by opening windows and doors, using exhaust fans, and installing vents or air vents in high-moisture areas such as bathrooms, kitchens, and laundry rooms. Proper ventilation helps remove excess moisture from the air and prevent condensation on wood surfaces.
Use Area Rugs or Mats: Place area rugs or mats in high-traffic areas and entryways to trap dirt, moisture, and debris before they can reach the wood floors. Regularly clean and vacuum rugs and mats to remove accumulated dirt and prevent mold spores from settling on the flooring surface.
Inspect and Maintain Wood Floors: Regularly inspect and maintain wood floors to identify any signs of water damage, warping, or discoloration. Repair or replace damaged floorboards promptly to prevent moisture intrusion and minimize the risk of mold growth.
Clean and Dust Regularly: Keep wood floors clean and free of dust, dirt, and debris by sweeping, vacuuming, or mopping regularly. Use a damp cloth or mop to clean the floors periodically, but avoid excessive moisture, as it can promote mold growth.
Apply Mold-Resistant Sealant: Consider applying a mold-resistant sealant or coating to wood floors to provide an additional layer of protection against mold growth. Follow the manufacturer’s instructions for application and reapplication to ensure long-lasting effectiveness.
Monitor Indoor Humidity: Use a hygrometer or humidity monitor to track indoor humidity levels and identify areas of concern. Aim for humidity levels below 60% to prevent mold growth and maintain a healthy indoor environment.
How to Get Rid of Mold on Wood Floors
How to Remove Mold Stains from Wood Floors (with Pictures)

What Kills Mold On Wood? Mold Help For You
How to Clean Mold From a Wood Floor : 4 Steps – Instructables

Wood Flooring Mold Problems .Dealing with Surface and Subfloor Mold
Black Mold on Floors? 7 Best Tips to Remove and Clean Floor!
How to Clean Mold From a Wood Floor : 4 Steps – Instructables

Related Posts:
- Wood Floor Mold Removal
- How Thick Is Engineered Wood Flooring
- Real Wood Flooring In Kitchen
- Wood Floor Kitchen Cabinet Combination Designs
- Solid Wood Floor Repair Kit
- Dark Wood Floor Finishes
- Light Oak Solid Wood Flooring
- Grey Wood Floor In Bathroom
- Pledge Wood Floor Cleaner Spray
- Wide Plank Wood Flooring Cost