Preparing the Concrete Subfloor for Cork Flooring Installation
Before installing cork flooring on a concrete subfloor, it’s essential to properly prepare the surface to ensure a smooth and successful installation. Preparing the concrete subfloor not only improves the adhesion of the cork flooring but also helps prevent moisture issues and ensures a long-lasting finish. Here are some essential steps to prepare the concrete subfloor for cork flooring installation:
- Clean the Surface: Start by thoroughly cleaning the concrete subfloor to remove any dirt, dust, debris, or residue. Sweep the surface with a broom and then vacuum to remove any remaining particles. For stubborn stains or residue, use a mild detergent or concrete cleaner and water to scrub the surface clean. Allow the subfloor to dry completely before proceeding to the next step.
- Repair Any Damage: Inspect the concrete subfloor for any cracks, holes, or uneven areas that may need to be repaired before installing cork flooring. Fill any cracks or holes with a suitable patching compound or concrete filler, following the manufacturer’s instructions. Use a leveling compound to smooth out any uneven areas and ensure a flat surface for the cork flooring.
- Check for Moisture: Moisture is a common concern when installing cork flooring over concrete subfloors, as excess moisture can lead to mold, mildew, and damage to the flooring. Use a moisture meter to test the moisture levels of the concrete subfloor. If the moisture levels are too high, consider using a moisture barrier or sealer to protect the cork flooring from moisture damage.
- Apply a Primer: Applying a primer to the concrete subfloor helps improve the adhesion of the cork flooring and provides a smooth, uniform surface for installation. Choose a primer specifically designed for use on concrete surfaces and follow the manufacturer’s instructions for application. Allow the primer to dry completely before installing the cork flooring.
- Acclimate the Cork Flooring: Before installation, acclimate the cork flooring to the room where it will be installed. Remove the flooring from its packaging and allow it to sit in the room for at least 48 hours to adjust to the temperature and humidity levels. This helps prevent the expansion or contraction of the flooring after installation.
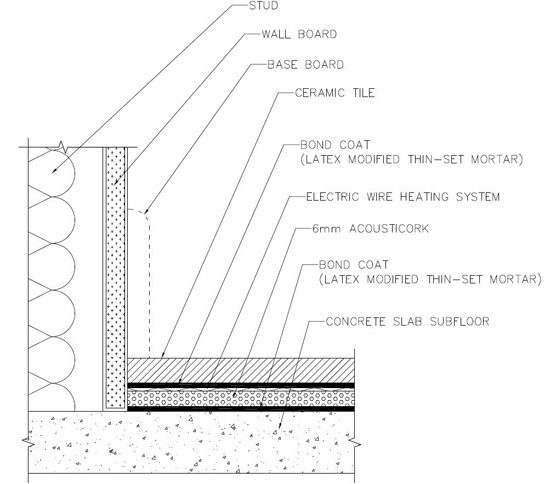
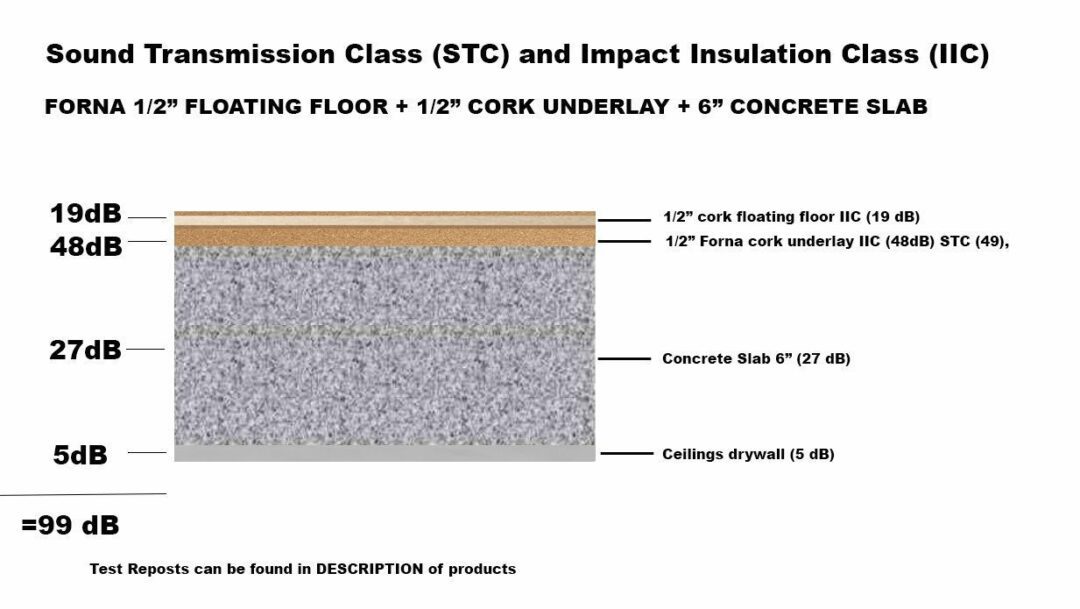
- Install a Subfloor Underlayment: Installing a subfloor underlayment can help improve the insulation, soundproofing, and comfort of the cork flooring. Choose a high-quality underlayment specifically designed for use with cork flooring and follow the manufacturer’s instructions for installation. Be sure to leave a small gap around the perimeter of the room to allow for expansion.

Choosing the Right Cork Flooring for Installation on Concrete
Choosing the right cork flooring for installation on a concrete subfloor is essential for achieving a successful and long-lasting finish. Cork flooring offers numerous benefits, including durability, comfort, and sustainability, making it an excellent choice for concrete subfloors. However, not all cork flooring is created equal, and it’s essential to consider factors such as thickness, finish, and installation method when selecting the right flooring for your space. Here are some tips for choosing the right cork flooring for installation on concrete:
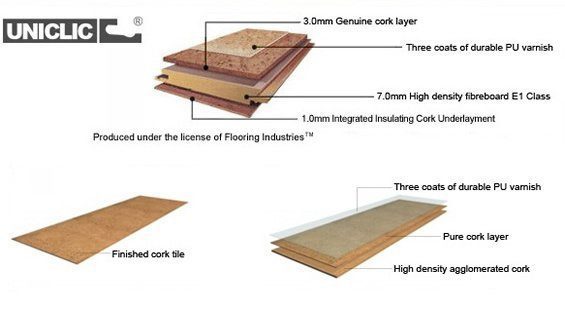
Thickness: Cork flooring comes in various thicknesses, typically ranging from 3mm to 12mm. Thicker cork flooring provides better insulation, soundproofing, and durability, making it ideal for high-traffic areas or rooms where comfort is a priority. However, thicker cork flooring may be more expensive and challenging to install, so consider your budget and installation requirements when choosing the thickness.
Finish: Cork flooring is available in a range of finishes, including natural, stained, and pre-finished options. Natural cork flooring has a rustic, organic look and can be stained or finished to match your decor. Stained cork flooring comes in a variety of colors and finishes to suit different tastes and preferences. Pre-finished cork flooring is coated with a protective finish at the factory, making it more durable and resistant to wear and tear.
Installation Method: Cork flooring can be installed using either a glue-down or floating installation method. Glue-down installation involves applying adhesive to the concrete subfloor and pressing the cork tiles or planks into place. Floating installation involves interlocking the cork tiles or planks without the need for adhesive. Consider your skill level, budget, and personal preference when choosing the installation method.
Underlayment Compatibility: When installing cork flooring on a concrete subfloor, it’s essential to choose an underlayment that is compatible with both the cork flooring and the concrete surface. Look for underlayment specifically designed for use with cork flooring and follow the manufacturer’s instructions for installation. A high-quality underlayment can help improve the insulation, soundproofing, and comfort of the cork flooring.
Moisture Resistance: Moisture is a common concern when installing cork flooring on concrete subfloors, as excess moisture can lead to mold, mildew, and damage to the flooring. Choose cork flooring with built-in moisture resistance or apply a moisture barrier or sealer to the concrete subfloor before installation. This helps protect the cork flooring from moisture damage and ensures a long-lasting finish.
Steps for Installing Cork Flooring on Concrete Subfloors
Installing cork flooring on concrete subfloors requires careful planning and attention to detail to ensure a successful and long-lasting finish. Cork flooring offers numerous benefits, including durability, comfort, and sustainability, making it an excellent choice for concrete subfloors. However, proper installation is essential for achieving the best results and maximizing the lifespan of your flooring. Here are the steps for installing cork flooring on concrete subfloors:
Prepare the Concrete Subfloor: Before installation, thoroughly clean and prepare the concrete subfloor to ensure a smooth and level surface. Remove any dirt, dust, debris, or residue, and repair any cracks, holes, or uneven areas. Use a primer to improve adhesion and apply a moisture barrier or sealer if necessary to protect the cork flooring from moisture damage.
Acclimate the Cork Flooring: Before installation, acclimate the cork flooring to the room where it will be installed. Remove the flooring from its packaging and allow it to sit in the room for at least 48 hours to adjust to the temperature and humidity levels. This helps prevent the expansion or contraction of the flooring after installation.
Plan the Layout: Carefully plan the layout of the cork flooring to ensure a balanced and aesthetically pleasing installation. Start by finding the center of the room and laying out the cork tiles or planks in a dry run to determine the best placement. Use spacers to maintain consistent spacing between tiles or planks and adjust the layout as needed to fit the space.
Install the Underlayment: If using an underlayment, install it according to the manufacturer’s instructions before laying the cork flooring. Roll out the underlayment over the concrete subfloor, leaving a small gap around the perimeter of the room to allow for expansion. Secure the underlayment in place with adhesive or tape as recommended.
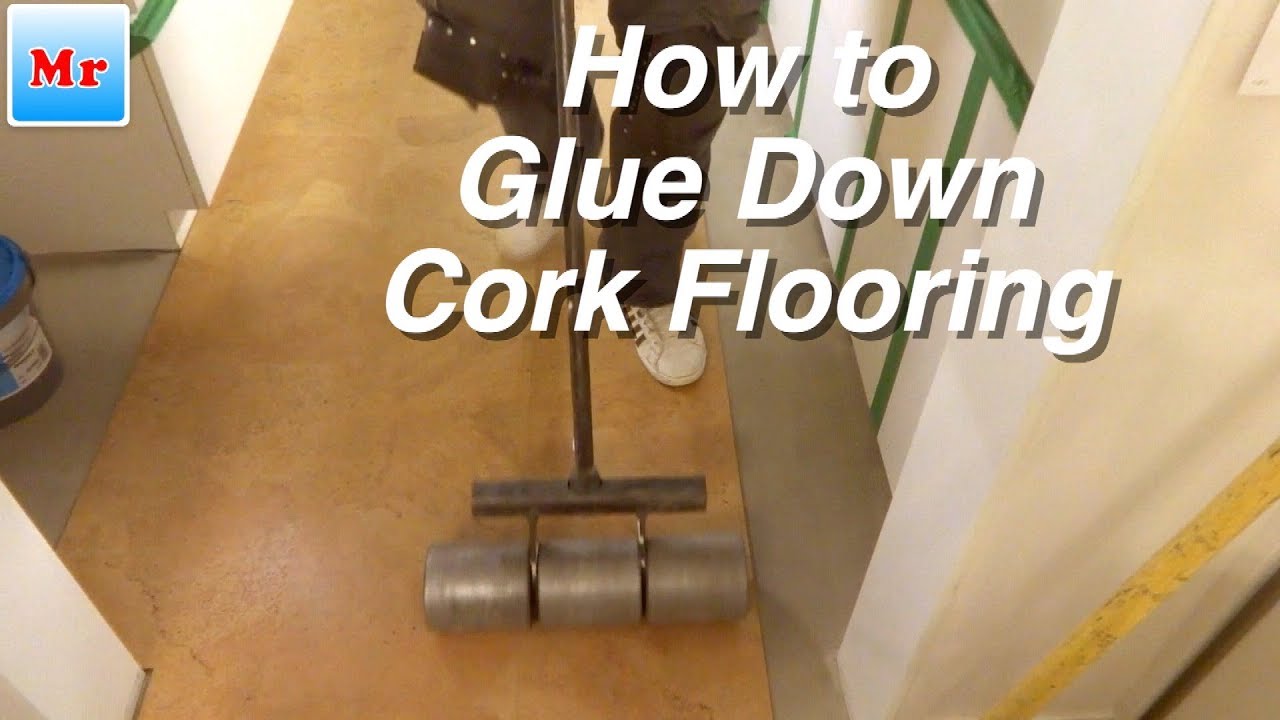
Apply Adhesive (if necessary): If using a glue-down installation method, apply adhesive to the concrete subfloor according to the manufacturer’s instructions. Use a trowel to spread the adhesive evenly over the surface, working in small sections at a time. Allow the adhesive to set for the specified amount of time before laying the cork flooring.
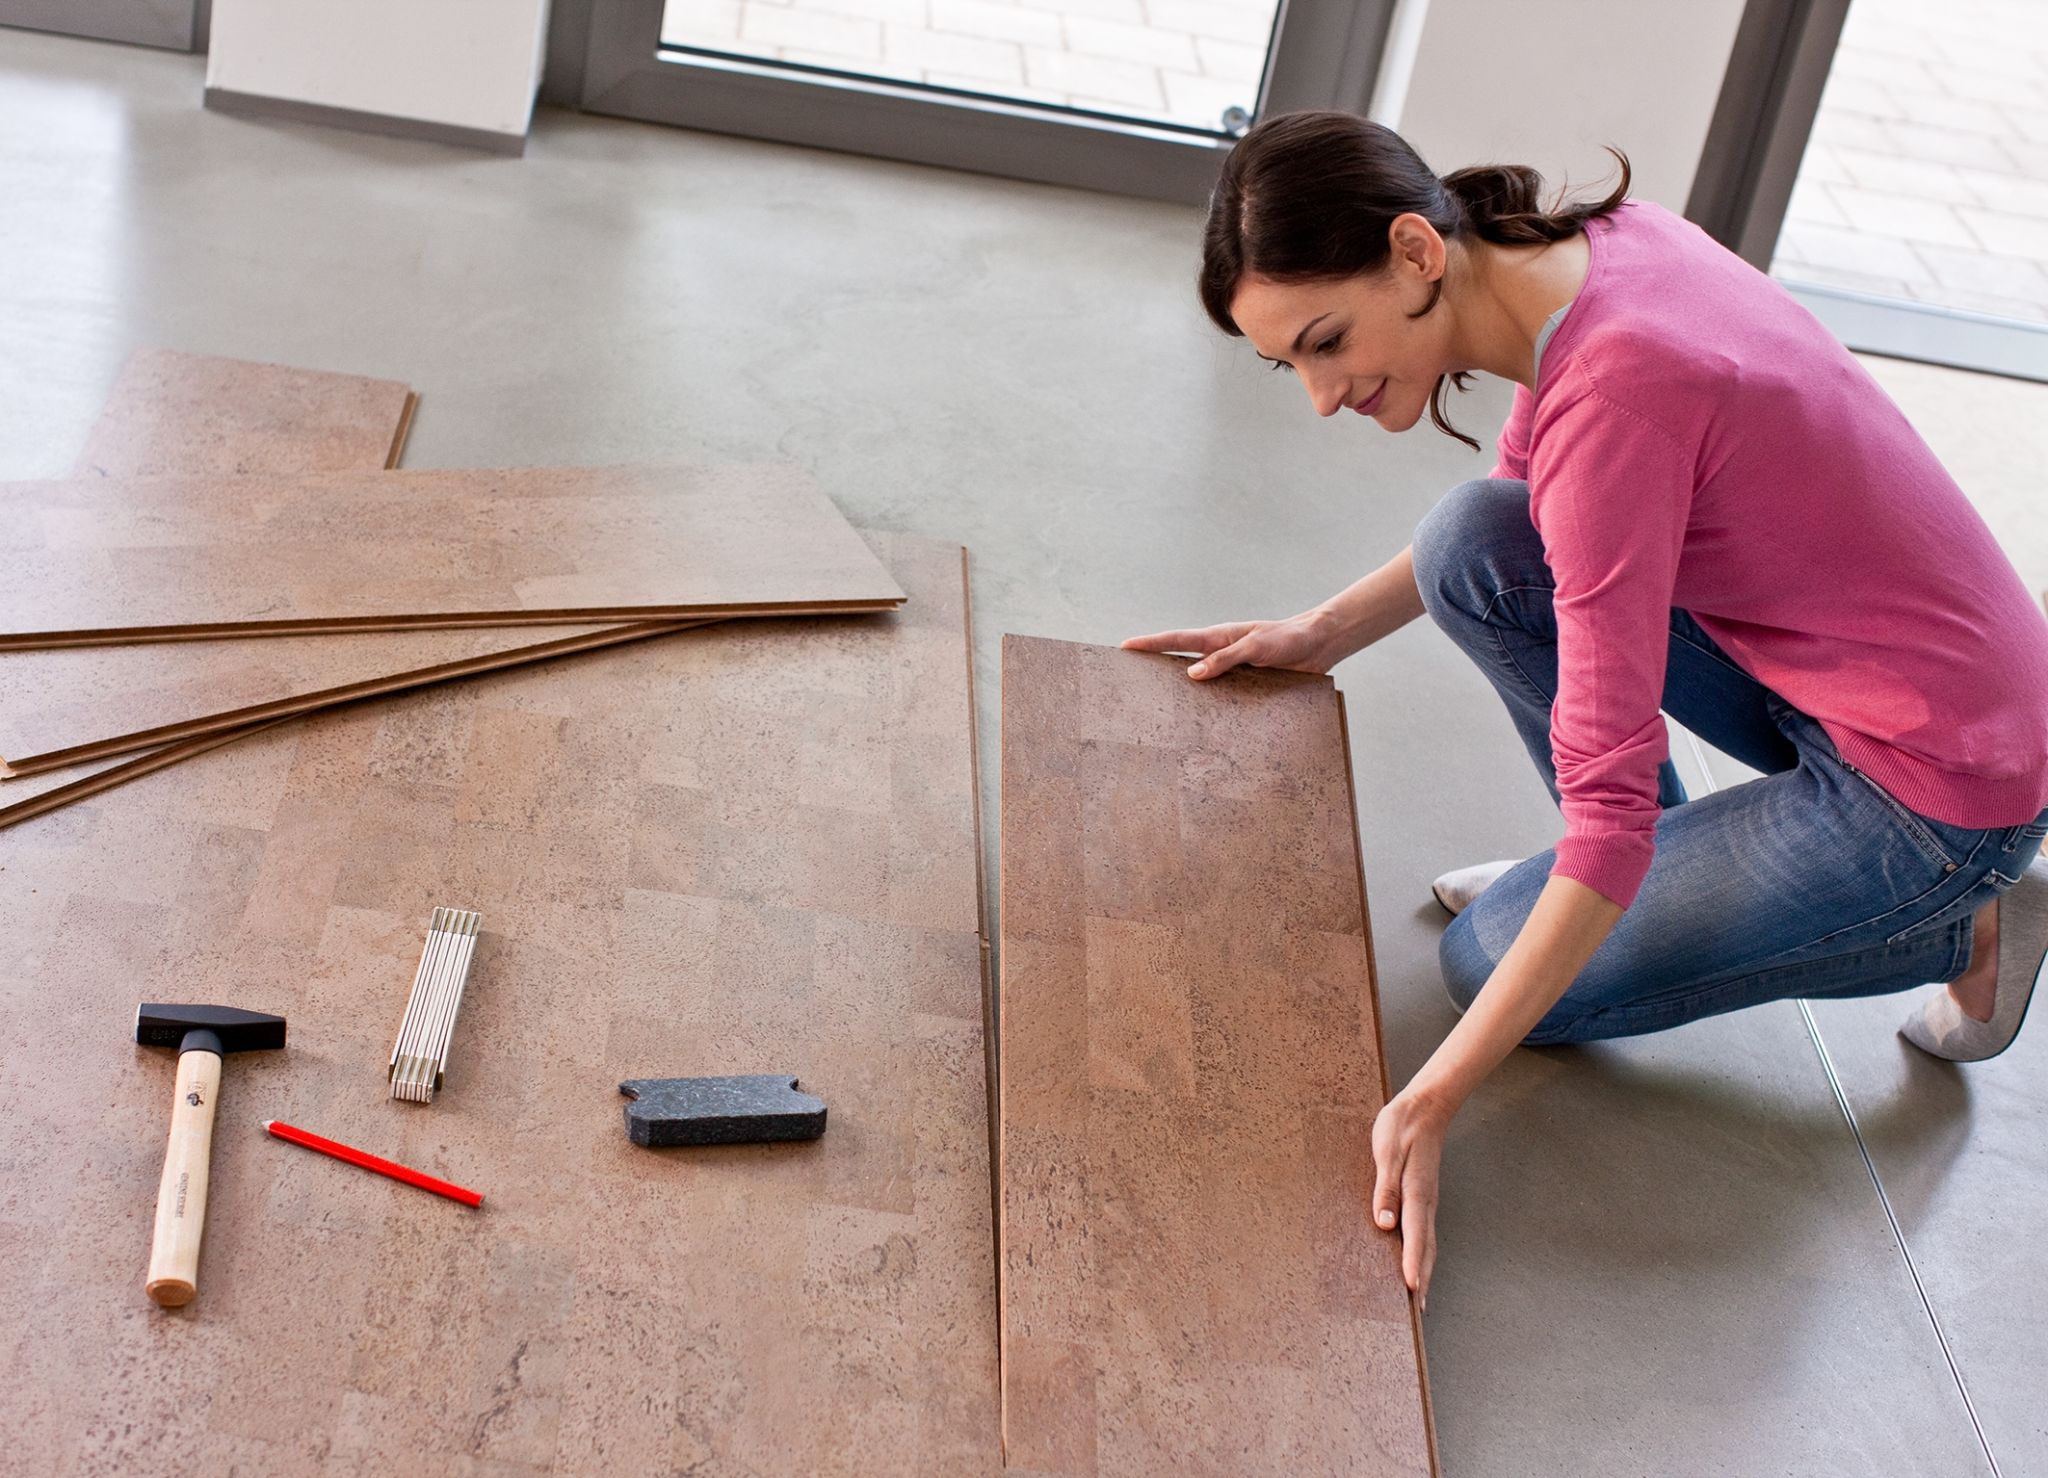
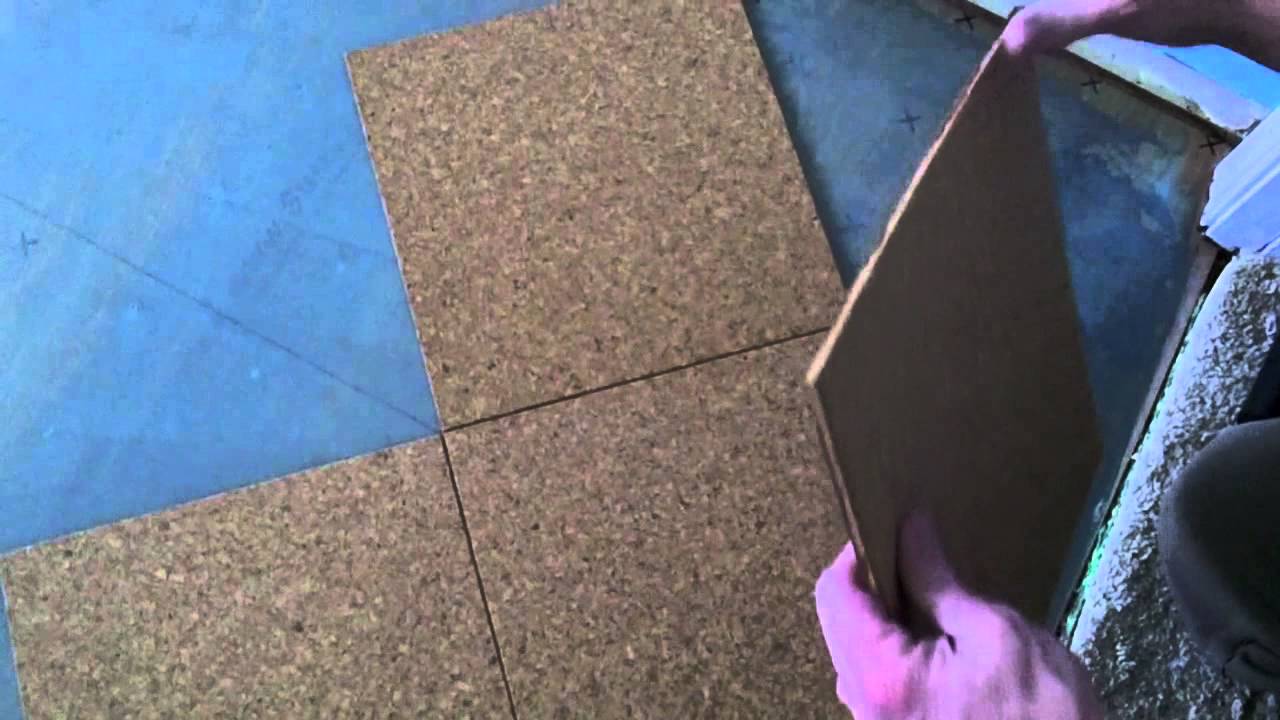
Install the Cork Flooring: Begin installing the cork flooring in one corner of the room, working your way across the room in rows. Place the first tile or plank in the corner, leaving a small gap around the perimeter of the room to allow for expansion. Use spacers to maintain consistent spacing between tiles or planks and ensure a uniform layout.
Cut Tiles as Needed: Use a utility knife or a jigsaw to cut cork tiles or planks as needed to fit around obstacles, corners, and edges. Measure carefully and make precise cuts to ensure a tight fit and professional-looking finish.
Secure the Flooring: Press the cork tiles or planks firmly into place, ensuring good contact with the adhesive or underlayment. Use a rubber mallet or tapping block to gently tap the tiles or planks into place and ensure a snug fit. Continue installing the flooring row by row until the entire room is covered.
Allow the Flooring to Set: Once the cork flooring is installed, allow it to set for the specified amount of time before walking on it or moving furniture back into the room. This allows the adhesive to cure and the flooring to acclimate to its new environment.
Finish the Edges: Once the main area of the room is covered, install baseboards or quarter-round molding around the perimeter of the room to cover any gaps and provide a finished look. Use adhesive or nails to secure the molding in place, taking care not to damage the cork flooring.
Tips and Tricks for a Successful Cork Flooring Installation on Concrete
Installing cork flooring on concrete subfloors requires careful planning, attention to detail, and the right tools and techniques to ensure a successful and long-lasting finish. Cork flooring offers numerous benefits, including durability, comfort, and sustainability, making it an excellent choice for concrete subfloors. However, proper installation is essential for achieving the best results and maximizing the lifespan of your flooring. Here are some tips and tricks for a successful cork flooring installation on concrete:
Choose the Right Cork Flooring: Before starting your installation, carefully choose the right cork flooring for your space. Consider factors such as thickness, finish, installation method, and moisture resistance to ensure the best fit for your needs. Thicker cork flooring provides better insulation and durability, while pre-finished options offer enhanced durability and ease of installation.
Prepare the Subfloor Thoroughly: Proper preparation of the concrete subfloor is essential for a successful cork flooring installation. Thoroughly clean the surface to remove any dirt, dust, debris, or residue, and repair any cracks, holes, or uneven areas. Use a primer to improve adhesion and apply a moisture barrier or sealer if necessary to protect the cork flooring from moisture damage.
Acclimate the Flooring: Before installation, acclimate the cork flooring to the room where it will be installed. Remove the flooring from its packaging and allow it to sit in the room for at least 48 hours to adjust to the temperature and humidity levels. This helps prevent the expansion or contraction of the flooring after installation.
Plan the Layout Carefully: Take the time to carefully plan the layout of the cork flooring to ensure a balanced and aesthetically pleasing installation. Start by finding the center of the room and laying out the cork tiles or planks in a dry run to determine the best placement. Use spacers to maintain consistent spacing between tiles or planks and adjust the layout as needed to fit the space.
Use the Right Tools and Techniques: Use the right tools and techniques for the installation to ensure a professional-looking finish. Choose a trowel with the correct notch size for the adhesive, and use a rubber mallet or tapping block to gently tap the tiles or planks into place. Cut tiles or planks carefully to fit around obstacles, corners, and edges, and ensure precise measurements for a tight fit.
Work in Small Sections: When installing cork flooring, work in small sections at a time to ensure proper adhesion and alignment. Apply adhesive to the subfloor and lay the cork tiles or planks row by row, pressing them firmly into place as you go. Avoid spreading adhesive over a large area at once, as it may dry before you have a chance to lay the flooring.
Allow for Expansion: Leave a small gap around the perimeter of the room to allow for expansion and contraction of the cork flooring. Use spacers to maintain consistent spacing between tiles or planks and ensure a uniform layout. Fill any gaps with matching caulk or filler once the flooring is installed to provide a seamless finish.
Follow Manufacturer’s Instructions: Always follow the manufacturer’s instructions for installation to ensure the best results and warranty coverage. Pay attention to recommended adhesive, underlayment, and installation techniques, and take the time to properly prepare the subfloor and acclimate the flooring before installation.
Protect the Flooring During Installation: Take care to protect the cork flooring during installation to avoid damage or staining. Use drop cloths or cardboard to cover the flooring and prevent spills, scratches, or marks from tools or equipment. Avoid walking on the flooring until the adhesive has fully cured and the flooring has set.
Allow Time for Curing: After installation, allow the cork flooring to cure for the specified amount of time before walking on it or moving furniture back into the room. This allows the adhesive to fully set and the flooring to acclimate to its new environment, ensuring a long-lasting finish.
Maintenance and Care Tips
Once your cork flooring is installed on a concrete subfloor, proper maintenance and care are essential to ensure its longevity and beauty. Cork flooring offers numerous benefits, including durability, comfort, and sustainability, making it an excellent choice for concrete subfloors. However, regular maintenance is necessary to protect the flooring from damage, wear, and tear. Here are some tips for maintaining and caring for cork flooring installed on concrete subfloors:
Regular Cleaning: Regular cleaning is essential for keeping cork flooring looking fresh and beautiful. Sweep or vacuum the floors regularly to remove dirt, dust, and debris, and mop with a damp mop and mild detergent or cork floor cleaner as needed to remove stains and spills. Avoid using harsh chemicals or abrasive cleaners, as these can damage the finish of the flooring.
Preventative Maintenance: Take steps to prevent damage to the cork flooring by using furniture pads or coasters under heavy furniture to prevent scratching and denting. Use area rugs or mats in high-traffic areas and near entryways to trap dirt and prevent it from being tracked onto the flooring. Avoid wearing high heels or cleats on the flooring, as these can cause scratches and indentations.
Protect from Sunlight: Direct sunlight can cause cork flooring to fade and discolor over time. To protect the flooring from sun damage, use blinds, curtains, or UV-blocking window film to reduce exposure to sunlight during peak hours. Rearrange furniture and rugs periodically to ensure even exposure and minimize fading.
Manage Moisture: While cork flooring is naturally resistant to moisture, excessive moisture can cause damage, warping, and mold growth. Wipe up spills and splashes immediately with a soft cloth or towel, and use mats or rugs in wet areas such as kitchens, bathrooms, and entryways to absorb excess moisture. Use a dehumidifier in humid environments to maintain optimal humidity levels and prevent moisture buildup.
Regular Maintenance Checks: Periodically inspect the cork flooring for signs of damage, wear, or discoloration. Look for scratches, dents, or stains, and address any issues promptly to prevent further damage. Clean and seal the flooring as needed to protect the surface and maintain its appearance.
Reapply Finish as Needed: Over time, the finish on cork flooring may wear away, leaving the surface vulnerable to damage and staining. Reapply a new coat of finish as needed to protect the flooring and restore its shine. Follow the manufacturer’s instructions for application and allow the finish to dry completely before walking on the flooring.
Avoid Excessive Moisture: While cork flooring is naturally resistant to moisture, excessive moisture can cause damage and warping. Avoid wet mopping or steam cleaning cork flooring, as this can cause moisture to seep into the seams and damage the flooring. Instead, use a damp mop or cloth with a mild detergent or cork floor cleaner for regular cleaning.
Protect from Sharp Objects: Sharp objects such as high heels, pet claws, or heavy furniture legs can scratch or dent cork flooring. Use furniture pads or coasters under heavy furniture legs to distribute weight evenly and prevent damage. Trim pets’ nails regularly to minimize scratches, and avoid dragging heavy objects across the flooring.
Use Protective Mats or Rugs: Place protective mats or rugs in high-traffic areas, near entryways, and in front of sinks and appliances to prevent wear and tear on cork flooring. Choose mats or rugs with non-slip backing to prevent accidents, and clean them regularly to remove dirt and debris.
Follow Manufacturer’s Guidelines: Always follow the manufacturer’s guidelines for maintenance and care to ensure the best results and warranty coverage. Use recommended cleaning products and techniques, and avoid using harsh chemicals or abrasive cleaners that can damage the finish of the flooring.
Cork Flooring Tiles Or Cork Floating Floor – ICork Floor
Acoustic Insulation Installation – Cork Flooring – ICork Floor
Installing Cork Flooring 2 – Construction Canada
How to Install Cork Tile Flooring (DIY) Family Handyman

Cork Floor Install – How to install a cork glue down floor.
How to Install Cork Tile Flooring (DIY) Family Handyman

Related Posts: