Preparing the Concrete Surface for Wood Flooring Installation
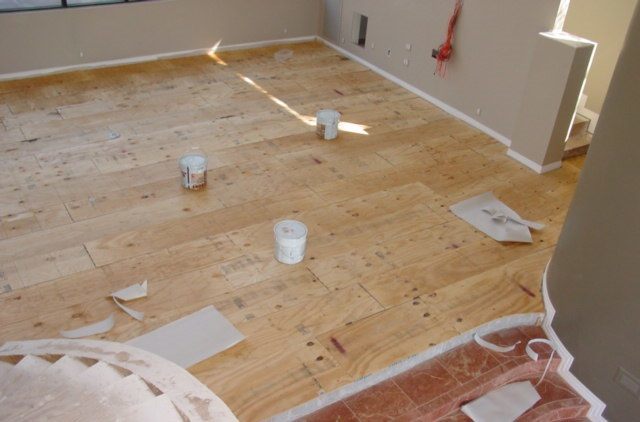
When I first decided to install wood flooring over concrete, I quickly learned that the most critical part of the process was preparing the concrete surface. Without a smooth, clean, and level foundation, the whole project can go sideways. That’s why I dedicate ample time to this step before diving into the actual installation. In my experience, the success of your flooring job truly hinges on how well you prepare that concrete slab.
- Inspecting the Surface for Damage: The first thing I do is give the concrete a thorough inspection. I look for cracks, chips, or any areas that might be uneven. Trust me, you don’t want to lay wood flooring over a slab that isn’t in tip-top shape. Small cracks may seem harmless, but they can grow over time, damaging your flooring. If there are significant cracks, I always make sure to fill them with a concrete repair compound. For minor imperfections, a simple patching kit will do the trick.
- Cleaning the Concrete Surface: Once I’ve made any necessary repairs, it’s time to clean the surface. Dust, dirt, and debris can wreak havoc on your wood floor installation, so I go over the slab with a vacuum, followed by a damp mop. I’ve found that using a mild detergent works best to remove any stubborn grime or stains. Just be sure to let the floor dry completely before moving on to the next step. A wet concrete surface can cause moisture issues down the road.
- Leveling the Concrete: One of the biggest challenges I faced was ensuring the surface was level. If your concrete floor isn’t level, your wood flooring won’t sit correctly, which can lead to warping or buckling. I always use a long level to check various areas of the floor. If there are any low spots, I fill them in with a self-leveling compound. For high spots, I’ve used a grinder to shave down the uneven areas. It’s tedious work, but the results are worth it.
- Checking for Moisture Issues: Concrete can retain moisture, which is a big no-no when you’re installing wood flooring. I always test for moisture by taping a piece of plastic sheeting to the concrete and leaving it for 24 hours. If there’s any condensation under the plastic, I know I need to take extra steps to deal with moisture, like applying a moisture barrier or dehumidifying the space. This step is crucial in preventing long-term damage to your wood flooring.
- Smoothing the Surface: After leveling, I go over the surface with a smoothing trowel or a concrete polisher. Even the tiniest bump can throw off the alignment of your wood planks. I’ve found that taking the time to smooth everything down ensures a cleaner installation. Plus, it makes the next steps much easier when you’re working with a perfectly smooth surface.
- Final Inspection Before Moving On: Before moving on to the next phase, I do one last inspection. This is when I double-check that the concrete is fully dry, level, and smooth. I also like to walk over the surface to make sure there are no hidden bumps or uneven areas. Once I’m satisfied, I feel confident moving on to the next crucial step in the process.
Choosing the Right Type of Wood Flooring for Concrete Subfloors
When it comes to choosing the perfect wood flooring for concrete, I quickly realized that not all wood flooring options are created equal. Since concrete can be more prone to moisture, selecting the right type of wood is essential to avoid future problems. After doing some research and trying a few types myself, I’ve come up with a solid list of considerations that have helped me make the best choices.
Engineered Wood vs. Solid Wood
One of the first decisions I had to make was whether to go with engineered wood or solid wood. For me, engineered wood was the obvious choice. It’s designed specifically to handle moisture better than solid wood, which is a huge benefit when installing over concrete. Engineered wood has a real wood veneer on top, but the layers beneath are made to withstand humidity and temperature changes. Solid wood, while beautiful, tends to warp or buckle in damp environments, so I usually avoid it when working with concrete.
Thickness and Durability
I’ve learned that the thickness of the wood plays a big role in durability. I always aim for planks that are at least 3/8 inch thick. Thicker wood provides more stability and can withstand the minor shifts that might happen with a concrete subfloor. Engineered wood comes in various thicknesses, so I pick a thicker option when I want a more solid feel underfoot, especially for high-traffic areas.
Click-Lock or Tongue-and-Groove?
There are a few different installation methods, but my go-to is click-lock wood flooring. It’s designed to snap together without nails or glue, making it ideal for a floating floor over concrete. Tongue-and-groove flooring requires either nails or adhesive, which can be a bit more involved when working with concrete. I prefer click-lock systems because they’re easier to install and remove, and they allow the wood to expand and contract without causing damage.
Moisture-Resistant Finishes
Since moisture is always a concern with concrete, I always choose wood flooring with a moisture-resistant finish. Some manufacturers offer pre-finished planks that come with a durable topcoat designed to repel water. I’ve found these types of finishes provide added protection, which is especially important in rooms like basements or areas with higher humidity.
Aesthetic Choices
Beyond the practical considerations, the look of the wood is just as important to me. I usually opt for species like oak, maple, or hickory because they’re known for their durability, but I also consider color and grain patterns. I’ve found that lighter woods tend to make a room feel more open, while darker tones create a cozier, more intimate atmosphere. It all comes down to the vibe I want for the space.
Sustainability Factors
Lastly, I like to consider eco-friendly options. Bamboo and cork are sustainable alternatives that work well over concrete, especially when you’re concerned about environmental impact. I’ve used bamboo flooring in the past and loved its durability and moisture resistance. It’s an excellent choice for anyone who wants to go green without sacrificing style or performance.
Installing a Moisture Barrier: Why It’s Essential
When I first started installing wood flooring over concrete, I didn’t fully appreciate the importance of a moisture barrier. Now, I wouldn’t dream of skipping this crucial step. Concrete is notorious for allowing moisture to seep through, and without a moisture barrier, that dampness can wreak havoc on your wood flooring. Here’s why I always make sure to install a moisture barrier and how it’s saved me from costly repairs down the road.
Preventing Water Damage
The biggest reason I installed a moisture barrier is to prevent water damage to my wood floors. Concrete absorbs moisture from the ground beneath it, which can rise up and seep into the wood. Over time, this moisture can cause the wood to warp, swell, or even rot. I’ve seen firsthand how quickly wood floors can get damaged without proper protection. A moisture barrier stops this from happening by creating a waterproof layer between the concrete and the wood.
Reducing Mold and Mildew Risks
Mold and mildew are other concerns when installing wood over concrete. Even a small amount of moisture trapped between the wood and concrete can create the perfect breeding ground for mold. Not only does mold cause unpleasant odors, but it can also lead to health issues. I always use a moisture barrier to keep the area dry and avoid any potential mold problems. It’s a simple step that offers peace of mind, especially in humid environments.
Protecting the Integrity of the Wood Flooring
A moisture barrier does more than just block water—it helps maintain the integrity of the wood. Wood is a natural material that expands and contracts based on humidity levels. By installing a moisture barrier, I’ve noticed that my wood floors stay more stable, with less warping or gapping over time. This stability means my floors last longer and look better without the need for frequent repairs or adjustments.
Types of Moisture Barriers
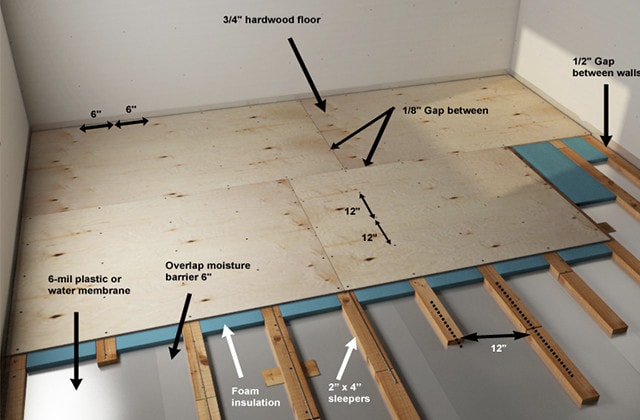
I’ve worked with a few different types of moisture barriers, and each has its advantages. The most common type I use is a plastic sheet barrier, which is affordable and easy to install. I simply roll it out over the concrete before laying down the underlayment or flooring. For added protection, I sometimes opt for a liquid-applied moisture barrier, which I paint onto the concrete like a sealant. This creates a more seamless barrier that’s great for high-moisture areas.
Installation Tips
Installing a moisture barrier isn’t difficult, but there are a few tricks I’ve picked up along the way. First, I always make sure to overlap the sheets by at least a few inches and tape the seams to create a continuous barrier. I also extend the barrier a few inches up the walls to prevent moisture from sneaking in at the edges. Lastly, I take my time smoothing out any wrinkles or bubbles to ensure the barrier lays flat and doesn’t interfere with the flooring installation.
Long-Term Benefits
The long-term benefits of installing a moisture barrier are undeniable. By taking this extra step, I’ve saved myself from expensive repairs and prolonged the life of my wood floors. Plus, knowing that my floors are protected from moisture gives me the confidence to install wood over concrete in basements, bathrooms, or other areas where I might have been hesitant before. It’s a small investment with huge returns in the durability and appearance of my floors.
Laying Down an Underlayment for Added Comfort and Soundproofing
One of the most overlooked steps in wood flooring installation, in my opinion, is laying down an underlayment. While it might seem optional, I’ve learned that it makes a world of difference in both comfort and soundproofing, especially when installing over concrete. Whenever I tackle a new flooring project, I make sure to choose the right underlayment to ensure my floors feel soft underfoot and are quieter to walk on.
Why Underlayment is Important
I’ve found that the underlayment serves multiple purposes. First and foremost, it acts as a cushion between the hard concrete and the wood flooring, which makes walking on the floor much more comfortable. Without underlayment, the floor feels hard and unforgiving. It also helps with soundproofing, reducing the noise of footsteps and other impacts. These benefits alone are reason enough for me to never skip this step.
Types of Underlayment
Over the years, I’ve experimented with different types of underlayment, each offering its advantages. Foam underlayment is the most common, and it’s easy to work with. It provides good cushioning and sound reduction without being too expensive. Cork underlayment is another favorite of mine because it’s a natural material that offers great insulation and soundproofing properties. Felt underlayment is another option, which adds an extra layer of warmth, making it ideal for colder climates.
Installation Made Simple
Laying down underlayment is one of the easiest parts of the whole flooring process. I roll it out over the moisture barrier, making sure it covers the entire area where I plan to install the wood flooring. I overlap the edges slightly and use tape to hold the pieces together. What’s great about this step is that there’s no need for nails, glue, or staples, so it’s a fast and straightforward process.
Improved Insulation
One of the surprising benefits I’ve noticed with underlayment is the improvement in insulation. Concrete floors can get cold, especially in basements or ground-level rooms. By adding underlayment, I’ve found that the floors retain more heat, making the room feel warmer and more comfortable, especially in the winter months. It’s a small investment that can make a big difference in the overall comfort of the space.
Soundproofing Perks
If you’ve ever walked on a wood floor without underlayment, you know how loud it can be. I’ve made the mistake of skipping underlayment in the past, only to regret it later when every footstep echoed through the house. Underlayment absorbs the impact of footsteps, reducing the sound significantly. This is especially important in multi-level homes where noise can easily travel between floors.
Long-Term Benefits of Underlayment
While the immediate benefits of comfort and soundproofing are clear, underlayment also helps extend the life of the wood flooring. It acts as a buffer, protecting the wood from the hard concrete below. I’ve noticed that my floors tend to show less wear and tear over time when I use underlayment, and the planks stay more secure without shifting or creaking. It’s one of those small details that make a big difference in the longevity of the installation.
Step-by-Step Guide to Installing Wood Flooring Over Concrete
Installing wood flooring over concrete can seem daunting, but once I figured out the right process, it became much more manageable. In fact, with the right tools and a clear plan, it’s a project that can be tackled by any dedicated DIYer. I’ve broken down the installation process into clear, easy-to-follow steps to help you get started on your wood flooring project.
Gathering the Necessary Tools and Materials
Before starting any project, I always make sure I have everything I need. For this installation, the essentials include a tape measure, a saw (for cutting planks), spacers, a rubber mallet, a tapping block, and a moisture barrier. I also make sure to have my underlayment and wood flooring planks on hand. Getting organized from the start helps me avoid unnecessary delays.
Preparing the Concrete Subfloor
As I mentioned earlier, preparing the concrete surface is key. After cleaning, repairing, and leveling the concrete, I lay down the moisture barrier to prevent any potential moisture issues. I take my time to ensure everything is properly sealed and ready for the next steps. A well-prepped subfloor ensures that the rest of the installation goes smoothly.
Installing the Underlayment
After the moisture barrier is in place, I roll out the underlayment. This step is simple but essential for comfort and soundproofing. I make sure the underlayment covers the entire floor area, overlapping the edges and taping them together to create a seamless surface. Once this layer is down, I’m ready to start laying the wood planks.
Laying the First Row of Planks
Starting the first row of wood planks is always the most critical step. I make sure to leave a small gap (about 1/4 inch) between the planks and the wall to allow for expansion. This gap is maintained using spacers. I take my time with this first row because it sets the foundation for the entire floor. If the first row isn’t straight, the rest of the floor will be off.
Connecting the Planks
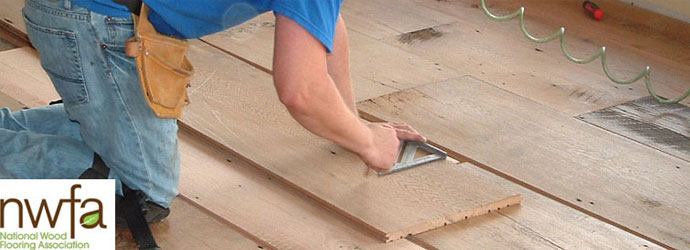
With the first row in place, I start connecting the rest of the planks. If I’m using a click-lock system, the planks snap together easily, and I use a rubber mallet and tapping block to ensure they’re securely connected. If I’m using tongue-and-groove planks, I apply adhesive to the seams or nail the planks into place. I’ve found that working row by row, I can maintain an even, tight fit across the entire floor.
Cutting Planks to Fit
As I work my way across the room, I inevitably need to cut some planks to fit the edges. A saw comes in handy here, and I always double-check my measurements before making any cuts. The goal is to create a seamless look with no gaps between the planks. I also ensure that no two seams line up perfectly, which helps create a more natural, staggered look.
Securing the Wood Planks: Nail, Glue, or Floating Installation Methods
Choosing the right method to secure the wood planks over concrete is one of the most important decisions I make during installation. Each method—nailing, gluing, or using a floating floor—has its pros and cons. I’ve tried all three, and I want to share my experiences with each to help you decide which method might be the best for your project.
The Pros and Cons of Nailing
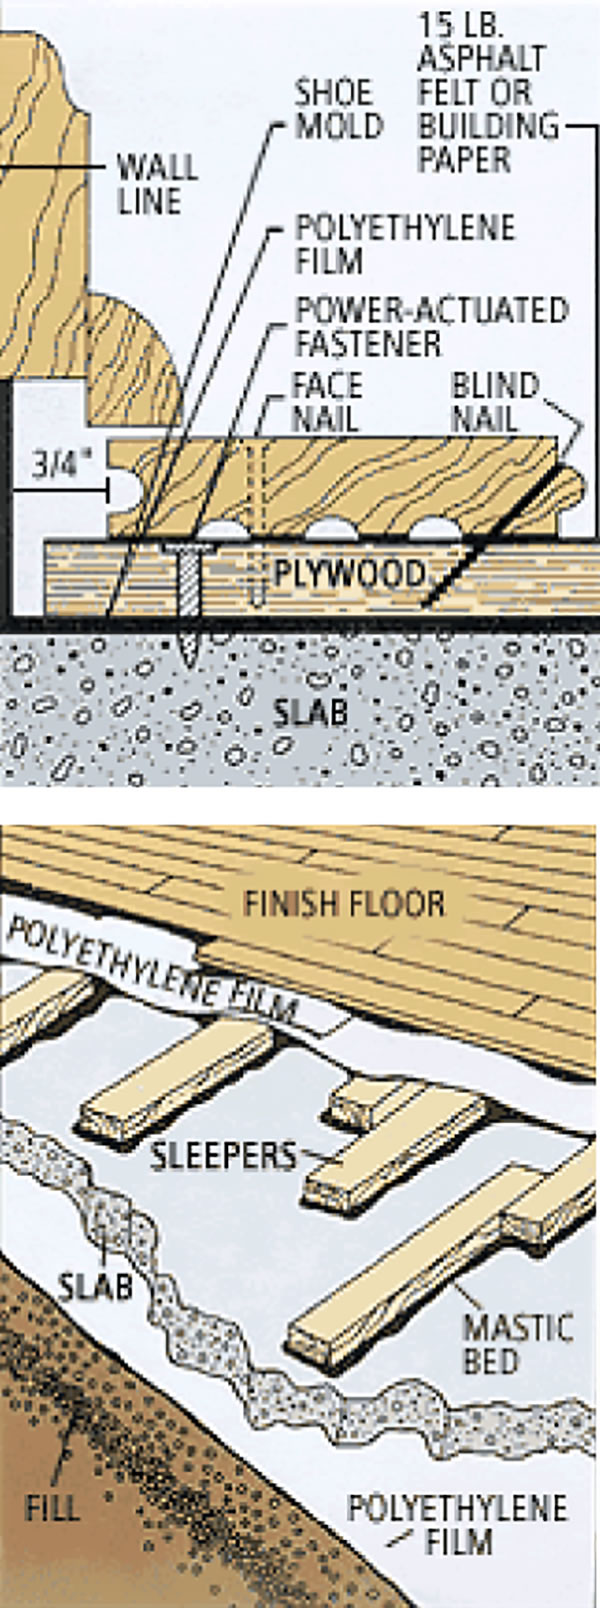
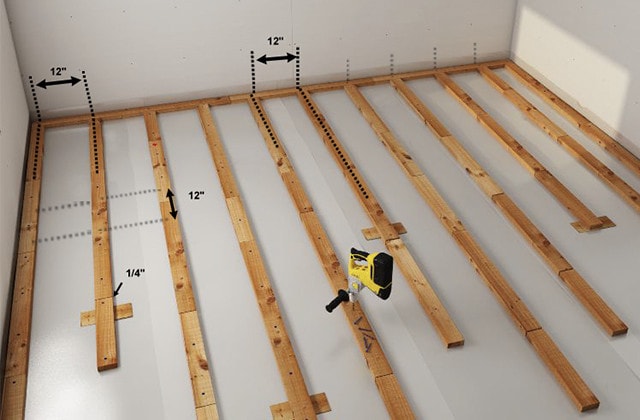
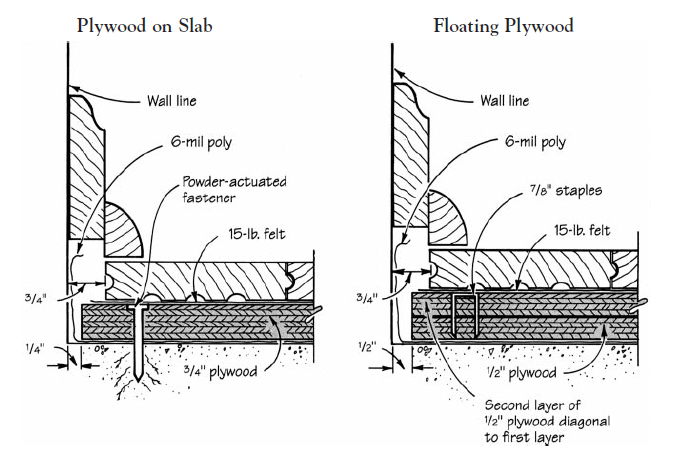
Nailing is a traditional method for installing wood floors, but it’s not always the best option when working over concrete. The biggest challenge is that concrete doesn’t hold nails well, so this method requires a plywood subfloor to be installed first. While this adds to the overall cost and time of the project, it does provide a very secure installation. I typically avoid this method unless I’m installing over a raised subfloor that’s already in place.
Using Adhesive to Secure the Planks
Gluing the planks down is a method I’ve used in high-traffic areas where I want a super-secure floor. For this method, I apply a special wood flooring adhesive to the concrete before laying each plank. It creates a strong bond, which helps prevent the planks from shifting over time. The downside? It can get messy, and once the planks are glued, they’re hard to remove. I always make sure I’m 100% happy with the layout before committing to this method.
The Floating Floor Method
The floating floor method has quickly become my favorite for installing wood over concrete. In this method, the planks aren’t secured to the subfloor with nails or glue—they simply snap together and “float” over the concrete. This makes installation quicker and easier, and if I ever need to replace a plank, I can do so without tearing up the entire floor. Floating floors also allow for more expansion and contraction, which is a big plus in environments with fluctuating temperatures and humidity.
When to Choose Nails
Nailing might be the best option if you’re working with a raised plywood subfloor or if you’re using solid wood planks. This method provides a traditional, timeless installation that feels sturdy and permanent. I’ve found it’s best for areas where I want to avoid any potential movement, but it’s definitely more labor-intensive.
When to Choose Glue
If I’m looking for a super-secure bond and I don’t mind putting in a bit more effort, gluing is a solid choice. I recommend this method for areas with high foot traffic, like hallways or kitchens, where I want to ensure the planks stay in place for the long haul. The key to success with this method is using a high-quality adhesive designed specifically for wood flooring.
When to Choose Floating Floors
For most DIY projects, I recommend the floating floor method. It’s fast, easy, and forgiving, especially for first-timers. I’ve used this method in several rooms with great success, and the results have always been fantastic. Floating floors are also ideal if you want to install over-radiant heating systems, as they allow for more flexibility in the material.
Finishing Touches: Sanding, Sealing, and Maintenance Tips
Once the wood flooring is installed, it’s tempting to call the project done, but the finishing touches are just as important as the installation itself. Sanding, sealing, and regular maintenance are the keys to ensuring that my wood floors stay beautiful and durable for years to come. I always take the time to finish the job properly, knowing it will save me from headaches down the road.
Sanding the Surface
If I’m installing unfinished wood flooring, sanding is a necessary step before applying any sealant. I use a floor sander to smooth out the surface and ensure an even finish. Sanding also removes any small imperfections or rough spots that might have occurred during installation. I start with a coarse grit to remove any obvious issues, then finish with a finer grit for a silky-smooth surface.
Choosing the Right Sealant
Once the floor is sanded, it’s time to apply a sealant. I’ve experimented with different types, but polyurethane has always been my go-to. It creates a durable, waterproof barrier that protects the wood from scratches, spills, and general wear and tear. I usually opt for a water-based polyurethane because it dries faster and has less odor, but oil-based sealants tend to offer a richer finish.
Applying the Sealant
Applying the sealant requires some patience, but it’s worth the effort. I use a high-quality brush or roller to apply an even coat, making sure to work in the direction of the wood grain. After the first coat dries, I lightly sand the surface again with fine grit paper before applying a second coat. Depending on the traffic the floor will see, I sometimes add a third coat for extra protection.
Allowing Proper Drying Time
One of the most important lessons I’ve learned is to give the sealant plenty of time to dry. Rushing this step can ruin all the hard work. I usually wait at least 24 hours before walking on the floor, and if possible, I give it a full 48 hours to cure completely. This ensures that the sealant hardens properly and provides maximum protection for the wood.
Regular Cleaning and Maintenance
To keep my wood floors looking their best, I follow a regular cleaning routine. I avoid using harsh chemicals or excessive water, as these can damage the sealant and warp the wood. Instead, I stick to a dry mop or a damp cloth for daily cleaning, and I use a wood-friendly cleaner when needed. I also make sure to clean up any spills immediately to prevent water from seeping into the seams.
Long-Term Care Tips
Over time, wood floors can start to show signs of wear, but with a little maintenance, they can last a lifetime. I’ve found that applying a fresh coat of sealant every few years keeps the floor looking new and protects it from damage. If the floor starts to look dull, a quick buffing can bring back its original shine. By taking the time to care for the floors, I ensure they remain a beautiful and functional part of my home for years to come.
Installing Plywood Flooring Over Concrete ⋆  ThePlywood.com
Solid Wood Floors Over Concrete Slabs
How to Install Hardwood Floors on Concrete Slab
Installing Hardwood Floors on Concrete
Related Posts:


