Garage Floor Epoxy Overview
Epoxy is a two-part coating consisting of a resin and a hardener. When these components are mixed, they create a chemical reaction that forms a hard, plastic-like coating that bonds tightly to the concrete surface. Epoxy coatings are popular for garage floors because of their durability, resistance to chemicals, and attractive finish.
- Durability and Protection: One of the primary benefits of applying epoxy to your garage floor is its durability. Epoxy creates a hard, impact-resistant surface that can withstand heavy traffic, dropped tools, and the weight of vehicles without cracking or chipping. It also protects the concrete underneath from stains, moisture, and wear, extending the life of your garage floor.
- Chemical Resistance: Epoxy is highly resistant to chemicals, making it an ideal choice for garages where vehicles are parked or where you work with automotive fluids, paints, and other substances that could stain or damage bare concrete. Spills can be easily wiped up without leaving permanent marks, and the epoxy will protect the floor from corrosive chemicals like oil, gasoline, and antifreeze.
- Ease of Cleaning: An epoxy-coated garage floor is much easier to clean than bare concrete. Dust, dirt, and debris can be easily swept away, and the smooth surface prevents substances from soaking in, so stains are less likely to occur. A simple mop with water and mild detergent is usually all that’s needed to keep the floor looking fresh.
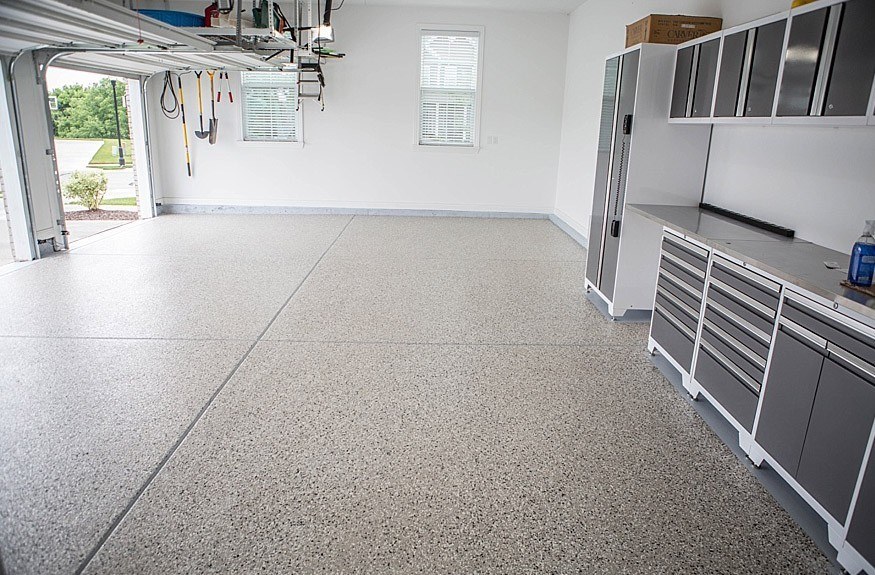
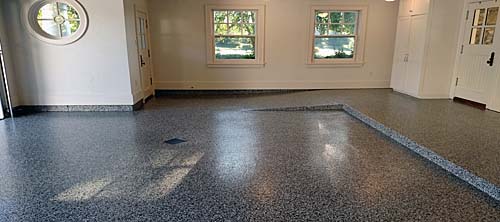
- Aesthetic Appeal: Epoxy coatings are available in a variety of colors and finishes, allowing you to customize the look of your garage floor. You can choose from solid colors, or metallic finishes, or add decorative flakes to create a textured, non-slip surface. This flexibility means you can create a garage floor that matches your style and complements the rest of your home.
- Light Reflection: The glossy finish of an epoxy-coated floor enhances the lighting in your garage by reflecting light off the surface. This can make your garage brighter and more pleasant to work in, reducing the need for additional lighting. The improved visibility is especially beneficial if you use your garage as a workshop or storage space.
- Increased Home Value: Applying epoxy to your garage floor is an investment that can increase the value of your home. A well-maintained, attractive garage floor can be a selling point for potential buyers, making your home stand out in the real estate market. The long-lasting nature of epoxy means it will continue to add value for years to come.
Choosing the Right Epoxy for Your Garage Floor
Not all epoxy products are created equal, so choosing the right one for your garage floor is crucial for achieving the best results. Several factors come into play when selecting an epoxy coating, including the type of epoxy, the level of traffic your garage floor will endure, and your budget.
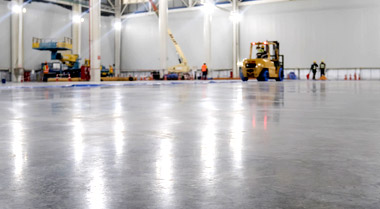
100% Solid Epoxy: For the most durable and long-lasting finish, 100% solid epoxy is the best choice. This type of epoxy contains no solvents, meaning it provides a thicker, more resilient coating. It’s often used in commercial and industrial settings due to its superior performance, but it requires careful application and is more expensive than other options.
Water-Based Epoxy: Water-based epoxy is easier to apply and less expensive than 100% solid epoxy, making it a popular choice for DIY projects. While not as durable as solid epoxy, water-based epoxy still provides a strong, attractive finish that’s resistant to most household chemicals. It’s also more environmentally friendly, as it emits fewer volatile organic compounds (VOCs).
Solvent-Based Epoxy: Solvent-based epoxy falls somewhere between 100% solid and water-based epoxy in terms of durability and ease of application. It provides a strong finish and is more resistant to stains and chemicals than water-based options. However, solvent-based epoxy emits more VOCs and requires proper ventilation during application.
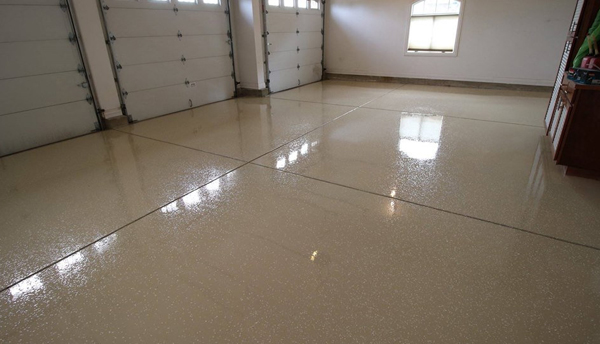
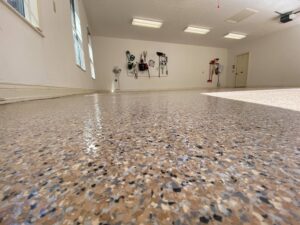
Epoxy with Decorative Flakes: If you want to add texture and visual interest to your garage floor, consider an epoxy kit that includes decorative flakes. These flakes are sprinkled onto the wet epoxy and create a speckled, granite-like appearance. In addition to enhancing the look of your floor, the flakes also add a non-slip texture, which can be beneficial in a garage setting.
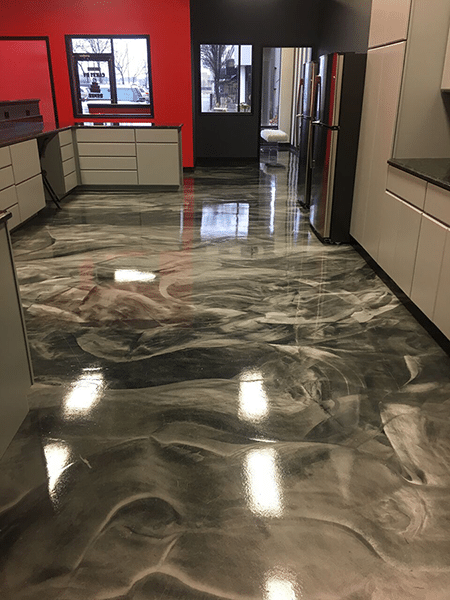
Metallic Epoxy: For a high-end, unique finish, metallic epoxy is a great option. This type of epoxy contains metallic pigments that create a shimmering, three-dimensional effect on the floor. While more expensive and challenging to apply, metallic epoxy can transform your garage floor into a work of art that’s sure to impress.
Epoxy Paint vs. Epoxy Coating: It’s important to note that epoxy paint is not the same as an epoxy coating. Epoxy paint typically contains a small amount of epoxy resin, but it’s mostly latex paint. While it’s easier to apply, it doesn’t provide the same level of durability or chemical resistance as a true epoxy coating. For a long-lasting garage floor, opt for an epoxy coating rather than epoxy paint.
Preparing Your Garage Floor for Epoxy Application
Proper preparation is the key to a successful epoxy application. Skipping or rushing through the preparation steps can lead to poor adhesion, bubbling, and other issues that will detract from the appearance and durability of the floor. Taking the time to prepare the concrete surface correctly will ensure that the epoxy bonds properly and provides a flawless finish.
Cleaning the Floor: The first step in preparing your garage floor is to clean it thoroughly. Remove all items from the garage and sweep away any dirt, dust, and debris. Use a degreaser to remove oil stains, grease, and other contaminants that could prevent the epoxy from adhering to the concrete. For stubborn stains, you may need to use a scrub brush or a power washer.
Etching the Concrete: After cleaning, the next step is to etch the concrete to create a rough surface that the epoxy can bond to. Etching involves applying a solution of muriatic acid and water to the floor, which opens up the pores in the concrete. Follow the manufacturer’s instructions for mixing and applying the acid, and be sure to wear protective gear, including gloves, goggles, and a mask.
Repairing Cracks and Holes: Before applying epoxy, it’s essential to repair any cracks, holes, or other imperfections in the concrete. Use a concrete patching compound to fill in these areas, and smooth them out with a trowel. Allow the repairs to cure according to the manufacturer’s instructions before moving on to the next step.
Testing for Moisture: Moisture can interfere with the epoxy’s ability to bond to the concrete, so it’s important to test the floor for moisture before application. Tape a square of plastic sheeting to the floor and leave it in place for 24 hours. If condensation forms under the plastic, the concrete is too wet to apply epoxy, and you’ll need to address the moisture issue before proceeding.
Sanding the Surface: For the best results, lightly sand the surface of the concrete after etching and repairing. This will create an even rougher surface, ensuring maximum adhesion of the epoxy. Use a floor buffer with a sanding attachment or a handheld grinder, and vacuum up the dust afterward.
Applying a Primer: Applying a primer before the epoxy will enhance adhesion and provide a more even finish. Some epoxy kits include a primer, while others may require you to purchase it separately. Roll on the primer with a paint roller, following the manufacturer’s instructions, and allow it to dry completely before applying the epoxy.
Applying Epoxy to Your Garage Floor
Once the garage floor is properly prepared, you’re ready to apply the epoxy. This process requires attention to detail and careful timing to ensure a smooth, even finish. Here’s how to apply epoxy to your garage floor step by step.
Mixing the Epoxy: Start by mixing the resin and hardener components of the epoxy according to the manufacturer’s instructions. Use a drill with a mixing attachment to ensure the components are thoroughly combined. Once mixed, you’ll need to work quickly, as the epoxy will begin to harden after a certain amount of time, known as the pot life.
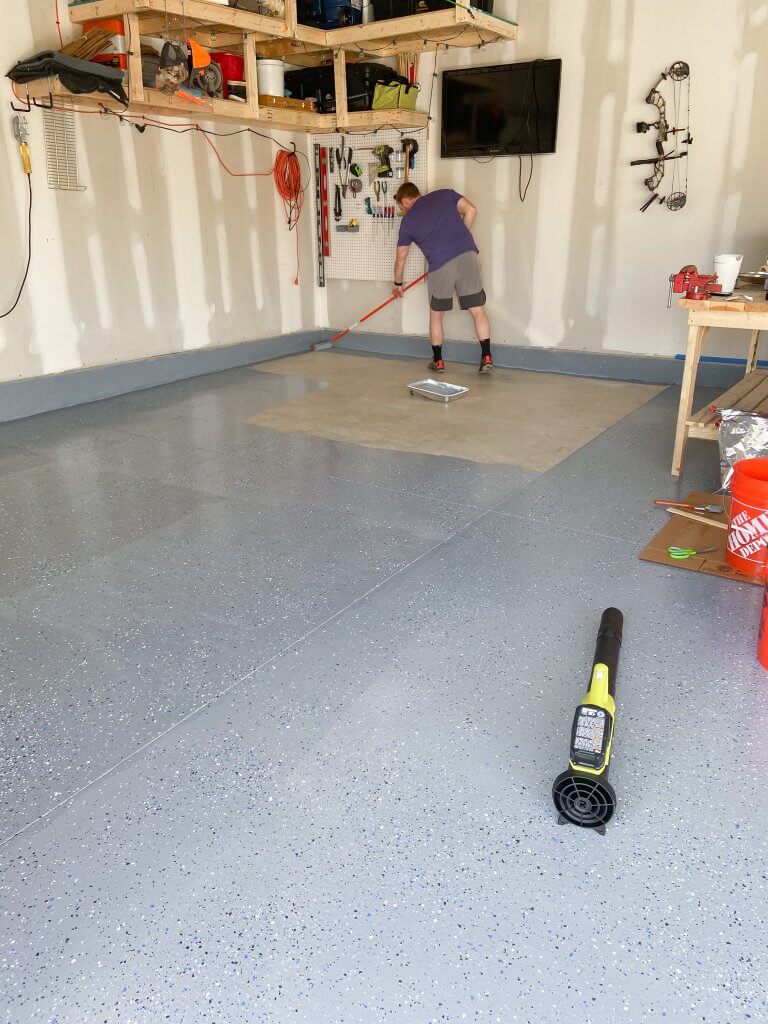
Cutting in the Edges: Begin by cutting in the edges of the garage floor with a paintbrush or a small roller. This means applying epoxy along the edges of the floor, where it meets the walls, and around any obstacles like columns or doorways. Cutting in ensures that you’ll have a clean, even finish along the edges.
Rolling on the Epoxy: After cutting in the edges, use a paint roller to apply the epoxy to the rest of the floor. Work in small sections, rolling the epoxy in a thin, even layer. Be sure to maintain a wet edge to prevent lap marks and uneven application. Depending on the size of your garage, you may need a helper to mix additional batches of epoxy as you work.
Applying Decorative Flakes: If you’re using decorative flakes, sprinkle them onto the wet epoxy as you go. Hold the flakes about a foot above the floor and toss them in a gentle, underhand motion to achieve even coverage. You can add as many or as few flakes as you like, depending on the look you’re going for. Be sure to apply the flakes while the epoxy is still wet.
Allowing the Epoxy to Cure: After the epoxy is applied, it needs time to cure. This process can take anywhere from 24 to 72 hours, depending on the temperature and humidity. During this time, avoid walking on the floor or placing anything on it. The longer you allow the epoxy to cure, the harder and more durable the finish will be.
Applying a Topcoat: Once the epoxy has cured, consider applying a clear topcoat for added protection. A topcoat can enhance the durability of the floor and provide additional resistance to chemicals, stains, and UV rays. Apply the topcoat in the same way as the epoxy, using a roller to ensure even coverage. Allow the topcoat to cure fully before using the garage.

Maintaining Your Epoxy Garage Floor
An epoxy-coated garage floor is relatively low-maintenance, but regular care will help keep it looking its best and extend its lifespan. With proper maintenance, your epoxy floor can remain glossy, durable, and free from damage for many years.
Regular Cleaning: Sweep or vacuum your epoxy garage floor regularly to remove dirt, dust, and debris. This helps prevent scratches and keeps the surface looking clean. For more thorough cleaning, use a mop with warm water and a mild detergent. Avoid using harsh chemicals or abrasive cleaners, as they can damage the epoxy finish.
Addressing Spills and Stains: While epoxy is resistant to most chemicals, it’s still a good idea to clean up spills as soon as possible. Use a cloth or paper towel to wipe up spills, and if necessary, use a mild detergent and water to clean the area. For stubborn stains, you can use a soft brush to gently scrub the surface.
Preventing Scratches: To prevent scratches, place mats or rugs in high-traffic areas, such as where your car enters the garage. Avoid dragging heavy items across the floor, as this can cause scratches or gouges in the epoxy. If you need to move heavy objects, use a dolly or lift them to avoid damaging the floor.
Reapplying the Topcoat: Over time, the topcoat of your epoxy floor may wear down, especially in areas with heavy traffic. If you notice that the finish is becoming dull or showing signs of wear, you can reapply the topcoat to restore the floor’s shine and protection. Be sure to clean and lightly sand the surface before applying a new layer of topcoat.
Inspecting for Damage: Periodically inspect your epoxy floor for any signs of damage, such as chips, cracks, or peeling. If you notice any issues, address them promptly to prevent further damage. Small chips and cracks can be repaired with an epoxy repair kit, while larger issues may require professional assistance.
Avoiding Excessive Moisture: While epoxy is resistant to moisture, excessive water exposure can cause issues, especially if the floor is not properly sealed. Avoid flooding the floor with water, and promptly dry any areas that become wet. In humid climates, using a dehumidifier in your garage can help prevent moisture buildup.

Common Mistakes to Avoid
When applying epoxy to your garage floor, certain mistakes can lead to poor results and a shorter lifespan for the floor. Avoid these common pitfalls to ensure a successful DIY epoxy application.
Insufficient Surface Preparation: Skipping or rushing the surface preparation is one of the most common mistakes when applying epoxy. Without proper cleaning, etching, and repairing, the epoxy may not adhere correctly, leading to peeling or bubbling.
Ignoring the Pot Life: Epoxy has a limited pot life, which is the amount of time you have to work with it after mixing. Ignoring this time limit can result in the epoxy hardening in the container before you’ve applied it, making it unusable.
Applying Epoxy in the Wrong Conditions: Temperature and humidity play a crucial role in the curing process of epoxy. Applying epoxy in extreme temperatures or high humidity can affect its bonding and lead to an uneven finish. Always follow the manufacturer’s recommendations for ideal application conditions.
Skipping the Primer: A primer helps the epoxy adhere better to the concrete and provides a more even finish. Skipping this step can result in poor adhesion and a less durable floor.
Overloading on Decorative Flakes: While decorative flakes can enhance the appearance of your epoxy floor, adding too many can affect the durability of the surface. Stick to the manufacturer’s guidelines for flake application to avoid creating a weak surface.
Not Allowing Enough Curing Time: Rushing the curing process by walking on the floor or moving items back into the garage too soon can damage the epoxy. Give the floor ample time to cure fully before using the space.
How long does it take to apply epoxy to a garage floor?
The time it takes to apply epoxy to a garage floor depends on several factors, including the size of the garage, the condition of the concrete, and the type of epoxy used. Generally, the preparation process, including cleaning, etching, and repairs, can take a full day. Applying the epoxy itself can take another day, and curing times can range from 24 to 72 hours. Overall, you should plan for the project to take several days from start to finish.
Can I apply epoxy to a previously painted garage floor?
Yes, you can apply epoxy over a previously painted garage floor, but it requires careful preparation. The existing paint must be in good condition, with no peeling or chipping. You’ll need to sand the paint to create a rough surface for the epoxy to bond to, and thoroughly clean the floor to remove any dust or debris. Applying a primer designed for use over painted surfaces can also help improve adhesion.
Is epoxy garage flooring slippery?
Epoxy flooring can be slippery when wet, especially if it has a glossy finish. To reduce the risk of slipping, consider adding a non-slip additive to the epoxy during application or incorporating decorative flakes that create a textured surface. These measures can improve traction and make the floor safer to walk on, particularly in areas where water or oil spills are likely.
How long does an epoxy garage floor last?
With proper application and maintenance, an epoxy garage floor can last 10 to 20 years or more. Factors such as the quality of the epoxy, the amount of traffic the floor receives, and how well it’s maintained will all affect its lifespan. Regular cleaning, avoiding harsh chemicals, and reapplying the topcoat as needed can help extend the life of your epoxy floor.
Can I apply epoxy to a garage floor with cracks or damage?
Yes, but you’ll need to repair the cracks or damage before applying the epoxy. Use a concrete patching compound to fill in any cracks, holes, or other imperfections in the floor. Allow the repairs to cure completely, and sand them smooth before proceeding with the epoxy application. Properly repairing the floor beforehand will ensure a smooth, durable finish.
What should I do if my epoxy garage floor starts to peel or bubble?
Peeling or bubbling typically occurs when the epoxy doesn’t adhere properly to the concrete, often due to inadequate surface preparation or applying the epoxy in unfavorable conditions. To fix the problem, you’ll need to remove the affected area by sanding or grinding it down. Reapply the epoxy after addressing the underlying issue, such as moisture in the concrete or poor surface preparation. Ensuring proper conditions and following the manufacturer’s instructions closely can help prevent these issues.

Epoxy Floors and Coatings
Epoxy Flooring / Floors; Serving
Industrial & Commercial Epoxy Flooring
Related Posts: