Wood flooring are able to be installed by yourself or maybe you’ll be able to take the assistance of a contractor for installing as well as finishing wood floors. Laminate flooring appear to be much the same in looks to real wood floors but are usually less expensive and in certain ways being more durable, and also with distinct finishes and bevelling opportunities this particular kind of flooring can certainly still create a genuine wood overall look at a tiny portion of the price.
Images about How To Install Floating Engineered Wood Flooring
How To Install Floating Engineered Wood Flooring

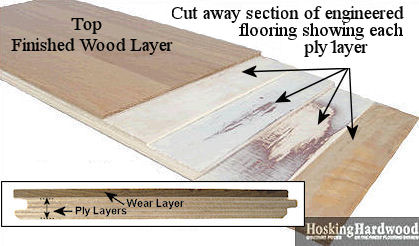
You are able to put up built wood flooring that is equally as gorgeous and will last just as long as a solid wood floor without the high cost as well as the high maintenance that difficult wood flooring can require. Today’s laminate floor surfaces are created using a photographic image of wood, marble, or tile that is bonded to fiberboard, backed with melamine plastic as well as coated with light weight aluminum oxide.
How to Install an Engineered Hardwood Floating Floor with Finishing Tips
Hardwood floors are easy adequate to dust or sweep and also mopping, but it needs cleaning solutions made for hardwood floors. Also you do not have to cope with that micro bevel groove between each board that is likely to fill up with dust and crumbs. Wood floors have the proper, beautiful and warm look that’s ideal for all forms of rooms. Which includes modifications in surface moisture, subfloor moisture, and humidity.
How to Install a Hardwood Floating Floor

All About Floating Wood Floors
Floating Wood Floor: Install One in 8 Steps – This Old House
/cdn.vox-cdn.com/uploads/chorus_asset/file/19493919/howto_tilefloor_03.jpg)
Floating Floors Pros and Cons
/what-is-a-floating-floor-1821740-hero-00e6b7fe102e4fafa8ba3f926944bcb7.jpg)
Floating Wood Floor: Install One in 8 Steps – This Old House
/cdn.vox-cdn.com/uploads/chorus_asset/file/19493744/howto_tilefloor_05.jpg)
Which Method Should I Use to Install My Engineered Wood Floor

Glueless Click Installation for Floating Hardwood Floors

How To Install Click Lock Engineered Hardwood Flooring
Floating Floor vs. Nail Down Slaughterbeck Floors, Inc.
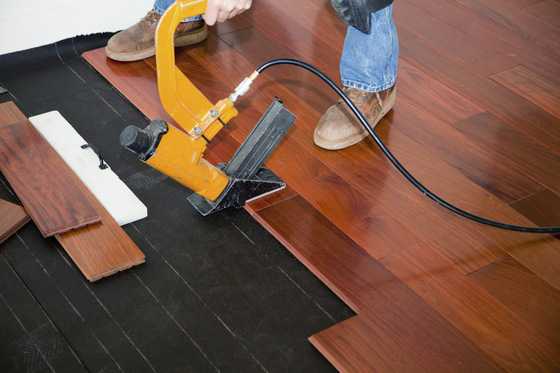
Engineered Hardwood Floor Installation: Part 1
How to Install a Floating Engineered-Wood Floor Diy flooring

Which Tools Do You Need to Install Engineered Hardwood Floors

Related Posts:
- Dark Wood Floor Pattern
- Wood Floor White Stain
- Dark Wood Floors Master Bedroom
- Grey Faux Wood Flooring
- Walnut Solid Wood Flooring
- Extra Wide Wood Flooring
- Cherry Wood Floor Bedroom
- White Oak Wood Tile Flooring
- Oak Solid Wood Flooring
- Dark Wood Floor Dining Room
How To Install Floating Engineered Wood Flooring
Installing a floating engineered wood floor is a great way to add a natural, beautiful look to any room in your home. While it may seem daunting to the novice, with a few simple steps, you can have your new floor installed in no time. This article will provide you with all the information you need to know about how to install floating engineered wood flooring.
Preparing for Installation
Before you begin installing your new floating engineered wood floor, there are several steps you must take to ensure a successful installation. First, inspect the subfloor for any signs of damage or imperfections that may affect the installation. Make sure the subfloor is clean, dry, and level. Any bumps, cracks, or holes should be filled in and sanded smooth before beginning the installation process.
Next, you will need to measure the room where the floor will be installed. Measuring the length and width of the room will help you determine how many boards you will need to purchase. It is important to note that each board should have an expansion gap of at least 1/8 inch around all sides of the room.
Once these steps have been completed, you can begin preparing the area for installation. Begin by laying out a vapor barrier over any concrete subfloors that may be present. This will help protect your new floor from moisture and other potential problems. Additionally, it is important to make sure that any existing baseboards have been removed before beginning the installation process.
Installing the Floor
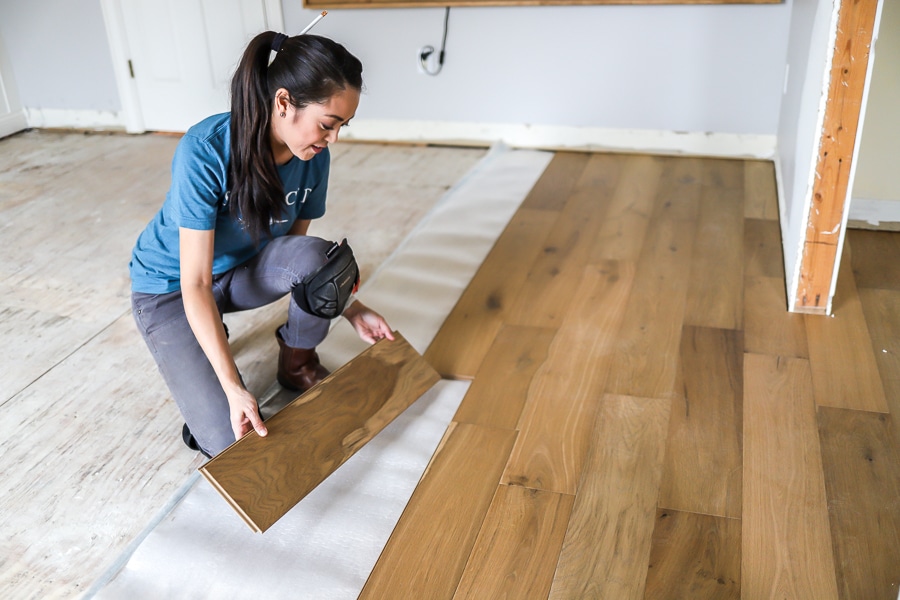
Once all of the necessary preparation steps have been taken, it is time to begin installing your new floating engineered wood floor. Start by laying out the first row of boards along one wall of the room. Make sure that each board is lined up straight and that all expansion gaps are present and consistent throughout the entire installation process. If necessary, use shims or spacers to keep each board in place until it can be fully secured.
Continue laying out rows of boards until the entire floor has been covered. Once all boards are in place, use a tapping block and a hammer to secure them together tightly. Before moving on to the next row, check that each board is securely fastened together and that there are no gaps between them.
Once all of the boards have been installed, finish off by trimming any excess material around door frames or baseboards with a jigsaw or circular saw. Finally, apply a sealant over the entire floor to protect it from moisture and other potential damages.
FAQs About Installing Floating Engineered Wood Flooring
Q: What tools will I need for installing my new floating engineered wood floor?
A: You will need several tools for installing your new floating engineered wood floor including: measuring tape, jigsaw or circular saw, hammer, tapping block, spacers, shims, and sealant.
Q: How long does it take to install a floating engineered wood floor?
A: The amount of time needed to install a floating engineered wood floor depends on several factors including size of the room and experience level of the installer. Generally speaking, it takes between 8-12 hours for an experienced installer to install a 200 square foot room with floating engineered wood floors.
Q: Can I install my own floating engineered wood floor?
A: Yes! With some basic knowledge and a few simple tools, it is possible for an experienced DIYer to successfully install their own floating engineered wood floor. However, if you are unsure about any aspect of the process, it is best to consult a professional for assistance.