Marble Floor Scratches: Common Causes and Types of Damage
Marble floors exude elegance and sophistication, but they are not immune to scratches and wear over time. Understanding the common causes and types of damage can help you better care for your marble flooring and prevent future issues. Let’s discuss the factors that contribute to marble floor scratches and the various types of damage that can occur.
- Abrasive Particles: Dust, dirt, sand, and other abrasive particles can scratch marble floors when tracked in on shoes or dragged across the surface. Over time, these particles can wear down the protective sealant and leave the marble vulnerable to scratching.
- Furniture Movement: Moving heavy furniture across marble floors without proper protection can result in scratches and scuffs. Even small particles trapped underneath furniture legs can cause damage when shifted or dragged across the floor.
- Improper Cleaning Techniques: Harsh cleaning chemicals, abrasive cleaners, and rough cleaning tools can damage the surface of marble floors, leading to scratches and etching. Using the wrong cleaning products or techniques can strip away the protective sealant and leave the marble vulnerable to damage.
- Pet Claws: Pets with long nails or claws can inadvertently scratch marble floors as they walk or play on the surface. While marble is durable, it is not entirely scratch-proof, and repeated contact with sharp claws can cause visible damage over time.
- Foot Traffic: High foot traffic areas in the home, such as entryways, hallways, and kitchens, are more prone to scratches and wear due to constant use. Over time, the repeated impact of foot traffic can dull the surface of marble floors and leave behind visible scratches and scuffs.
- Chemical Spills: Acidic substances such as lemon juice, vinegar, or harsh cleaning products can etch the surface of marble floors, leaving behind dull spots or discoloration. These chemical spills can weaken the protective sealant and make the marble more susceptible to scratching and other damage.

Preparing for Repair
Before attempting to repair scratches on your marble floor, it’s essential to assess the severity of the damage and gather the necessary supplies. Proper preparation ensures that you approach the repair process effectively and achieve the best results possible. Let’s learn how to assess scratches in marble flooring and what supplies you’ll need for repair.
Assessing Scratch Depth: Begin by examining the scratches in your marble floor to determine their depth and severity. Light surface scratches may only affect the top layer of the marble, while deeper scratches may penetrate the surface and require more extensive repair. Use natural light or a flashlight to illuminate the scratches and assess their depth.
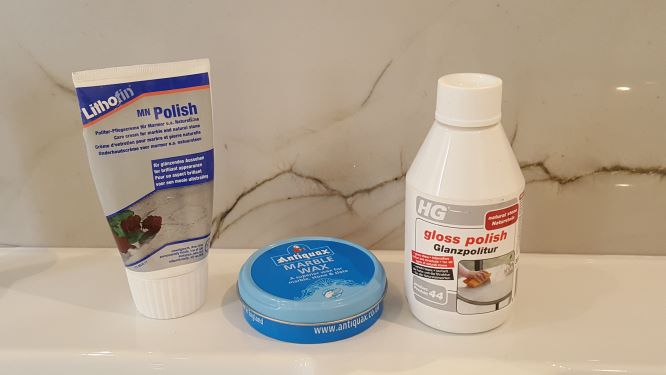
Gathering Supplies: Once you’ve assessed the scratches, gather the necessary supplies for repair. You’ll need fine-grit sandpaper or a polishing compound for light scratches, as well as a marble polishing powder or compound for deeper damage. Additionally, gather clean microfiber cloths, a bucket of warm water, mild dish soap, and protective gloves to ensure safe and effective repair.
Testing in a Small Area: Before proceeding with repair, it’s a good idea to test your chosen method in a small, inconspicuous area of the marble floor. This allows you to assess the effectiveness of the repair technique and ensure that it doesn’t cause further damage to the marble surface. Apply the chosen product or method to the test area and evaluate the results before proceeding with the entire floor.
Protecting Surrounding Surfaces: When repairing scratches in marble flooring, it’s essential to protect surrounding surfaces from damage. Use painter’s tape to mask off baseboards, walls, and adjacent flooring to prevent accidental scratches or spills during the repair process. Cover any nearby furniture or fixtures with drop cloths or plastic sheeting to protect them from damage or dust.
Cleaning the Surface: Before beginning the repair process, thoroughly clean the scratched area of the marble floor to remove any dirt, debris, or residue. Use a mixture of warm water and mild dish soap to gently clean the surface, then rinse with clean water and allow the area to dry completely before proceeding with repair. A clean surface ensures optimal adhesion and effectiveness of the repair products.
Reading Product Instructions: Before using any repair products or techniques on your marble floor, carefully read and follow the manufacturer’s instructions. Different products may have specific application methods, dwell times, or safety precautions that you need to be aware of. By following the instructions closely, you can ensure safe and effective repair of scratches in your marble flooring.
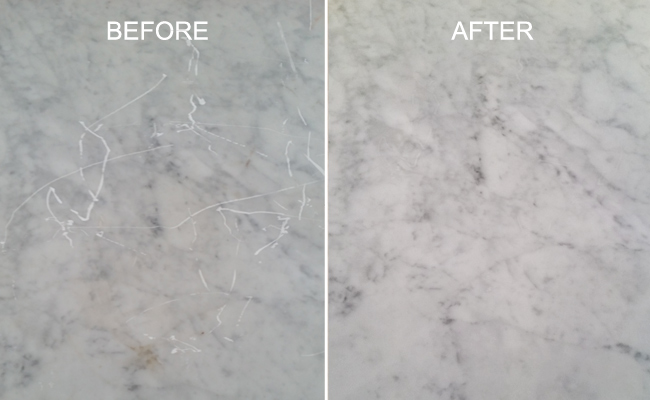
Removing Minor Scratches from Marble Floors
Minor scratches on marble floors can be unsightly, but they can often be repaired using gentle methods that don’t require professional intervention. With the right techniques and supplies, you can effectively remove minor scratches and restore the beauty of your marble flooring. Follow this step-by-step guide to removing minor scratches from marble floors using gentle solutions.
Clean the Surface: Begin by thoroughly cleaning the scratched area of the marble floor to remove any dirt, debris, or residue. Use a mixture of warm water and mild dish soap to gently clean the surface, then rinse with clean water and allow the area to dry completely. A clean surface ensures optimal adhesion and effectiveness of the repair products.
Assess the Depth of the Scratch: Examine the scratch in your marble floor to determine its depth and severity. Minor scratches may only affect the top layer of the marble and can often be buffed out using a polishing compound or fine-grit sandpaper. Deeper scratches that penetrate the surface may require more extensive repair techniques.
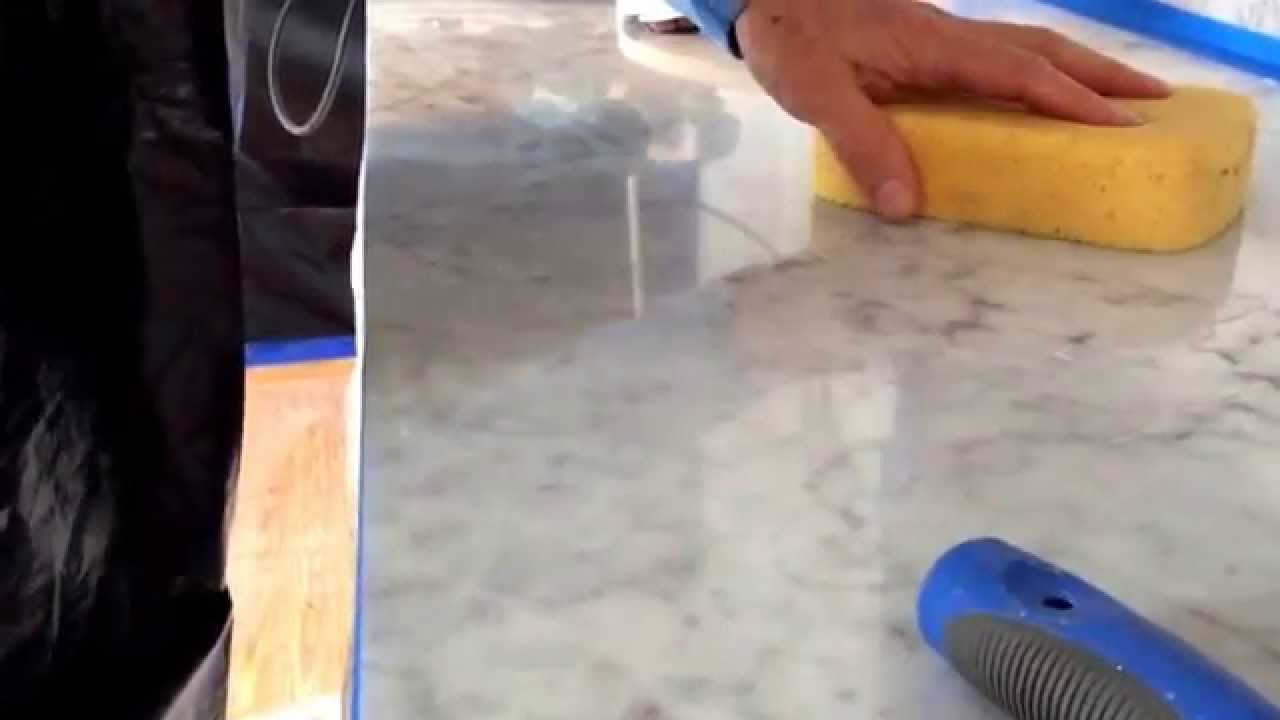
Apply Polishing Compound: For minor surface scratches, apply a small amount of marble polishing compound to the scratched area. Use a clean microfiber cloth to gently buff the compound into the scratch, working in small circular motions. Continue buffing until the scratch begins to fade and the surface of the marble becomes smooth and shiny.
Buff with Fine-Grit Sandpaper: If the scratch persists after using a polishing compound, you can try buffing it out with fine-grit sandpaper. Fold a piece of fine-grit sandpaper into a small pad and gently sand the scratched area of the marble floor. Use light pressure and smooth, even strokes to gradually buff away the scratch, being careful not to apply too much pressure or sand too aggressively.
Clean and Rinse: After removing the scratch, clean the surface of the marble floor to remove any residue from the repair process. Use a clean microfiber cloth dampened with warm water to wipe away any remaining polishing compound or sanding debris. Rinse the area with clean water and allow it to dry completely before inspecting the results.
Evaluate and Repeat if Necessary: Once the repaired area has dried, inspect the results to ensure that the scratch has been effectively removed. If the scratch is still visible or if additional repair is needed, you can repeat the process using the same gentle methods until the desired results are achieved. Be patient and methodical, as removing scratches from marble floors may require multiple attempts for optimal results.

Techniques for Repairing Moderate to Severe Scratches in Marble Flooring
Moderate to severe scratches in marble flooring may require more extensive repair techniques to restore the surface to its original beauty. While deeper damage may be challenging to repair, with the right tools and methods, you can effectively address scratches and restore the appearance of your marble floor. Let’s explore techniques for repairing moderate to severe scratches in marble flooring.
Measure the Severity of the Damage: Begin by assessing the severity of the scratches on your marble floor to determine the most appropriate repair technique. Moderate to severe scratches that penetrate the surface may require more aggressive repair methods, such as filling or honing, to achieve optimal results.
Fill with Epoxy Resin: For deeper scratches or gouges in the marble surface, you can fill the damaged area with epoxy resin to level the surface and conceal the imperfections. Clean the scratched area thoroughly and allow it to dry completely before applying the epoxy resin. Use a small spatula or putty knife to fill the scratch with the resin, then smooth it out evenly over the surface. Allow the resin to cure according to the manufacturer’s instructions before sanding and polishing the repaired area.
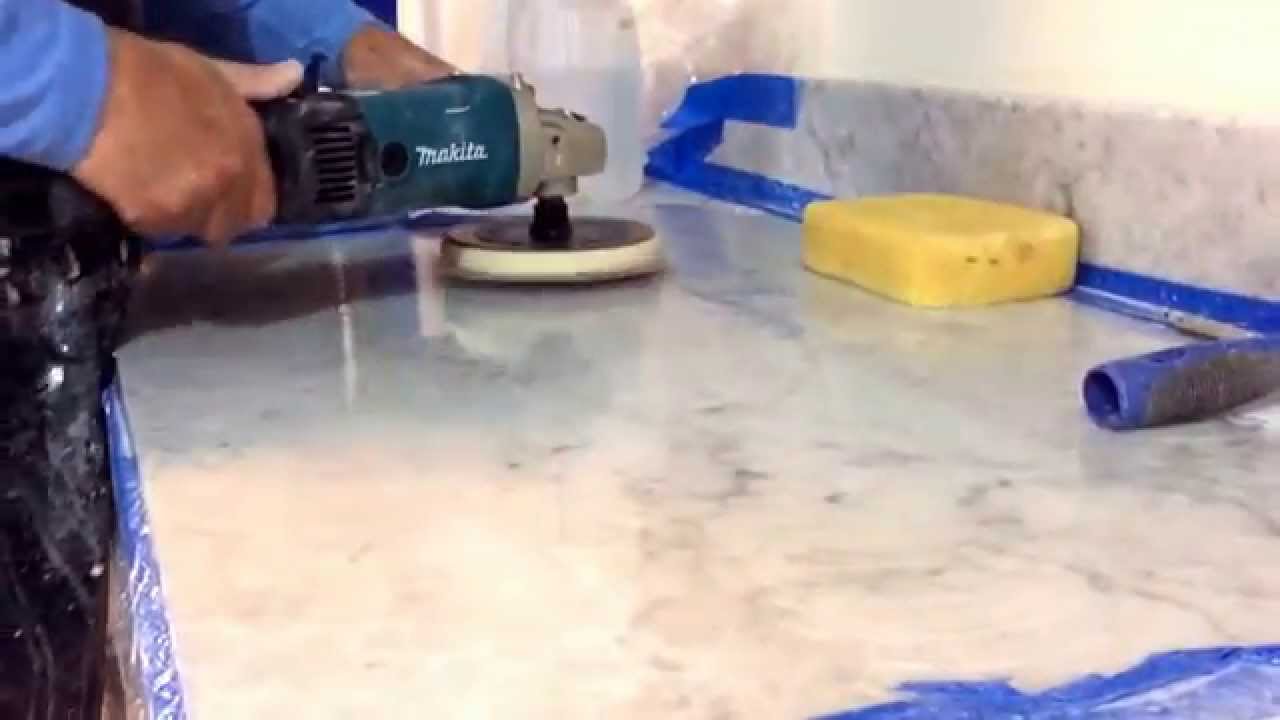
Hone the Surface: Honing is a process that involves using diamond abrasives to remove a thin layer of the marble surface, effectively leveling out scratches and imperfections. This technique is best suited for moderate to severe scratches that cannot be repaired with fillers or polishing compounds alone. Use a floor buffer equipped with diamond abrasives to hone the surface of the marble floor, working in small sections and overlapping each pass to ensure uniform results. After honing, polish the surface to restore its shine and smoothness.
Resurface with Grinding: In cases of severe damage or deep scratches, you may need to resurface the marble floor using a grinding machine equipped with diamond abrasives. This technique involves removing a thin layer of the marble surface to eliminate scratches, stains, and imperfections. It’s a more aggressive repair method that should be performed by experienced professionals to ensure proper results and avoid further damage to the marble.
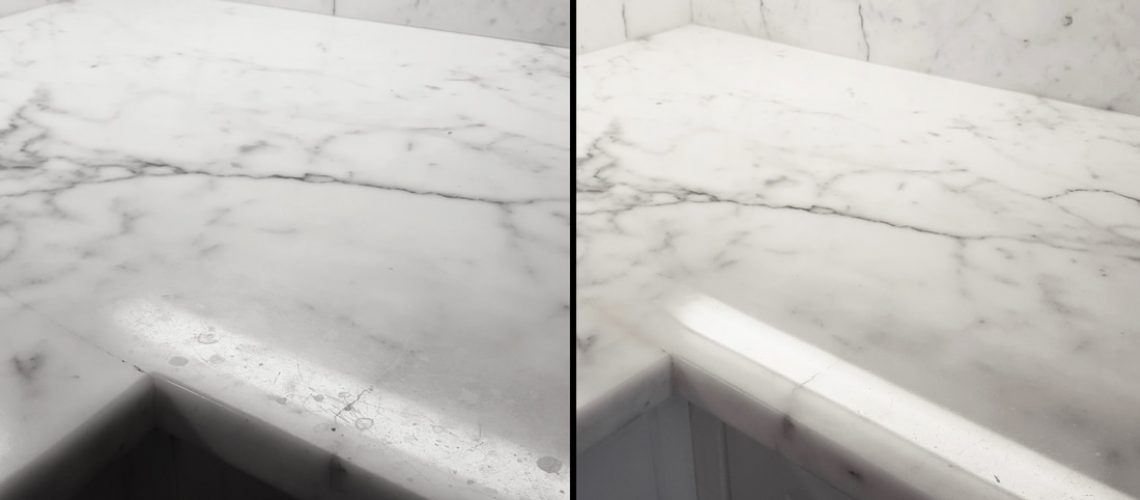
Seal and Protect: Once the scratches have been repaired, it’s essential to seal the surface of the marble floor to protect it from future damage and maintain its beauty. Apply a high-quality marble sealant according to the manufacturer’s instructions, ensuring that the entire surface is evenly coated. Allow the sealant to cure completely before resuming normal foot traffic or cleaning routines.
Regular Maintenance: To prevent future scratches and maintain the beauty of your marble floor, implement a regular maintenance routine that includes gentle cleaning and periodic sealing. Avoid using harsh cleaning chemicals or abrasive tools that can damage the surface of the marble. Instead, use a pH-neutral cleaner and a soft mop or cloth to gently clean the floor, and reapply sealant as needed to maintain protection against scratches and stains.
Preventing Future Scratches and Keeping Your Marble Floors Looking Pristine
Preventing future scratches and maintaining the pristine appearance of your marble floors requires ongoing care and attention. By implementing a regular maintenance routine and taking proactive measures to protect your floors, you can ensure that they remain beautiful and scratch-free for years to come. Below are some maintenance tips for preventing scratches and keeping your marble floors looking pristine.
Use Protective Furniture Pads: Place felt or rubber pads under furniture legs to protect your marble floors from scratches and scuffs caused by movement. These pads create a cushioning barrier between the furniture and the floor, reducing the risk of damage when items are moved or rearranged.
Clean Regularly: Implement a regular cleaning routine to remove dirt, debris, and abrasive particles from the surface of your marble floors. Use a soft mop or cloth dampened with warm water and a pH-neutral cleaner to gently clean the floors, avoiding harsh chemicals or abrasive tools that can damage the surface.
Wipe Up Spills Immediately: Accidental spills of water, liquids, or acidic substances should be wiped up immediately to prevent staining or etching of the marble surface. Use a clean cloth or paper towel to blot up the spill, then clean the area with warm water and mild dish soap to remove any residue.
Avoid High Heels and Sharp Objects: Encourage household members and guests to avoid walking on marble floors with high heels, cleats, or other sharp objects that can scratch or damage the surface. Place mats or rugs in high-traffic areas to protect the floors from wear and tear.
Reapply Sealant Regularly: Periodically reapply sealant to your marble floors to maintain protection against scratches, stains, and moisture damage. Follow the manufacturer’s instructions for application and allow the sealant to cure completely before resuming normal foot traffic or cleaning routines.
Use Entryway Mats: Place entryway mats or rugs at all entry points to your home to trap dirt, debris, and moisture before it can be tracked onto your marble floors. Regularly shake out or vacuum the mats to remove accumulated dirt and prevent it from being transferred onto the floors.
Trim Pet Nails: Keep pet nails trimmed to prevent scratching of the marble floors when pets walk or play on the surface. Regular grooming helps minimize the risk of accidental damage and preserves the beauty of your floors.
Implement No-Shoe Policy: Consider implementing a no-shoe policy in your home to reduce the risk of scratches and damage to your marble floors. Provide a designated area for shoes near the entryway and encourage household members and guests to remove their shoes upon entering.
Schedule Professional Maintenance: Periodically schedule professional maintenance for your marble floors to address any deep scratches, stains, or damage that may occur over time. Professional technicians can assess the condition of your floors and recommend appropriate repair and maintenance solutions to keep them looking pristine.
Scratched Marble Repair
![]()
HOW TO REMOVE A SCRATCH FROM MARBLE WWW.STONE-REPAIRS.COM
How to remove a Scratch from Marble by Steve Aussem Step 1
How to Removal a scratch from marble Changing from120 to 220 Grit By Steve Aussem. Step 12
DIY No.2 – Stone Care Tips and Tricks – How to Remove Scratches
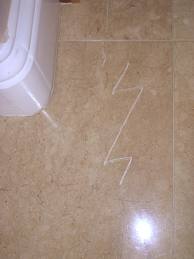
Pls help!! Scratches on my new marble floor!!
How to Repair a Scratch in a Marble Table Top – LetsFixIt
How To Remove Scratches From Marble Tiles The Effective Way
How to Remove Scratches from Marble? Step-by-Step! SK Stones USA

Related Posts: