Preparing the Cork Floor Tiles for Staining
Before diving into the process of staining cork floor tiles, it is crucial to ensure that the surface is properly prepared. Preparing the cork floor tiles for staining involves cleaning, sanding, and repairing any imperfections. We will provide a step-by-step guide on how to prepare your cork floor tiles for staining, ensuring optimal results.
- Clear the Area: Start by removing all furniture, rugs, and other items from the cork floor. This will provide a clear and unobstructed workspace. It is essential to have a clean and clutter-free area to work effectively.
- Clean the Cork Floor Tiles: Using a mild detergent and warm water, thoroughly clean the cork floor tiles. Remove any dirt, dust, or debris that may be present. It is important to ensure that the surface is clean and free from any contaminants before proceeding.
- Sand the Surface: Next, lightly sand the cork floor tiles using fine-grit sandpaper. This will help to smoothen the surface and remove any imperfections. Be careful not to apply too much pressure, as excessive sanding can damage the cork. Once you have finished sanding, use a vacuum cleaner or a damp cloth to remove any dust.
- Repair Any Damaged Areas: Inspect the cork floor tiles for any cracks, chips, or other damages. If you come across any, use a cork repair kit or a suitable filler to fix the imperfections. Follow the manufacturer’s instructions carefully to ensure proper application and drying time.
- Allow Sufficient Drying Time: After completing the cleaning, sanding, and repair process, it is crucial to allow the cork floor tiles to dry completely. This typically takes around 24-48 hours, depending on the humidity levels in your area. Ensure that the surface is completely dry before proceeding to the staining process.
Choosing the Right Stain for Your Cork Floor Tiles
Choosing the right stain for your cork floor tiles is crucial to achieving the desired look and ensuring long-lasting durability. With various options available in the market, it can be overwhelming to make the right choice. We will guide you through the process of selecting the perfect stain for your cork floor tiles, considering factors such as color, finish, and compatibility.
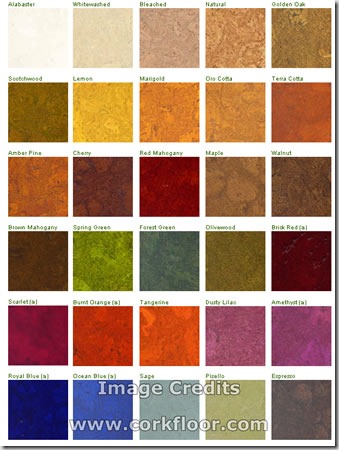
Consider the Desired Color: The first step in choosing a stain for your cork floor tiles is to consider the desired color. Determine whether you want to achieve a lighter or darker shade, or if you prefer a more natural look. Keep in mind that different stains may react differently on cork, so it is advisable to test a small inconspicuous area before proceeding with the entire floor.
Assess the Finish Options: Stains come in various finishes, such as matte, satin, or glossy. Consider the overall aesthetic of your space and the level of shine you desire. Keep in mind that a glossy finish may require more maintenance to keep it looking pristine, while a matte finish may be more forgiving in terms of hiding scratches or imperfections.
Research Cork-Specific Stains: Cork is a unique material that requires stains specifically formulated for its porous nature. Look for stains that are designed for cork flooring or have been successfully used on cork surfaces. These stains are specially formulated to penetrate and adhere to the cork, ensuring a long-lasting and even finish.
Read Reviews and Seek Expert Advice: Before making a final decision, read reviews of different stain brands and colors to gather insights from other users. Additionally, seek advice from professionals or experts in the field who can provide guidance based on their experience. Their expertise can help you make an informed decision and avoid any potential pitfalls.
Test Samples: Once you have narrowed down your options, it is essential to test stain samples on a small section of your cork floor tiles. Apply the samples according to the manufacturer’s instructions and observe how the stain reacts with your specific cork surface. This will give you a better idea of the final result before committing to a particular stain.

Step-by-Step Guide to Staining Cork Floor Tiles
Staining cork floor tiles is a great way to enhance their natural beauty and add a touch of color to your space. However, it is essential to follow a step-by-step process to ensure a successful staining project. Here is a detailed guide on how to stain cork floor tiles, from preparing the surface to applying the stain and finishing touches.
Prepare the Surface: Before starting the staining process, make sure that the cork floor tiles are properly prepared. Follow the steps outlined in the previous article on preparing cork floor tiles for staining, including cleaning, sanding, and repairing any damages. A clean and smooth surface will ensure that the stain adheres evenly and produces the desired result.
Protect Surrounding Areas: To prevent staining any adjacent surfaces or furniture, it is crucial to protect them before applying the stain. Use painter’s tape and plastic sheets to cover baseboards, walls, and any other areas that may come into contact with the stain. This will make the cleanup process much easier.
Choose and Mix the Stain: Select the stain color and finish that best suits your preferences and the overall aesthetic of your space. Follow the manufacturer’s instructions to mix the stain properly, ensuring that it is well-blended before application. It is advisable to wear gloves and use a stir stick to mix the stain.
Apply the Stain: Using a brush or a sponge applicator, apply the stain evenly to the cork floor tiles. Work in small sections, starting from one corner and moving towards the exit of the room. Ensure that the stain is applied consistently and smoothly, avoiding any overlapping or streaks. Take breaks between sections to avoid the stain drying too quickly.
Wipe off Excess Stain: After applying the stain, use a clean cloth or rag to wipe off any excess stain from the surface of the cork floor tiles. This will help to achieve a more uniform and natural-looking finish. Be gentle while wiping to avoid disturbing the stain that has already been absorbed by the cork.
Allow for Drying and Curing: Once the stain has been applied and the excess wiped off, allow the cork floor tiles to dry and cure according to the manufacturer’s instructions. This typically takes anywhere from 24 to 48 hours, depending on the type of stain and environmental conditions. Avoid walking or placing any furniture on the stained surface during this time.
Apply a Protective Finish: To protect the stained cork floor tiles and enhance their longevity, apply a protective finish. Choose a finish that is compatible with the stain you have used and follow the manufacturer’s instructions for application. This will provide an additional layer of protection against wear, tear, and spills.
Tips and Tricks for Achieving a Beautiful Stained Finish
Staining cork floor tiles can be a rewarding and transformative process, but it requires attention to detail and some insider tips and tricks to achieve a beautiful and professional-looking finish. We will share valuable tips and tricks to help you enhance your staining skills and ensure stunning results on your cork floor tiles.
Test the Stain on a Sample Piece: Before applying the stain to your entire cork floor, it is essential to test it on a small, inconspicuous area or a sample piece of cork. This will allow you to see how the stain reacts with your specific cork surface and help you determine if any adjustments or modifications are needed. It’s always better to be safe than sorry!
Apply Multiple Coats for Deeper Color: If you desire a deeper and more saturated color on your cork floor tiles, consider applying multiple coats of stain. Allow each coat to dry completely before applying the next one. This layering technique will intensify the color and give your floor a vibrant appearance.
Use a Stain Conditioner: Cork is a porous material, which means it can absorb stains unevenly if not properly conditioned. To ensure a more consistent and even color distribution, consider using a stain conditioner before applying the stain. This will help the cork absorb the stain more uniformly, resulting in a smoother and more professional finish.
Work in Small Sections: To maintain control and achieve an even application, work in small sections when applying the stain to your cork floor tiles. This will prevent the stain from drying too quickly or becoming uneven. By breaking the project into manageable sections, you can focus on applying the stain with precision and attention to detail.
Blend Stain Colors for Custom Shades: If you can’t find the exact stain color you desire, consider blending different shades to create a custom color. Mix small amounts of different stains on a palette or in a separate container until you achieve the desired hue. Remember to take notes of the ratios used, so you can replicate the color if needed.
Protect Yourself and Ventilate: Staining cork floor tiles involves working with chemicals that may emit strong odors and potentially harmful fumes. Ensure proper ventilation in the area by opening windows or using fans to circulate fresh air. Additionally, wear protective gear such as gloves, goggles, and a respirator to safeguard yourself from any potential health hazards.
Practice Proper Cleanup: After completing the staining process, it is crucial to clean up properly to prevent any damage to the stained cork floor tiles. Dispose of used brushes, sponges, and rags safely according to local regulations. Clean any spills or drips immediately to avoid permanent staining. Follow the manufacturer’s instructions for cleaning tools and equipment.

Caring for and Maintaining Stained Cork Floor Tiles
Once you have stained your cork floor tiles, it’s important to establish a regular care and maintenance routine to ensure their long-lasting beauty and durability. Here are several tips on how to care for and maintain stained cork floor tiles, including cleaning methods, preventative measures, and general upkeep.
Regular Cleaning: To keep your stained cork floor tiles looking their best, establish a regular cleaning routine. Sweep or vacuum the floor regularly to remove dirt, dust, and debris that can cause scratches. Avoid using abrasive brushes or harsh cleaning chemicals that can damage the stain or the cork surface. Instead, opt for a soft mop or microfiber cloth dampened with a mild cleaning solution specifically formulated for cork flooring.
Wipe Up Spills Immediately: Cork is a porous material that can absorb liquids quickly, potentially causing staining or damage. To prevent this, wipe up any spills or liquid accidents immediately using a clean, absorbent cloth or paper towel. Avoid letting liquids sit on the surface for an extended period.
Use Protective Pads and Rugs: Place protective pads or felt furniture sliders under the legs of heavy furniture to prevent them from scratching or denting the stained cork floor tiles. Avoid dragging furniture across the floor, as this can also cause damage. Additionally, use rugs or mats in high-traffic areas or near entryways to minimize dirt and debris from being tracked onto the floor.
Avoid Direct Sunlight: Prolonged exposure to direct sunlight can cause the color of the stain to fade over time. Use curtains, blinds, or UV-protective window films to limit the amount of sunlight that reaches the stained cork floor tiles. This will help preserve the color and vibrancy of the stain.
Reapply Protective Finish: Over time, the protective finish on your stained cork floor tiles may wear down due to regular foot traffic. To maintain the durability and appearance of the stain, periodically reapply a fresh coat of protective finish as recommended by the manufacturer. Follow the instructions carefully and allow sufficient drying time before using the floor.
Avoid Excessive Moisture: Cork is sensitive to moisture, so it’s important to avoid excessive exposure to water or humidity. Clean up spills promptly, and avoid using excessive amounts of water when cleaning the floor. Use a damp mop or cloth rather than soaking the floor. Additionally, maintain a consistent indoor humidity level to prevent the cork from swelling or warping.
Schedule Periodic Maintenance: Consider scheduling periodic maintenance for your stained cork floor tiles. This may include professional cleaning, resealing, or refinishing, depending on the condition and wear of the floor. Consult with flooring experts or professionals to determine the appropriate maintenance schedule for your specific situation.
Sealing and Trimming Kitchen Cork Floor
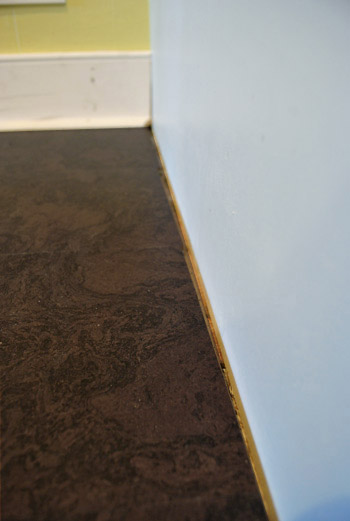
Sealing and Trimming Out Our Kitchen’s Cork Floors Young House
 Related Posts: