Marble flooring is a timeless and luxurious choice for residential and commercial spaces, known for its elegant appearance, durability, and versatility. Understanding the construction details of marble flooring is essential for architects, designers, and homeowners involved in the planning and installation process. Marble flooring construction involves several key components, including the subfloor preparation, installation method, types of marble tiles, and finishing details, all of which contribute to the overall quality and performance of the finished floor.
Images about Marble Flooring Construction Details
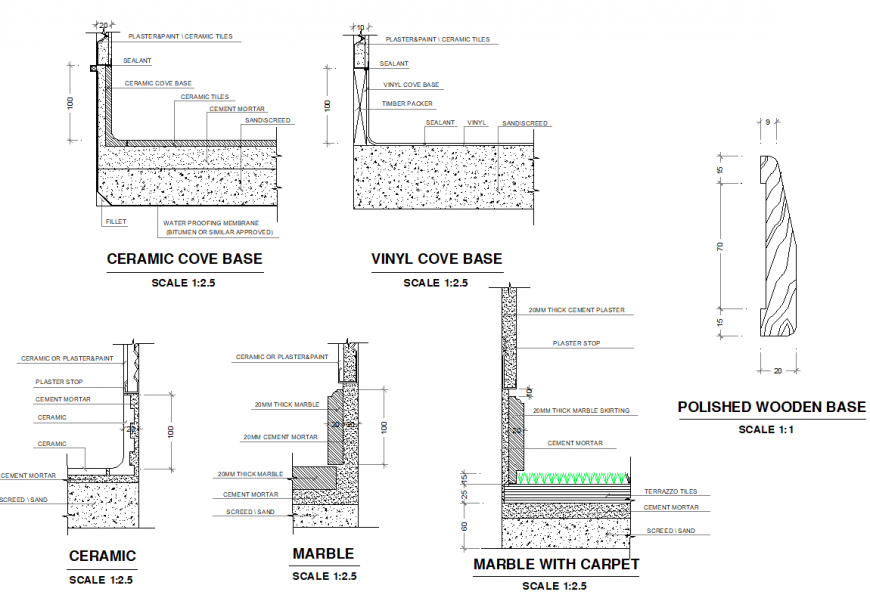
Marble Flooring Construction Details

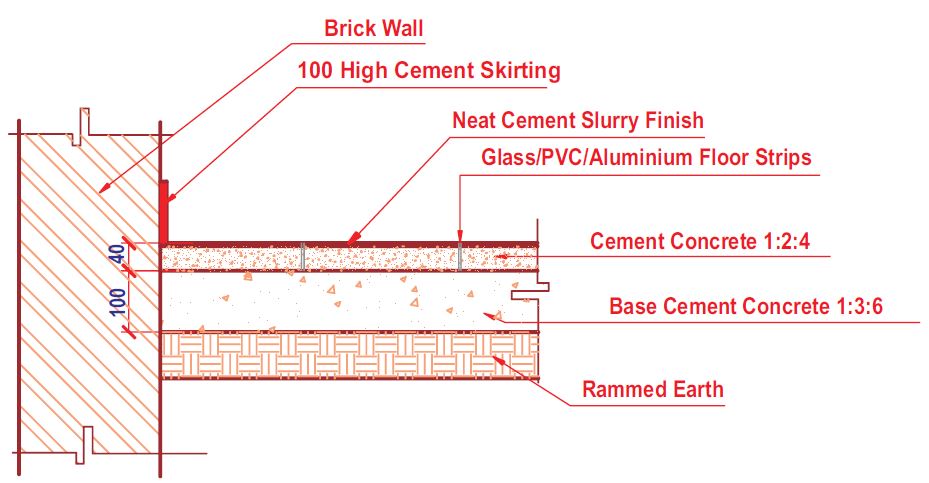
Subfloor preparation is a critical aspect of marble flooring construction, as it lays the foundation for a durable and long-lasting floor. The subfloor must be clean, level, and free of any debris, moisture, or irregularities that could affect the installation of the marble tiles. Depending on the existing subfloor material and condition, preparatory measures such as leveling, patching, and moisture sealing may be necessary to ensure a smooth and stable surface for the marble tiles.

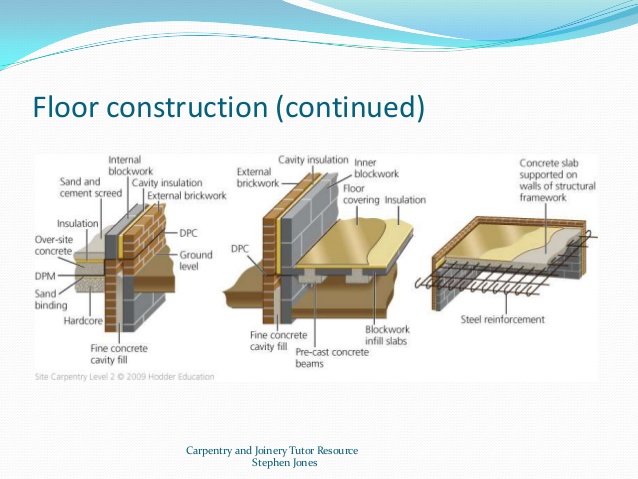
The installation method used for marble flooring can vary depending on factors such as the type of marble tiles, the size and layout of the space, and the desired aesthetic. Common installation methods for marble flooring include thin-set adhesive, mortar bed, and floating installation. The thin-set adhesive is a popular choice for installing marble tiles directly onto the subfloor, providing a strong and secure bond that minimizes the risk of tile movement or shifting over time. Mortar bed installation involves pouring a layer of mortar onto the subfloor and embedding the marble tiles into the mortar to create a level and stable surface. Floating installation, on the other hand, involves placing marble tiles over an underlayment or subfloor without adhesive, allowing for flexibility and ease of installation.

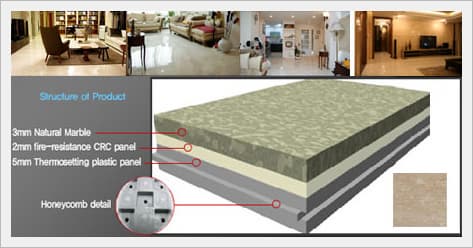
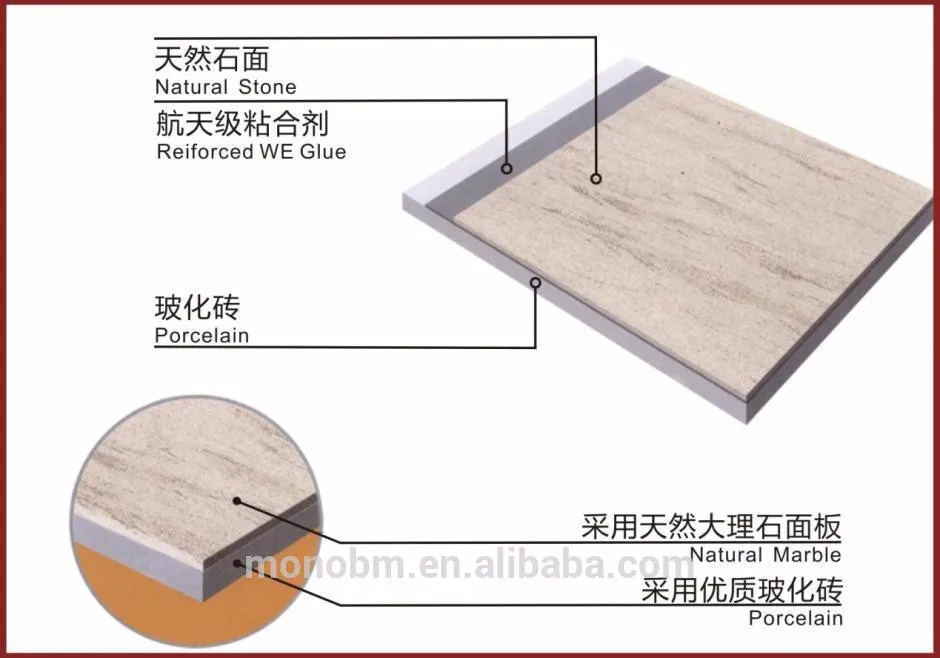
Choosing the right type of marble tiles is another important consideration in marble flooring construction. Marble tiles come in various sizes, shapes, colors, and finishes, allowing for endless design possibilities. Common types of marble tiles include polished, honed, tumbled, and brushed finishes, each with its own unique characteristics and aesthetic appeal. Additionally, marble tiles can vary in thickness, with standard thicknesses ranging from 3/8 inch to 3/4 inch, depending on the intended application and installation method.
Finally, finishing details such as grout, sealing, and maintenance play a crucial role in the construction of marble flooring. Grout is used to fill the joints between marble tiles, providing stability and support while also enhancing the overall appearance of the floor. Sealing marble flooring with a high-quality sealant helps protect the surface from stains, scratches, and moisture damage while also enhancing its natural beauty and luster. Regular maintenance practices such as sweeping, mopping, and polishing are essential for preserving the appearance and longevity of marble flooring, ensuring that it remains a stunning and durable investment for years to come.
How to Lay In Situ Terrazzo (Marble Chips) Flooring? [PDF] – The

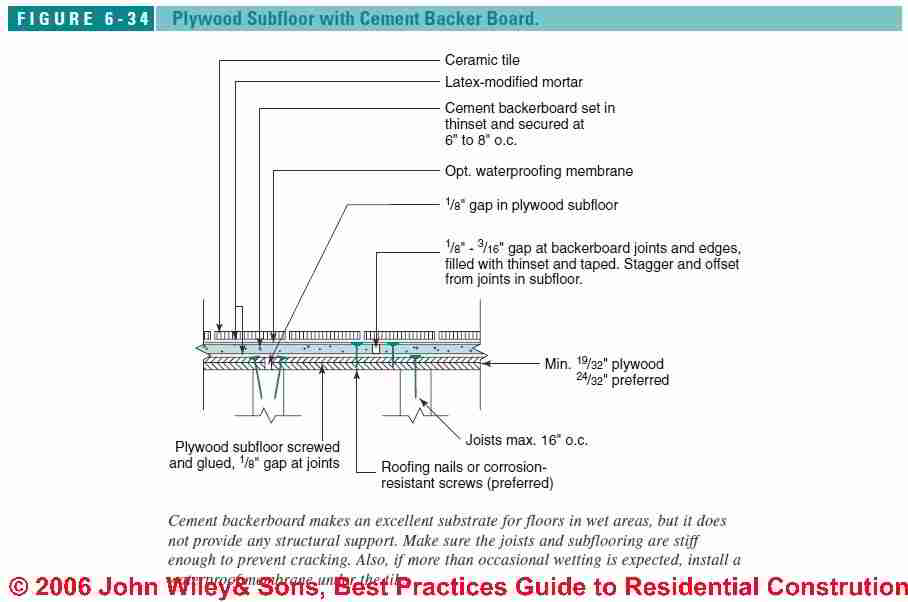
Floor-Framing Subfloor Details for Ceramic or Stone Tile Flooring
File:Drawing of floor protection.jpg – Wikimedia Commons

HOW TO CONSTRUCT CEMENT CONCRETE FLOOR? – CivilBlog.Org
Travertine Engineered Natural Marble tradekorea
Floors – Types of floors – Methods of Construction of Floor
Cheap 60X60 Price in The Philippines Wholesale Carrara White

Turkey Beige Marble Tiles Wall And Floor Applications Design
Details – Floors Details DWG Detail for AutoCAD u2022 Designs CAD
Related Posts:
- Marble Flooring Border
- Home Marble Floor Design
- Beige Marble Flooring
- Black White Marble Floor
- White Carrara Marble Floor
- Marble Floor Design Ideas
- How To Clean White Marble Floors
- Marble Floor Entrance
- Yellow Marble Floor Tiles
- Luxury Marble Flooring Design
Introduction to Marble Flooring Construction Details
Marble flooring is a popular choice for many homeowners due to its elegant and timeless look. Marble flooring construction is a complex process that requires precise measurements, the right tools, and careful attention to detail. In this article, we’ll discuss the various aspects of marble flooring construction in detail, from the initial planning stage to the installation of the marble tiles. We’ll also provide tips on how to properly care for and maintain your marble flooring once it’s been installed.
Planning Your Marble Flooring Project
The first step in any marble flooring construction project is planning. This involves measuring the area you intend to cover with marble tiles, considering the layout of your room, and deciding which type of marble tiles you want to use. You should also consider whether or not you need to reinforce your existing subfloor before installation. Once you’ve determined the size and layout of your marble flooring project, you can begin collecting the necessary materials and tools.
Tools and Materials for Installing Marble Flooring
The list of tools and materials you will need for installing marble flooring includes a power saw, a hammer, a chisel, tile spacers, a grout float, a level, a notched trowel, tile adhesive, grout sealer, and of course the marble tiles. If you are using a pre-cut marble tile pattern, you will also need an electric saw or wet saw to cut the tiles to fit.
Prepping Your Subfloor for Marble Flooring
Once you have gathered all of your tools and materials, it’s time to prepare your subfloor for installation. This involves cleaning your subfloor thoroughly to remove any dirt or debris that may interfere with adhesion. If necessary, you can also reinforce your subfloor with plywood to ensure that it is stable enough to support the weight of your marble flooring.
Installing Your Marble Floor Tiles
After preparing your subfloor for installation, it’s time to begin laying down the marble tiles. Start by laying out a few rows at a time so that you can check that they fit together properly before moving on to the next row. Make sure to use tile spacers between each tile to ensure that they are evenly spaced apart. Once the tiles are in place, spread tile adhesive across them using a notched trowel before pressing them firmly into place.
Grouting Your Marble Flooring
Once all of your tiles have been installed properly, it’s time to grout them. Begin by mixing up your grout according to the manufacturer’s instructions and then applying it with a grout float in an even layer across all of the joints between your tiles. Allow the grout to set for about an hour before wiping away any excess grout with a damp cloth or sponge. After allowing your grout 24 hours to cure completely, apply grout sealer over it using an applicator brush or roller. This will help protect against staining and discoloration over time.
What type of saw is needed for cutting marble tiles?
You will need either an electric saw or a wet saw when cutting marble tiles for installation. An electric saw is suitable for straight cuts but may struggle with curved cuts while a wet saw is better suited for more intricate designs and shapes.
How long should I wait before walking on my newly installed marble floor?
It is recommended that you wait at least 24 hours after installation before walking on your new marble floors. This will give the adhesive enough time to set properly and prevent any damage from occurring as a result of too much pressure being applied too soon after installation.
How should I clean my marble floors?
You should use a mild detergent or soap mixed with warm water when cleaning your marble floors. Avoid using abrasive cleaners or harsh chemicals as these can damage or discolor your marble floors over time. You should also avoid using steam cleaners or any product containing vinegar as these can etch into the surface of your marble.