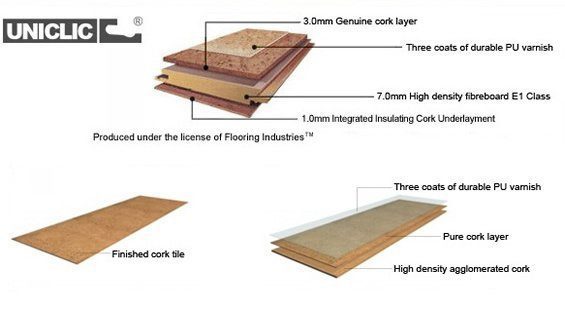
Understanding the Uniclic Cork Flooring System
Cork flooring has gained popularity in recent years for its eco-friendly properties and natural aesthetic appeal. Among the various cork flooring systems available, the Uniclic Cork Flooring System stands out for its innovative installation method. Below we provide a step-by-step guide on how to install Uniclic Cork Flooring, ensuring a successful and long-lasting installation.
- Assessing the Subfloor: Before beginning the installation process, it is crucial to assess the condition of the subfloor. Ensure that the subfloor is clean, dry, level, and free from any damage. Remove any existing flooring and repair any imperfections to create a smooth and stable surface for the cork flooring.
- Acclimating the Cork Flooring: Cork is a natural material that can expand or contract with changes in temperature and humidity. To prevent any issues after installation, it is essential to acclimate the cork flooring to the environment of the room where it will be installed. Follow the manufacturer’s instructions for acclimation time, typically ranging from 24 to 48 hours.
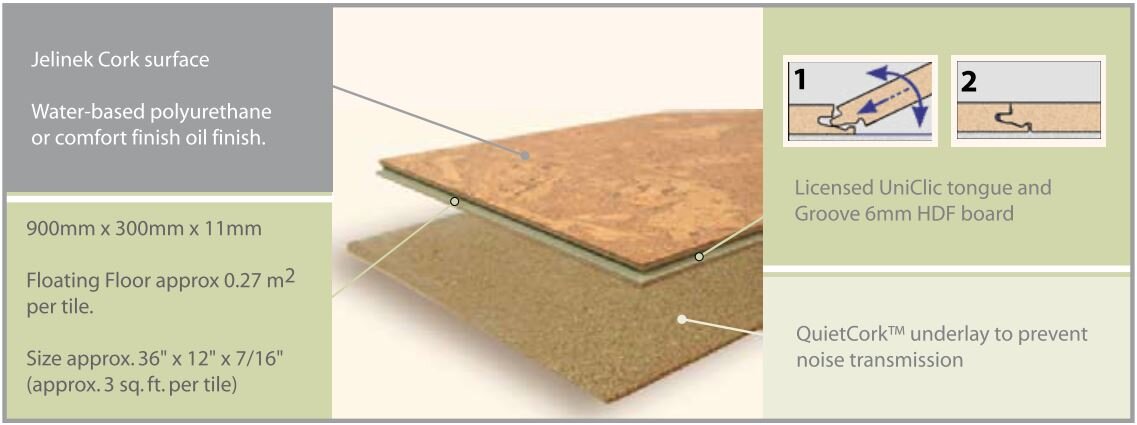
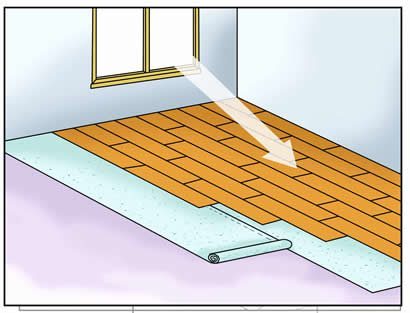
- Lay the Underlayment: Uniclic Cork Flooring requires an underlayment for added insulation, moisture protection, and noise reduction. Begin by rolling out the underlayment, ensuring that it covers the entire floor area. Trim any excess material and use adhesive or tape to secure it in place, creating a smooth and even surface.
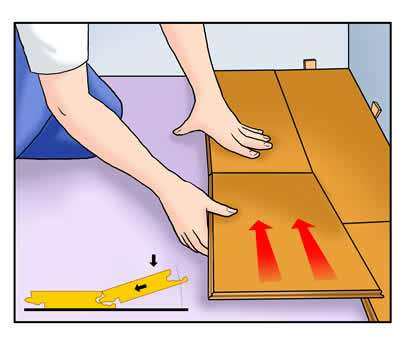
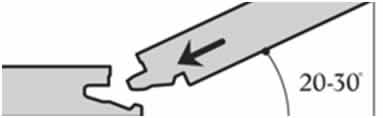
- Installing the First Row: Start by placing the first plank along one of the walls, ensuring a ¼-inch gap between the plank and the wall for expansion. Use spacers to maintain consistent spacing between planks. Connect the next plank to the first one by angling it and gently pressing the tongue into the groove. Continue this process until the first row is complete.
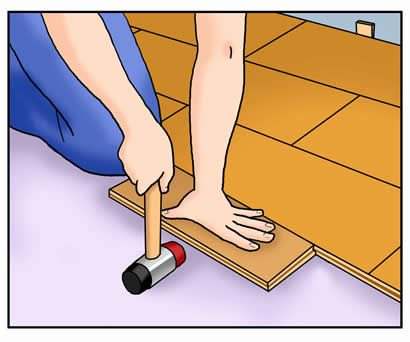
- Completing the Installation: For subsequent rows, apply a small amount of adhesive along the tongue and groove of each plank before connecting them. Use a tapping block and mallet to ensure a tight fit and eliminate any gaps between planks. Work row by row until the entire floor is covered, ensuring that each plank is securely locked into place.
- Finishing Touches: Once the installation is complete, remove the spacers and install baseboards or moldings to cover the expansion gap around the perimeter of the room. Use a cork-specific sealant to protect the cork flooring from moisture and stains. Allow the sealant to dry completely before walking on the floor or moving furniture back into the room.
Essential Tips for a Successful Uniclic Cork Flooring Installation
Proper preparation is key to achieving a successful Uniclic Cork Flooring installation. By taking the time to prepare your space adequately, you can ensure a smooth and hassle-free installation process. Here are some essential tips for preparing your space to achieve the best possible outcome for your Uniclic Cork Flooring installation.
Measure and Calculate: Before purchasing the Uniclic Cork Flooring, accurately measure the dimensions of the room. Calculate the square footage by multiplying the length and width of the space. It is advisable to purchase an extra 5-10% of cork flooring to account for any mistakes or wastage during the installation process.
Clear the Space: Remove all furniture, appliances, and any other items from the room where the installation will take place. This will provide a clear and unobstructed area for the installation process. It is essential to have enough space to maneuver the planks and tools comfortably.
Check for Moisture: Cork flooring is susceptible to moisture damage. It is crucial to check the moisture levels of the subfloor before installation. Use a moisture meter to ensure that the subfloor’s moisture content is within the acceptable range specified by the manufacturer. If the moisture levels are high, address the issue before proceeding with the installation.
Level the Subfloor: A level subfloor is necessary for a seamless and secure installation. Use a leveling compound to fill in any low spots or imperfections in the subfloor. Sand down any high spots to create a level surface. A smooth and even subfloor will prevent the cork flooring from sagging or cracking over time.
Clean and Prepare the Subfloor: Thoroughly clean the subfloor to remove any dirt, dust, or debris. Sweep or vacuum the area and wipe it down with a damp cloth. Ensure that the subfloor is dry before proceeding with the installation. Remove any adhesive residue or paint splatters that may hinder the installation process.
Create a Layout Plan: Before installing the cork flooring, create a layout plan to determine the best starting point and direction for the planks. Consider the aesthetics of the room and the natural light source when deciding the layout. It is advisable to install the planks parallel to the longest wall in the room for a visually appealing result.
Tools and Materials: What You’ll Need to Install Uniclic Cork Flooring
To ensure a smooth and efficient Uniclic Cork Flooring installation, it is essential to have the right tools and materials at hand. Having the proper equipment will not only make the installation process easier but also help achieve a professional and polished result. Let’s discuss the tools and materials you’ll need to install Uniclic Cork Flooring.
Safety Equipment: Before starting the installation, prioritize safety by wearing the necessary protective gear. This includes safety goggles, gloves, and knee pads. Safety goggles will shield your eyes from any debris or flying particles, while gloves and knee pads will provide protection and cushioning as you work.
Measuring and Layout Tools: Accurate measurements and layout planning are crucial for a successful installation. Make sure to have a tape measure, chalk line, and a carpenter’s square or T-square on hand. These tools will help you measure and mark the floor accurately, ensuring precise cuts and alignment during installation.
Cutting Tools: Cork flooring often requires cutting to fit around doorways, corners, and other obstacles. A utility knife with a sharp blade is essential for making clean and precise cuts. Additionally, a jigsaw or circular saw with a fine-toothed blade can be useful for cutting planks to size or trimming edges.
Installation Tools: Several tools are specifically designed to facilitate the installation of Uniclic Cork Flooring. A tapping block and a rubber mallet are essential for gently tapping the planks into place without causing damage. A pull bar is useful for fitting planks in tight spaces or against walls. Additionally, a pry bar or crowbar can come in handy for removing baseboards or moldings.
Underlayment: Uniclic Cork Flooring requires an underlayment for added insulation and moisture protection. Make sure to choose a high-quality underlayment specifically designed for cork flooring installation. This may include materials like cork or foam, which provide cushioning and sound absorption properties.
Adhesive: Depending on the manufacturer’s instructions, you may need adhesive for the installation of Uniclic Cork Flooring. Check the product specifications to determine if adhesive is required and, if so, choose a suitable cork flooring adhesive. Follow the manufacturer’s guidelines for proper application and drying time.
Spacers: Spacers are essential for maintaining consistent spacing between the cork planks and the walls. They ensure proper expansion and contraction of the flooring. Use plastic spacers specifically designed for cork flooring installation to achieve the recommended gap.
Cleaning Supplies: Before and after installation, it is important to keep the work area clean and free from debris. Have a broom, dustpan, and vacuum cleaner on hand to remove any dust, dirt, or small particles. Additionally, have a mop or a damp cloth ready for cleaning the floor as needed.
Installing Uniclic Cork Flooring: Techniques and Tricks for a Seamless Finish
Installing Uniclic Cork Flooring requires attention to detail and proper techniques to achieve a seamless and visually appealing finish. Let’s explore various techniques and tricks that can enhance the installation process and help you achieve outstanding results with your Uniclic Cork Flooring.
Start with a Clean and Level Subfloor: Before laying the cork planks, ensure that the subfloor is clean, dry, and level. Remove any debris, dust, or adhesive residue. Use a leveling compound to fill in any low spots and sand down any high spots to create a smooth and even surface. A level subfloor is crucial for ensuring a seamless installation.
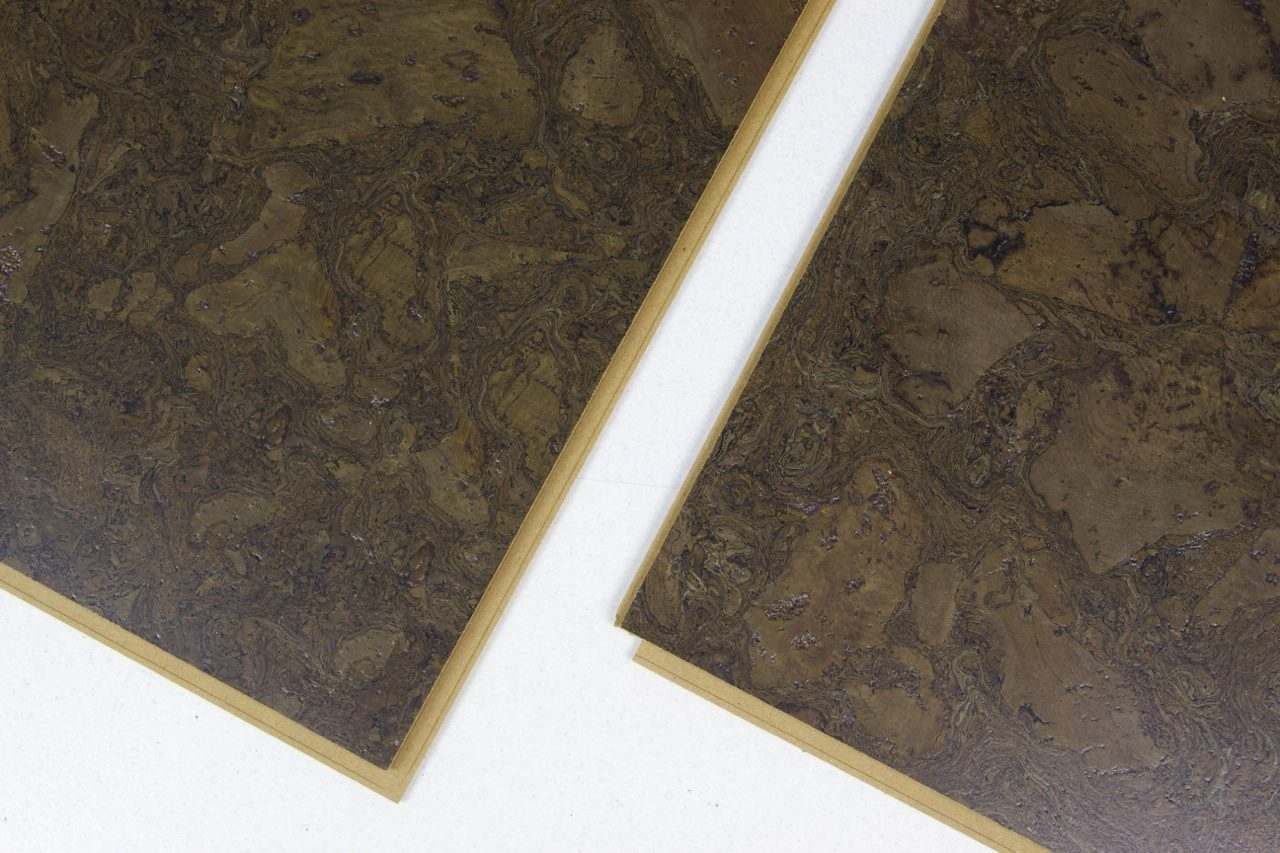
Mix and Match Planks: Uniclic Cork Flooring often comes in a variety of patterns and shades. To achieve a natural and visually appealing result, mix and match the planks from different boxes. This will create a more blended and authentic look, as natural cork often varies in color and texture.
Stagger the Joints: When installing the cork planks, it is important to stagger the joints or seams. This means that the end of one plank should not align with the end of the adjacent plank in the same row. Staggering the joints creates a more stable and visually appealing floor. Follow the manufacturer’s recommendations for the specific pattern or staggering technique.
Use a Tapping Block and Mallet: To ensure that the cork planks fit snugly together, use a tapping block and a rubber mallet. Place the tapping block against the edge of the plank and gently tap it with the mallet. This will help lock the planks in place without causing any damage. Ensure that each plank is securely locked into the adjacent ones.
Maintain Consistent Spacing: Throughout the installation, it is important to maintain consistent spacing between the cork planks and the walls. Use plastic spacers designed for cork flooring installation to achieve the recommended gap. This will allow for proper expansion and contraction of the flooring and help prevent buckling or warping over time.
Trim Planks for a Custom Fit: Inevitably, you will encounter areas where the full-size planks won’t fit. Use a utility knife or a jigsaw to trim the planks to the required size and shape. Take accurate measurements and make precise cuts to ensure a seamless and professional finish. Remember to leave the recommended expansion gap around the edges of the room.
Allow for Proper Acclimation: After the installation is complete, allow the cork flooring to acclimate to the room’s environment before using or placing furniture on it. Follow the manufacturer’s instructions for the recommended acclimation time, usually ranging from 24 to 48 hours. This will help prevent any potential issues with expansion or contraction.
Troubleshooting Common Issues
While installing Uniclic Cork Flooring can be a relatively straightforward process, challenges may arise that require troubleshooting. We will see common issues that may occur during the installation and provide tips on how to overcome them, ensuring a successful Uniclic Cork Flooring installation.
Gaps between Planks: Gaps between planks can occur if they are not properly locked into place. To fix this issue, gently tap the planks with a rubber mallet and a tapping block to ensure a tight fit. If the gaps persist, insert a small amount of cork-specific adhesive into the gaps and use a damp cloth to clean off any excess adhesive.
Uneven Subfloor: An uneven subfloor can cause the cork flooring to feel uneven or unstable. If you notice any bumps or dips in the subfloor, use a leveling compound to create a smooth and level surface. Sand down any high spots and fill in any low spots before proceeding with the installation.
Damaged Planks: Accidents happen, and you may encounter a damaged or flawed plank during the installation process. If this occurs, set the damaged plank aside and use a new one in its place. It is always a good idea to purchase extra planks to account for any potential issues or mistakes during the installation.
Difficult to Lock Planks: Sometimes, the planks may be difficult to lock into place, especially around doorways or tight corners. In such cases, use a pull bar or a crowbar to gently guide the planks into place. Be careful not to apply excessive force, as this can damage the planks or the subfloor.
Subfloor Moisture Issues: Cork flooring is susceptible to moisture damage, so it is crucial to address any subfloor moisture issues before installation. If you notice excessive moisture, use a moisture barrier or a waterproof sealant to protect the subfloor. Consult a professional if the moisture issue persists or if you are unsure how to proceed.
Baseboard Gaps: After the installation, you may notice small gaps between the cork flooring and the baseboards or moldings. To fix this issue, use a cork-specific sealant or caulk to fill in the gaps. This will create a clean and finished look while preventing any moisture or dirt from entering the gaps.
Environmental Factors: Environmental factors such as temperature and humidity can affect the installation process and the performance of the cork flooring. Ensure that the room is within the recommended temperature and humidity range specified by the manufacturer. This will help prevent any expansion, contraction, or warping of the cork flooring over time.
How to Install Cork Flooring- Cork Flooring Installation Made Easy

Floating Cork FLooring Benefits With Uniclic System – ICork Floor
Install Cork Flooring – Forna Floating – Cancork
Cali Cork Flooring Floated Click-lock Installation
One possibility is a cork floor, but what is cork? Floating Cork

How to install cork flooring – YouTube
Related Posts: