Wood flooring adds warmth, elegance, and a timeless appeal to any space. While traditional wood flooring is often installed on wooden subfloors, it is also possible to install wood flooring directly on concrete surfaces. Whether you’re looking to upgrade your basement, a ground-level room, or any other area with a concrete floor, the installation process can be successfully accomplished with the right tools and techniques. In this comprehensive guide, I’ll take you through the step-by-step process of installing wood flooring on concrete, ensuring a stunning and durable result.
Assessing the Concrete Surface
Before embarking on the wood flooring installation, it’s crucial to assess the condition of the concrete surface. Ensure that the concrete is clean, level, and free from any cracks or major imperfections. If there are any cracks or uneven areas, they must be addressed before proceeding with the installation. Small cracks can be filled with a concrete patching compound, and high spots can be ground down to achieve a level surface.
Additionally, it’s essential to check the moisture level of the concrete. Excessive moisture can lead to wood warping and damage over time. Perform a moisture test by taping a plastic sheet to the concrete floor and checking for condensation after 24 hours. If there is moisture present, a moisture barrier, such as a vapor barrier or epoxy sealant, may be necessary to protect the wood flooring.
Acclimating the Wood Flooring
Wood is a natural material that can expand or contract based on its environment. To avoid issues after installation, acclimate the wood flooring to the room where it will be installed. Remove the wood flooring from its packaging and stack the boards in the room for at least 48 hours. This allows the wood to adjust to the humidity and temperature of the space, minimizing the risk of warping or gapping once installed.
Installing the Wood Flooring
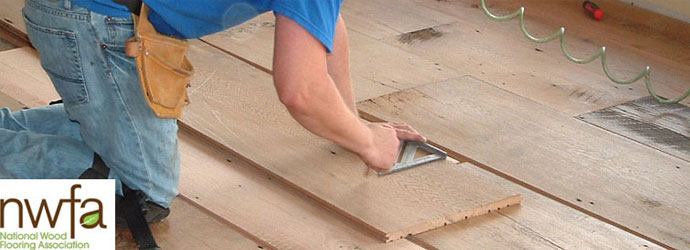
Once the concrete surface is prepared, and the wood flooring has acclimated, you can start the installation process. It’s essential to use a proper adhesive or underlayment designed specifically for wood flooring installation on concrete. Follow the manufacturer’s instructions for the best results.
Start by applying the adhesive or underlayment in small sections, working from one end of the room to the other. Lay each wood board carefully, ensuring a snug fit and even spacing between boards. Use a rubber mallet to gently tap the boards into place, ensuring they are securely adhered to the concrete.
Finishing and Sealing
After all the wood flooring is installed, you can proceed with finishing and sealing. If your wood flooring is pre-finished, this step may not be necessary. However, if you’ve opted for unfinished wood, you’ll need to sand and finish the flooring to achieve the desired look and protection.
Sand the wood flooring to achieve a smooth and even surface. Clean the dust thoroughly before applying the finish. Choose an appropriate wood finish for your needs, such as polyurethane or wood oil. Apply the finish evenly, following the manufacturer’s instructions, and allow it to dry completely before using the space.
Conclusion
Installing wood flooring on a concrete surface can be a rewarding and aesthetically pleasing project. By thoroughly preparing the concrete, acclimating the wood flooring, and using the right adhesives and underlayments, you can achieve a beautiful and durable wood floor that enhances the appeal of your space.
Whether it’s a basement, a ground-level room, or any other area with a concrete floor, the warmth and elegance of wood flooring will add charm and value to your home. With proper installation and care, your wood flooring will stand the test of time, providing you with a welcoming and comfortable environment for years to come.

Installing Hardwood Floors over Concrete

ASK FRED: How Do I Install Wood Floor Below Grade? – Schedule Fred
Can I Install Hardwood Floors On A Slab Floors By The Shore

Qu0026A: Solid Wood Floors Over Concrete Slabs JLC Online
How to Install a Barn Board Floor over Concrete Tutorial DIY

BSI-082: Walking the Plank Building Science Corporation
Qu0026A: Insulated Wood Floor Over Concrete JLC Online

Guide: How to Install Hardwoods on a Concrete Subfloor
Prepping Concrete Slabs for Hardwood Floor Installation City

Related Posts:
- Dark Wood Floor Pattern
- Wood Floor White Stain
- Dark Wood Floors Master Bedroom
- Grey Faux Wood Flooring
- Walnut Solid Wood Flooring
- Extra Wide Wood Flooring
- Cherry Wood Floor Bedroom
- White Oak Wood Tile Flooring
- Oak Solid Wood Flooring
- Dark Wood Floor Dining Room
Installing Wood Flooring On Concrete: A Comprehensive Guide
When it comes to adding a touch of warmth and elegance to your home, few materials can beat the classic look of hardwood. From traditional oak to modern bamboo, wood flooring can provide an instant boost to any room. But if you’re installing wood flooring on concrete, there are some additional considerations you need to take into account. From moisture levels to subfloor preparation, here’s a comprehensive guide to installing hardwood flooring on concrete.
Assessing the Moisture Levels in Your Concrete Subfloor
Before you begin the installation of your wood flooring, you need to ensure that the moisture levels in your concrete subfloor are within acceptable limits. Too much moisture can lead to warping, buckling, and even mold growth. To check for moisture levels, use a concrete moisture meter and take readings from several different areas of the surface. If the reading is over the recommended level (usually between 3-4%), then you should use a vapor barrier or other method to reduce the moisture level before proceeding with the installation.
Preparing Your Concrete Subfloor
Once you have assessed and addressed any potential issues with excess moisture, you can begin preparing your concrete subfloor for your hardwood installation. Start by making sure that your subfloor is free of dirt, debris, and other contaminants that could interfere with the installation process. You should also check for any cracks or dips in the surface and use a leveling compound if necessary to make sure that it’s flat and even.
Choosing the Right Underlayment
The right underlayment is essential for creating a successful hardwood installation on concrete. You’ll need to choose an underlayment that is designed specifically for wood floors and will provide adequate cushioning and insulation from any potential moisture issues. Most underlayments are made from foam or cork and should be installed before laying down your hardwood planks.
Gluing Down Your Hardwood Planks
Once your concrete subfloor is prepped and your underlayment is in place, you can begin gluing down your hardwood planks. Start by spreading a thin layer of adhesive onto the concrete surface and then carefully pressing each plank into place. Make sure that the seams between each plank are properly sealed with adhesive for maximum durability. Allow the adhesive to dry completely before walking on your new flooring.
Finishing Touches
Once all of your planks have been glued down onto the concrete subfloor, you can add any finishing touches such as baseboards or trim pieces around the perimeter of the room. You may also want to consider applying a sealant or finish to help protect your new flooring from any potential damage or wear over time.
FAQs about Installing Wood Flooring On Concrete
Q: What type of underlayment should I use when installing wood flooring on concrete?
A: When installing wood flooring on concrete, it’s important to choose an underlayment that provides adequate cushioning and insulation from any potential moisture issues. Most underlayments are made from foam or cork and should be installed before laying down your hardwood planks.
Q: How do I check for excess moisture in my concrete subfloor?
A: To check for excessive moisture in your concrete subfloor, use a concrete moisture meter and take readings from several different areas of the surface. If the reading is over the recommended level (usually between 3-4%), then you should use a vapor barrier or other method to reduce the moisture level before proceeding with the installation.
Q: Do I need to seal my hardwood floor after installation?
A: Sealing your hardwood floor after installation is not necessary but it can help protect it from any potential damage or wear over time. Applying a sealant or finish will also help keep your floor looking its best for years to come.