The Importance of Caulking in the Kitchen
Caulking plays a crucial role in maintaining the integrity and cleanliness of your kitchen floor. It provides a protective seal that prevents water, dirt, and food particles from seeping into the gaps between the tiles or floorboards. By sealing these gaps, caulking helps to prevent mold growth, water damage, and potential pest infestations. Additionally, it enhances the overall appearance of your kitchen by creating a clean and polished look. Let’s explore the importance of caulking in the kitchen and how it can benefit you in the long run.
- Prevents Water Damage: One of the main reasons why caulking is important in the kitchen is that it helps prevent water damage. The kitchen is a high-moisture area, with spills, splashes, and even leaks from appliances like dishwashers or sinks. Caulking acts as a barrier, preventing water from seeping into the subfloor or causing damage to the surrounding areas. By keeping water at bay, caulking prolongs the lifespan of your kitchen floor.
- Protects Against Mold and Mildew: Another significant benefit of caulking in the kitchen is its ability to prevent the growth of mold and mildew. Moisture and organic matter can easily accumulate in the gaps between tiles or floorboards, creating an ideal environment for mold and mildew to thrive. By sealing these gaps with caulking, you create a waterproof barrier that inhibits the growth of mold and mildew, ensuring a healthy and hygienic kitchen environment.
- Enhances Kitchen Hygiene: Caulking also plays a vital role in maintaining kitchen hygiene. Food particles, dirt, and debris can easily accumulate in the gaps between the floor tiles or floorboards. These crevices can become breeding grounds for bacteria and pests, posing a health risk to you and your family. By caulking these gaps, you create a smooth and easy-to-clean surface, reducing the chances of bacteria buildup and making it easier to maintain a clean and sanitary kitchen.
- Improves Aesthetic Appeal: In addition to its functional benefits, caulking can greatly enhance the aesthetic appeal of your kitchen. A well-caulked floor creates a seamless and polished look, making your kitchen appear more visually appealing and well-maintained. It provides a finishing touch that ties the entire kitchen design together, giving it a more cohesive and professional appearance.
- Cost-Effective Solution: Lastly, caulking is a cost-effective solution for maintaining your kitchen floor. Regularly inspecting and re-caulking the gaps in your kitchen floor can help prevent costly repairs or replacements in the future. By addressing any gaps or cracks early on, you can avoid more significant damage that may require extensive renovation or replacement, ultimately saving you time, money, and stress.
Steps to Prepare and Clean the Kitchen Floor for Caulking
Before you start caulking your kitchen floor, it’s essential to prepare and clean the surface properly to ensure a successful and long-lasting seal. Let me guide you through the necessary steps to prepare and clean your kitchen floor for caulking, ensuring optimal adhesion and durability.
- Clear the Area: Begin by removing any furniture, appliances, or rugs from the kitchen floor. This will provide you with a clear and unobstructed workspace, allowing you to reach all areas that need to be caulked. It’s important to have a clean and clutter-free surface to work on for ease of access and to avoid any accidental damage to your belongings.
- Sweep or Vacuum: Next, thoroughly sweep or vacuum the kitchen floor to remove any loose dirt, crumbs, or debris. Pay close attention to the gaps between tiles or floorboards, as these areas tend to accumulate dirt and grime over time. Use a soft-bristle broom or a vacuum cleaner with a brush attachment to ensure you capture all the particles.
- Deep Clean: After sweeping or vacuuming, it’s time to deep clean the kitchen floor. Use an appropriate cleaning solution that is suitable for your flooring material. Follow the manufacturer’s instructions and dilute the cleaning solution as recommended. Scrub the floor using a mop or a scrub brush, paying extra attention to the gaps between the tiles or floorboards. Remove any stains, grease, or residue that may hinder the adhesion of the caulk.
- Rinse and Dry: Once you have thoroughly cleaned the floor, rinse it with clean water to remove any residual cleaning solution. Use a clean mop or a damp cloth to ensure all traces of the cleaning solution are removed. After rinsing, allow the floor to dry completely before moving on to the next step. Proper drying is crucial to ensure optimal adhesion of the caulk.
- Inspect for Damage: Before applying caulk, carefully inspect the kitchen floor for any signs of damage or deterioration. Look for cracked tiles, loose floorboards, or any other issues that may require repair. Addressing these problems beforehand will ensure a more effective and long-lasting caulking job. If necessary, consult with a professional to assess and repair any significant damage or structural issues.
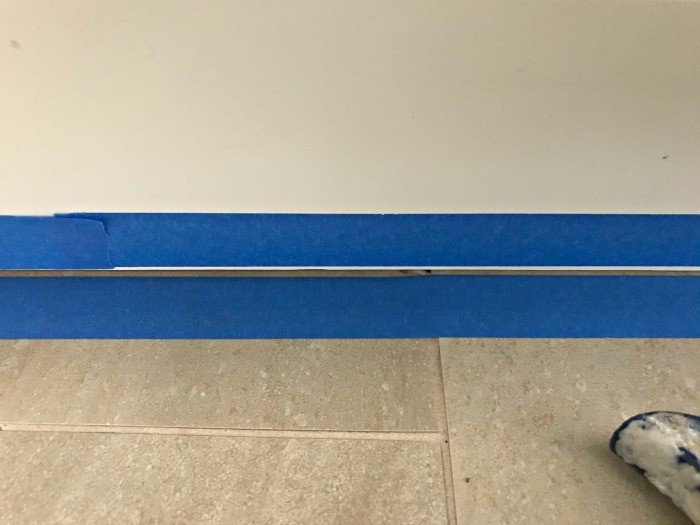
- Masking Tape: As a final step in preparing the kitchen floor for caulking, use masking tape to protect adjacent surfaces such as baseboards or countertops. Apply the tape along the edges of these surfaces, ensuring a clean and straight line. The masking tape will help prevent any accidental smearing or excess caulk from spreading onto unwanted areas, resulting in a neater and more professional finish.

Choosing the Right Caulking Material for Your Kitchen Floor
Selecting the appropriate caulking material for your kitchen floor is crucial to ensure a long-lasting seal that can withstand the demands of a high-traffic area. With numerous options available in the market, it’s essential to consider factors such as durability, flexibility, moisture resistance, and compatibility with your flooring material. We will guide you through the process of choosing the right caulking material for your kitchen floor, enabling you to make an informed decision.
Consider the Flooring Material: The first step in choosing the right caulking material is to consider the type of flooring in your kitchen. Different flooring materials require specific types of caulk. For instance, if you have ceramic or porcelain tiles, a silicone-based caulk is recommended due to its flexibility and resistance to water. For wood floors, a flexible polyurethane or latex caulk is more suitable to accommodate the natural movement of the wood.
Assess the Durability: Kitchen floors experience heavy foot traffic and frequent exposure to spills and cleaning agents. Therefore, it’s important to choose a caulking material that is durable and can withstand these conditions. Look for caulk products labeled as “high durability” or “heavy-duty” to ensure they can withstand the demands of your kitchen.
Check for Moisture Resistance: Kitchens are prone to moisture and water spills, making it crucial to select a caulking material with excellent moisture resistance. Silicone-based caulk is highly recommended for its superior water resistance and ability to prevent water penetration. Ensure that the caulk you choose is specifically labeled as “waterproof” or “moisture-resistant” to provide optimal protection against water damage.
Evaluate Flexibility: Flexibility is an essential characteristic of caulking materials, especially for kitchen floors that may expand or contract due to temperature and humidity changes. A flexible caulk will accommodate these movements and prevent cracks or gaps from forming. Look for products labeled as “flexible” or “elastic” to ensure the caulk can withstand these movements without compromising the seal.
Color and Aesthetics: While functionality is crucial, considering the color and aesthetics of the caulk is also important to achieve a visually appealing result. Choose a caulk color that matches or complements the color of your flooring. Many caulking products come in a variety of colors, allowing you to find the perfect match for your kitchen floor.
Read Customer Reviews and Seek Professional Advice: Before making a final decision, take the time to read customer reviews and experiences with different caulking materials. These reviews can provide valuable insights into the performance and durability of various products. Additionally, consult with professionals, such as flooring experts or contractors, who can offer guidance and recommendations based on their experience and expertise.
Proper Techniques for Applying Caulk to the Kitchen Floor
Applying caulk to your kitchen floor requires proper technique to ensure a neat and effective seal. Whether you’re filling gaps between tiles or floorboards, it’s important to follow the correct procedures to achieve a professional-looking finish. We will guide you through the proper techniques for applying caulk to your kitchen floor, ensuring a successful and long-lasting seal.
Gather the Necessary Tools: Before you begin, gather all the necessary tools and materials. These typically include a caulk gun, a utility knife, a damp cloth, masking tape, and the caulk of your choice. Make sure the caulk is suitable for your flooring material and follows the recommendations of the manufacturer.
Prepare the Caulk and Gun: Load the caulk cartridge into the caulk gun by pulling back the rod and inserting the cartridge into the gun’s chamber. Then, push the rod forward until the plunger meets the bottom of the cartridge. Cut the tip of the caulk cartridge at a 45-degree angle using a utility knife. The size of the opening will depend on the width of the gap you’re filling.
Clean and Prep the Surface: Before applying the caulk, ensure that the surface is clean and dry. Use a damp cloth to wipe away any dust, dirt, or debris from the gaps between the tiles or floorboards. This step is crucial to ensure optimal adhesion and prevent any contaminants from interfering with the caulk.
Apply Masking Tape: To achieve a clean and straight caulk line, apply masking tape along the edges of the gap you’re filling. This will help create a neat boundary and prevent any excess caulk from spreading onto unwanted areas.
Apply the Caulk: Hold the caulk gun at a 45-degree angle and place the tip of the caulk gun into the gap. Apply steady pressure to the trigger, guiding the caulk along the gap in a smooth and consistent motion. Move the caulk gun steadily, maintaining a consistent speed to ensure an even application. Fill the gap, slightly overfilling if necessary.
Smooth and Shape the Caulk: After applying the caulk, use a caulk smoothing tool or a wet finger to smooth and shape the caulk line. Wetting your finger or the smoothing tool with water or a mild soap solution will help prevent the caulk from sticking. Gently run your finger or the smoothing tool along the caulk line, pressing down slightly to create a smooth and even finish.
Remove the Masking Tape: While the caulk is still wet, carefully remove the masking tape at a 45-degree angle. This will help create a clean break between the caulk and the surrounding surface, resulting in a professional-looking seal.
Allow the Caulk to Dry: Finally, allow the caulk to dry and cure as per the manufacturer’s instructions. This can take anywhere from a few hours to several days, depending on the type of caulk you use. Avoid walking on the caulked area or exposing it to moisture until it is fully cured.

Maintenance Tips to Keep Your Caulked Kitchen Floor Looking Great
Once you have successfully caulked your kitchen floor, it’s important to implement regular maintenance practices to keep it looking great and maximize its longevity. While caulk is durable and resistant to moisture and dirt, proper care and maintenance will help preserve its effectiveness and appearance over time. Below we provide you with some maintenance tips to keep your caulked kitchen floor in excellent condition.
Regular Cleaning: Regular cleaning is essential to prevent dirt, grime, and food particles from accumulating on your caulked kitchen floor. Use a non-abrasive cleaner that is suitable for your flooring material and follow the manufacturer’s instructions. Avoid using harsh chemicals or abrasive tools that can damage or degrade the caulk. Regularly sweep or vacuum the floor to remove any loose debris, and mop it with a damp cloth or mop to maintain its cleanliness.
Avoid Excessive Moisture: While caulk is moisture-resistant, excessive moisture can still affect its durability over time. Wipe up any spills or excess moisture immediately to prevent water from seeping into the caulk or causing damage to the surrounding areas. Be mindful of areas near sinks, dishwashers, or other water sources, and use mats or rugs to absorb any moisture and prevent it from reaching the caulked areas.
Inspect and Repair: Regularly inspect the caulked areas of your kitchen floor for any signs of damage or deterioration. Look for cracks, gaps, or areas where the caulk may have pulled away from the surface. If you notice any issues, it’s important to address them promptly. Remove any damaged or deteriorated caulk and reapply a fresh layer to ensure a proper seal. Regular maintenance and timely repairs will help prevent further damage and maintain the integrity of the caulked areas.
Avoid Harsh Cleaning Tools: When cleaning your caulked kitchen floor, avoid using harsh cleaning tools such as steel wool or abrasive brushes. These tools can scratch or damage the caulk, leading to premature wear and compromised effectiveness. Opt for soft sponges, microfiber cloths, or gentle scrub brushes to clean the floor without causing any harm to the caulked areas.
Protect the Caulk: Take precautions to protect the caulked areas when moving heavy appliances or furniture. Use furniture sliders or mats to prevent dragging or scratching the caulk. Additionally, be cautious when using sharp objects or utensils near the caulked areas to avoid accidentally damaging or puncturing the caulk.
Regular Reapplication: Over time, caulk may begin to deteriorate or wear down. To maintain the effectiveness of the seal, consider periodically reapplying caulk to the gaps between tiles or floorboards. This preventative measure will help ensure that your kitchen floor remains properly sealed and protected against moisture and dirt.
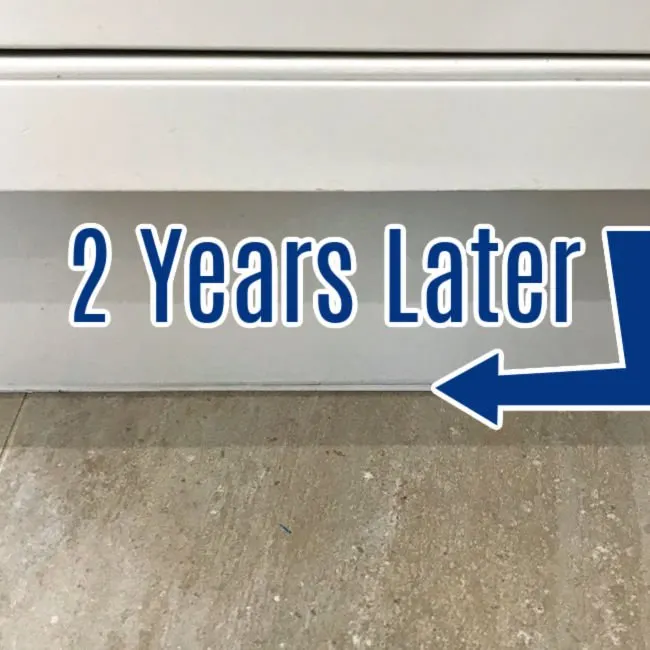
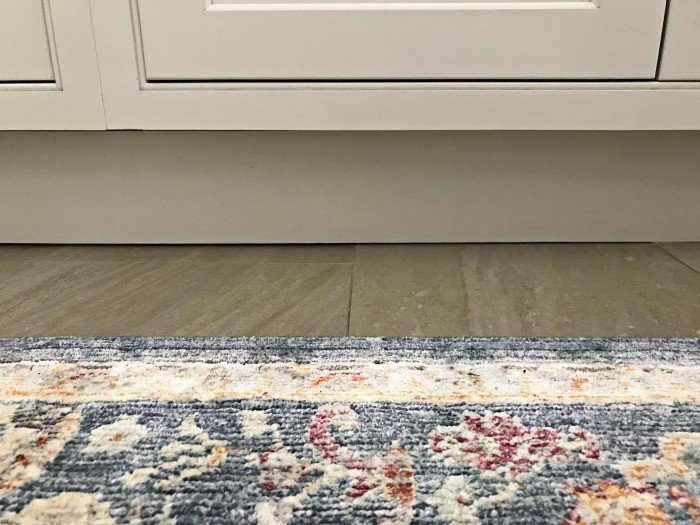
Fill the Gap Between Cabinets and Floor (Super Easy) – Abbotts At Home

How To Install Caulk On A Kitchen Tile Backsplash

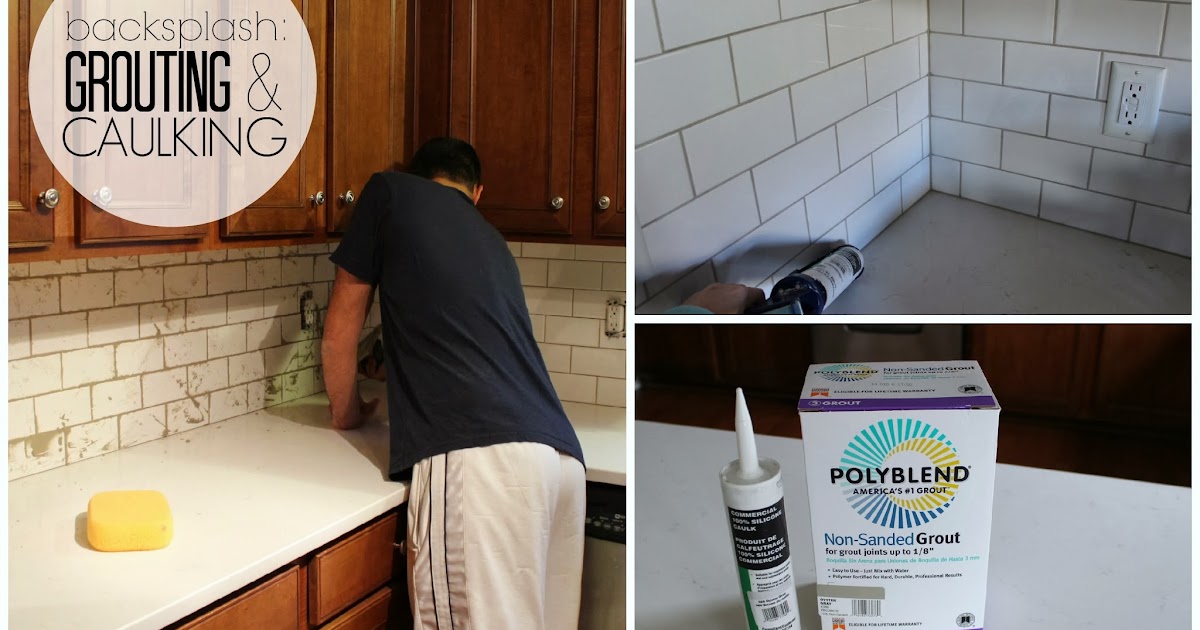
Kitchen Update: Grouting u0026 Caulking Subway Tile Backsplash

Clark Tile Grout Cleaning – Clean Zone NJ Tile and Grout Cleaning

Caulk Strip Tape, Black Self-Adhesive Decorative Sealing Tape, Caulking Tape for Kitchen Bathtube Bathroom Toilet Sink Floor Wall Corner Edge (6.5 ft

How to install silicone caulk around kitchen countertop, shower, bath tub etc.

Saker Silicone Caulking Tools-3 in 1 Sealant Finishing Tool Grout Remove Scraper (Stainless Steelhead),Caulk Remover Glass Glue Angle Scraper for

Duo Ventures: Kitchen Update: Grouting u0026 Caulking Subway Tile
Related Posts: