A smooth and polished basement floor can significantly enhance the overall appeal of your home. If you’re looking to transform your concrete basement floor into a flawless surface, skim coating is the answer. This technique allows you to achieve a seamless and durable finish, making it an ideal solution for enhancing the aesthetics and functionality of your basement space.
Understanding Skim Coating: Skim coating, also known as microtopping or thin overlay, is a specialized process that involves applying a thin layer of cementitious material onto the existing concrete surface. The primary purpose of the skim coating is to create a uniform and smooth finish, effectively concealing any imperfections, stains, or cracks present in the original concrete floor. It’s an excellent way to refresh the appearance of an old and worn-out basement floor without the need for extensive renovations.
Preparation is Key
Before diving into the skim coating process, proper preparation is essential to ensure the best results. Here are the steps you need to follow:
Thorough Cleaning: Begin by cleaning the basement floor thoroughly. Remove any debris, dust, or loose particles using a vacuum cleaner and a stiff brush. A clean surface is crucial for the skim coat to adhere properly to the concrete.
Surface Repairs: Inspect the floor for any cracks or damages and repair them before proceeding. Fill in the cracks and level uneven areas using a suitable concrete patching compound.
Moisture Barrier: Since basements are prone to moisture, it’s vital to apply a moisture barrier primer on the floor surface. This will prevent any potential moisture-related issues and improve the adhesion of the skim coat.
The Skim Coating Process
Now that your basement floor is well-prepared, let’s dive into the skim coating process. Follow these steps for a successful application:
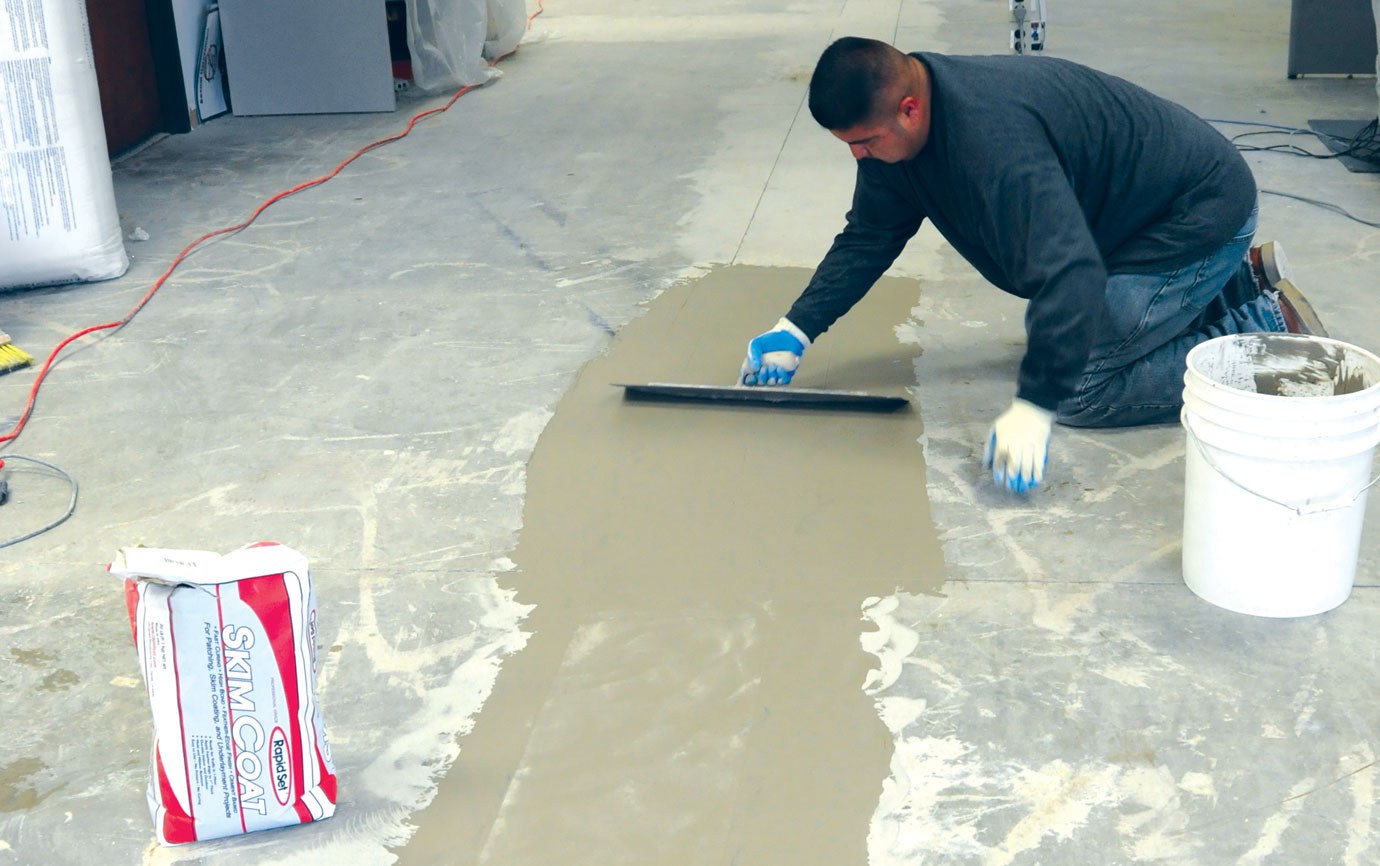
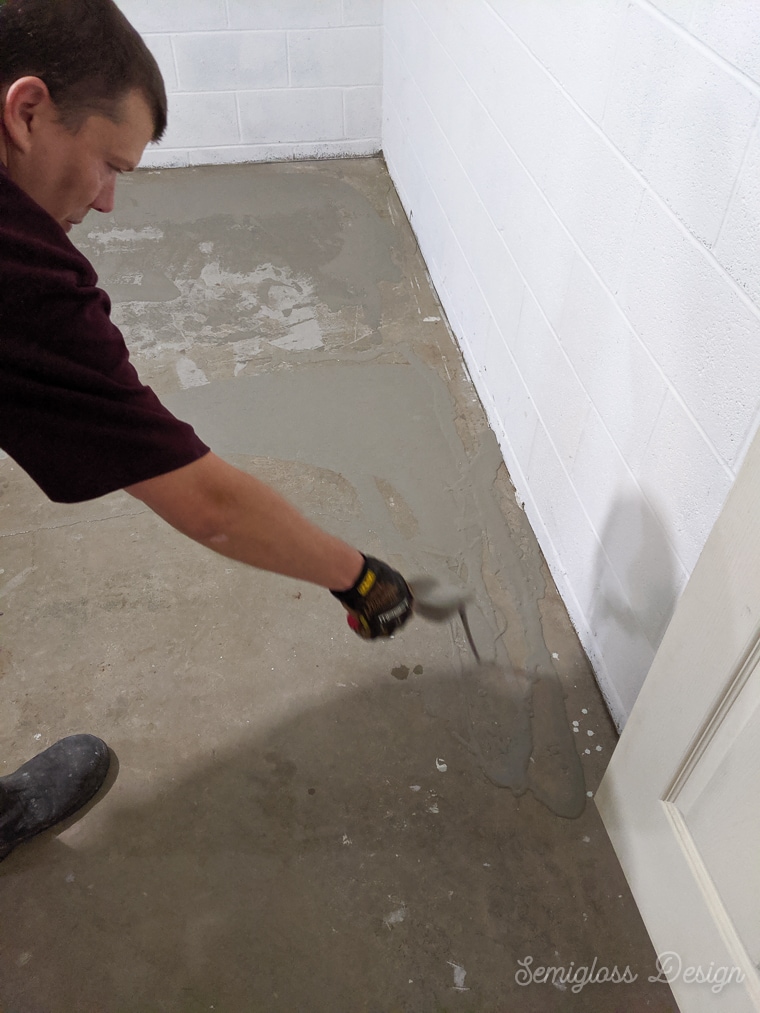
Mixing the Skim Coat: Begin by mixing the skim coat material according to the manufacturer’s instructions. Consistency is key here – aim for a smooth and lump-free mixture to ensure easy application.
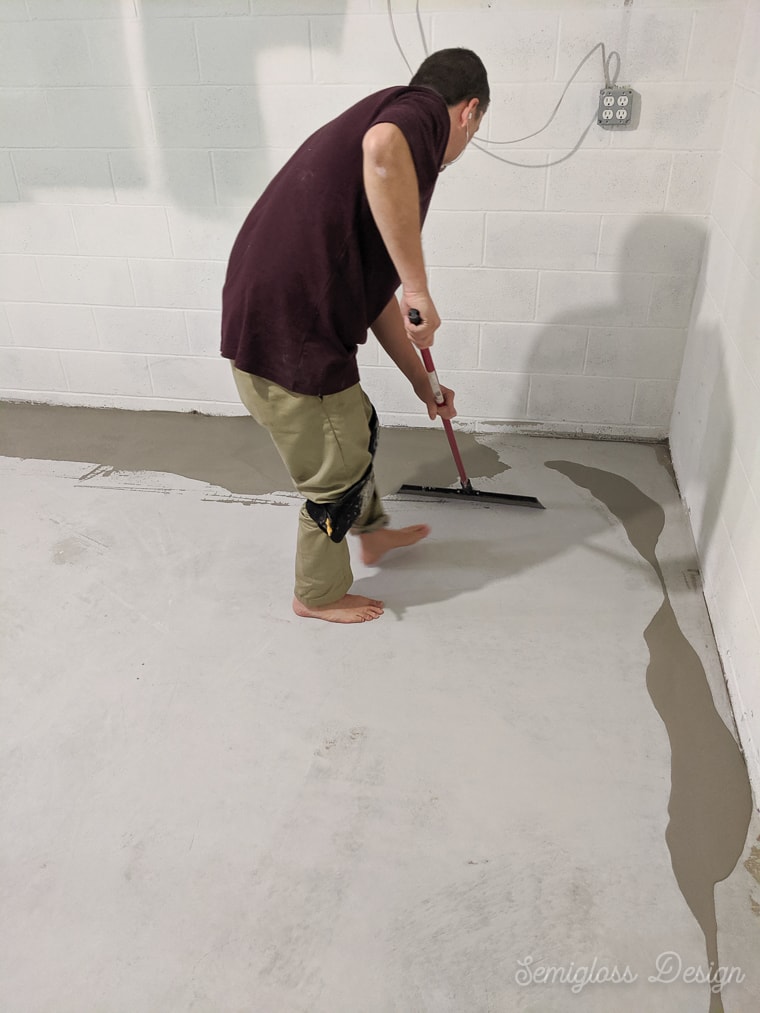
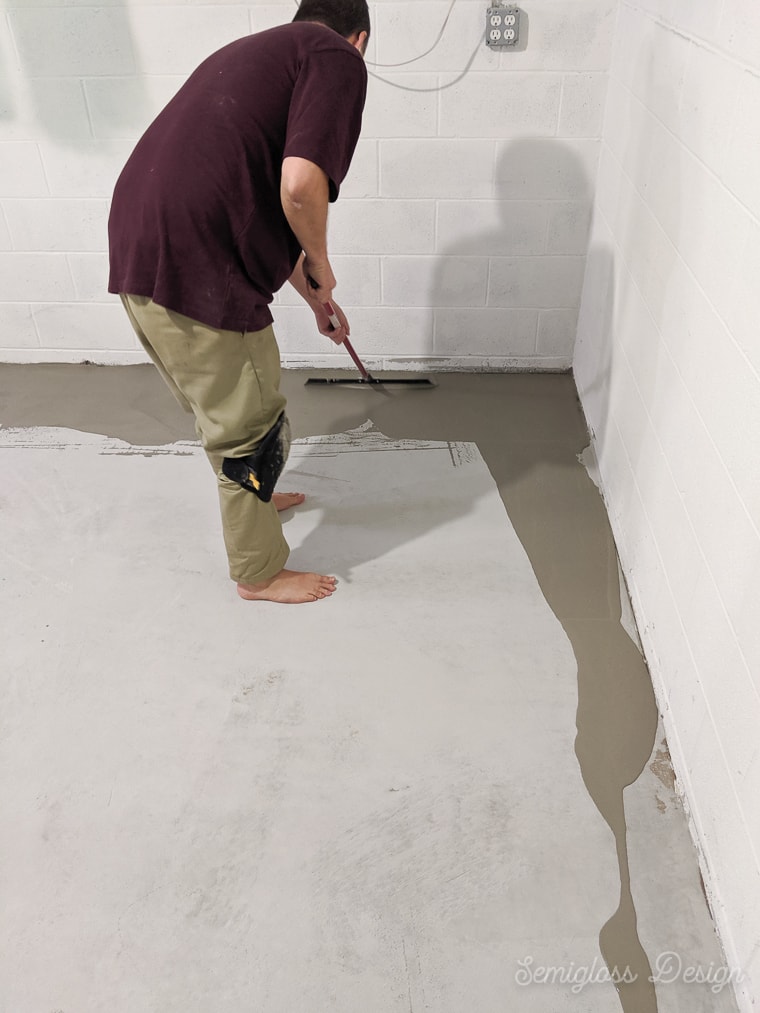
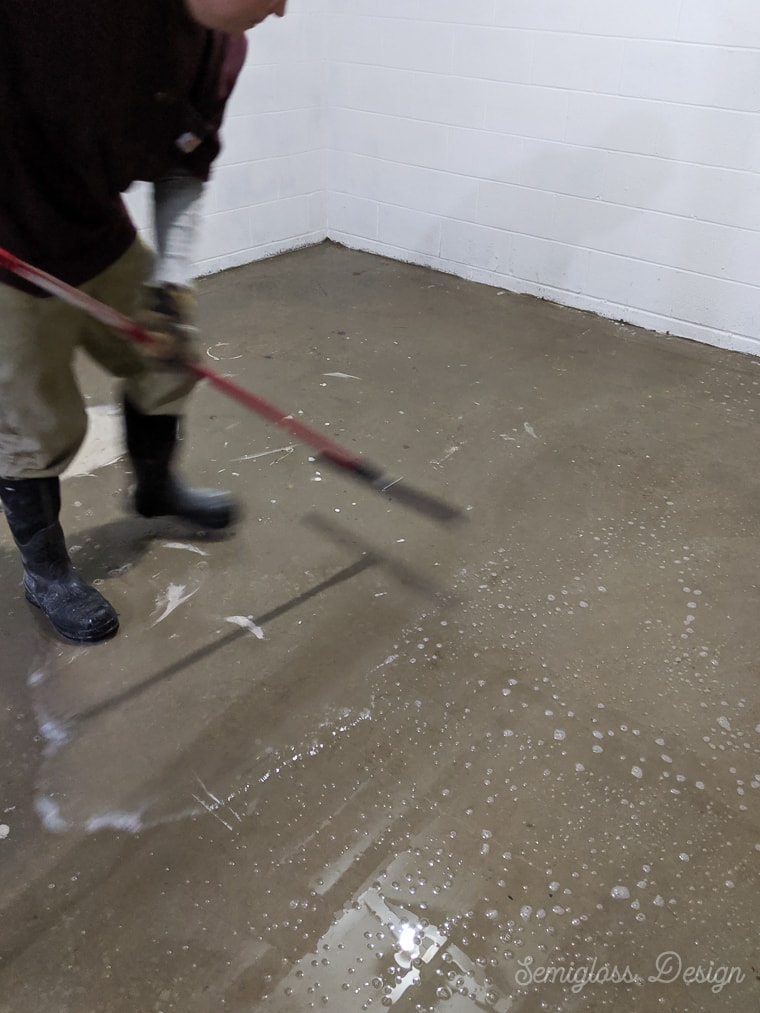
Applying the Skim Coat: Start by dampening the prepared floor surface with clean water. Then, using a trowel, apply the skim coat evenly across the floor. Work in small sections to maintain control and achieve a uniform thickness throughout.
Smoothing and Leveling: After applying the skim coat, use a long-handled squeegee or a trowel to smooth and level the surface further. This step is crucial for eliminating any ridges or uneven spots, resulting in a seamless finish.
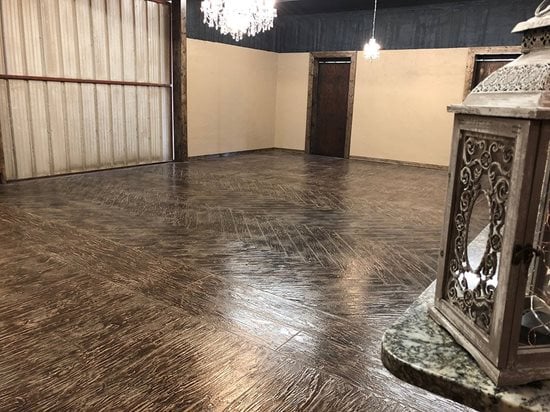
Adding Decorative Elements (Optional): If you desire a more visually appealing basement floor, you can incorporate various decorative elements during the skim coating process. For instance, you can add pigments, stains, or even create patterns to achieve a unique and personalized look.
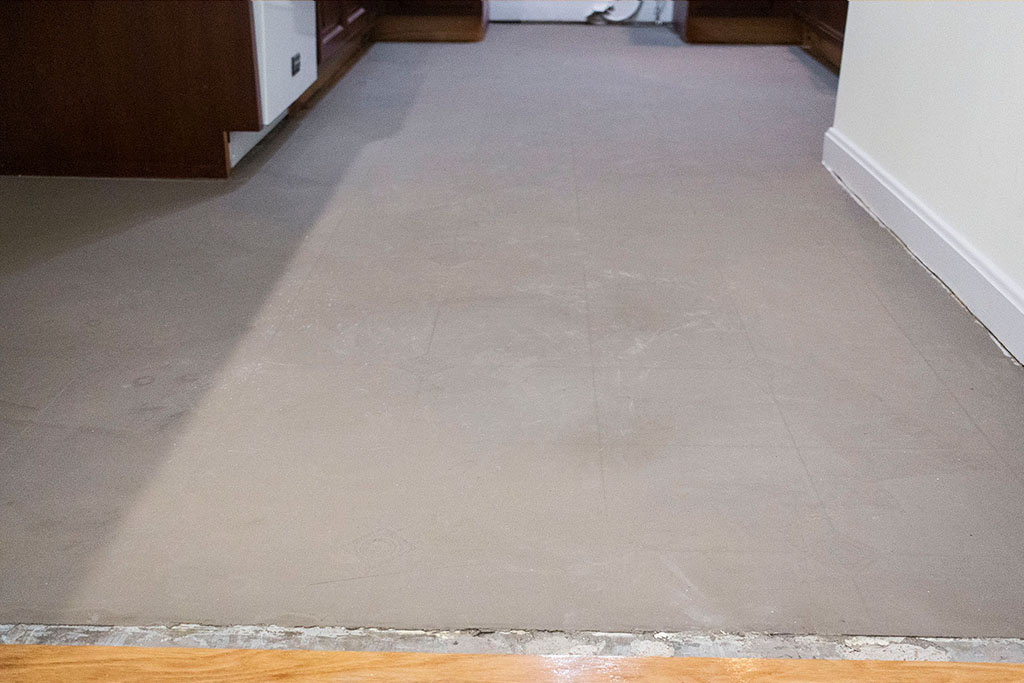
Drying Time: Allow the skim coat to dry according to the manufacturer’s recommendations. Typically, it takes around 24 hours for the skim coat to cure properly. During this time, ensure the basement space is well-ventilated to aid the drying process.
Achieve a Stunning Basement Floor
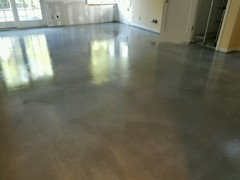
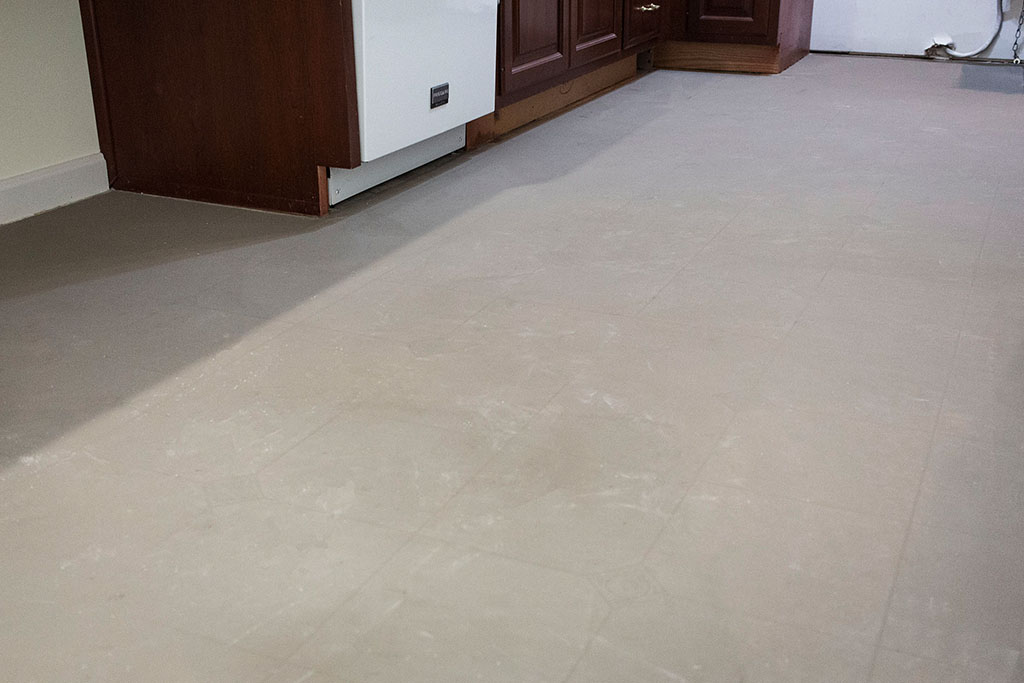
Once the skim coat has dried completely, you’ll be left with a flawless and elegant basement floor that will elevate the overall ambiance of your home. The skim coat not only enhances the appearance but also adds a protective layer to the concrete, making it more resistant to stains and abrasion.
Maintaining Your Skim Coated Floor
To ensure your newly skim coated basement floor remains in top condition, follow these maintenance tips:
Regularly sweep or vacuum the floor to remove dirt and debris.
Clean spills promptly to prevent stains from setting in.
Avoid using harsh cleaning agents that may damage the skim coat. Stick to mild, pH-neutral cleaners.
Skim Coat Concrete Basement Floor: A Comprehensive Guide
Skim coating a concrete basement floor is an effective way to improve the look and feel of the area. Skim coating is a process that involves applying a thin layer of cement over the existing concrete. The result is a smooth, polished surface that can be used for a variety of purposes. This guide will provide detailed information on skim coating your concrete basement floor.
What Is Skim Coating?
Skim coating is the process of applying a thin layer of cement or mortar over an existing surface. It is often used to improve the texture and appearance of concrete floors. Skim coating can also be used to level out uneven or rough surfaces, such as those in basements, before laying flooring. The resulting surface is smooth and even, and it can be painted or stained if desired.
Benefits of Skim Coating Concrete Basement Floors
Skim coating a concrete basement floor provides several benefits. It can make the surface more attractive, reduce dust and dirt buildup, and make it easier to lay down new flooring. In addition, it can help prevent water damage by creating a waterproof, sealed surface. Skim coating also helps keep the basement cooler in the summer months and warmer in the winter months.
Preparation for Skim Coating Concrete Basement Floors
Before skim coating your concrete basement floor, you’ll need to prepare the area. Begin by cleaning the surface with soap and water to remove any dirt or debris. Then, use a scrub brush or wire brush to remove any loose material from the surface. Next, use a vacuum cleaner with a HEPA filter to ensure that all dust particles are removed from the area before you begin skim coating. Finally, make sure that all cracks and holes are filled with mortar or patching compound before you apply the skim coat.
Materials Needed for Skim Coating Concrete Basement Floors
Once you have prepared the area, you’ll need to gather the materials for skim coating your concrete basement floor. You’ll need a bucket of pre-mixed drywall joint compound or skim coat material, a trowel, a sponge float, a rubber squeegee, a whisk broom, and an edging tool.You may also want to purchase paint or sealer if you plan on painting or sealing the surface after it has been skim coated.
Applying Skim Coat to Concrete Basement Floors
Once you have gathered all of your materials, you can begin applying the skim coat to your concrete basement floor. Start by pouring some of the joint compound or skim coat material into the bucket. Using your trowel, spread the material evenly across the surface in thin layers. Use your sponge float to smooth out any uneven areas and then use your rubber squeegee to remove any excess material from the surface. Finally, use your whisk broom and edging tool to create any desired texture on the surface before allowing it to dry completely.
Finishing Touches After Skim Coating Concrete Basement Floors
Once your skim coat has dried completely, you may choose to add some finishing touches such as painting or sealing it. If you choose to paint it, make sure that you use a paint suitable for concrete surfaces and follow all manufacturer instructions for application. Once painted, you may choose to seal it with a sealer designed specifically for concrete surfaces in order to keep moisture out and protect your floor from wear and tear over time.
FAQs about Skim Coating Concrete Basement Floors
Q: What Is The Best Material To Use For Skim Coating A Concrete Basement Floor?
A: The best material to use for skim coating a concrete basement floor is pre-mixed drywall joint compound or skim coat material. This type of material is designed specifically for use on concrete surfaces and provides excellent results without requiring much effort on your part.
Q: How Long Does It Take To Skim Coat A Concrete Basement Floor?
A: The amount of time it takes to skim coat a concrete basement floor will vary depending on how large the area is and how many layers of material you choose to apply. Generally
We use cookies on our website to give you the most relevant experience by remembering your preferences and repeat visits. By clicking “Accept All”, you consent to the use of ALL the cookies. However, you may visit "Cookie Settings" to provide a controlled consent.
This website uses cookies to improve your experience while you navigate through the website. Out of these, the cookies that are categorized as necessary are stored on your browser as they are essential for the working of basic functionalities of the website. We also use third-party cookies that help us analyze and understand how you use this website. These cookies will be stored in your browser only with your consent. You also have the option to opt-out of these cookies. But opting out of some of these cookies may affect your browsing experience.
Necessary cookies are absolutely essential for the website to function properly. These cookies ensure basic functionalities and security features of the website, anonymously.
Cookie
Duration
Description
cookielawinfo-checkbox-analytics
11 months
This cookie is set by GDPR Cookie Consent plugin. The cookie is used to store the user consent for the cookies in the category "Analytics".
cookielawinfo-checkbox-functional
11 months
The cookie is set by GDPR cookie consent to record the user consent for the cookies in the category "Functional".
cookielawinfo-checkbox-necessary
11 months
This cookie is set by GDPR Cookie Consent plugin. The cookies is used to store the user consent for the cookies in the category "Necessary".
cookielawinfo-checkbox-others
11 months
This cookie is set by GDPR Cookie Consent plugin. The cookie is used to store the user consent for the cookies in the category "Other.
cookielawinfo-checkbox-performance
11 months
This cookie is set by GDPR Cookie Consent plugin. The cookie is used to store the user consent for the cookies in the category "Performance".
viewed_cookie_policy
11 months
The cookie is set by the GDPR Cookie Consent plugin and is used to store whether or not user has consented to the use of cookies. It does not store any personal data.
Functional cookies help to perform certain functionalities like sharing the content of the website on social media platforms, collect feedbacks, and other third-party features.
Performance cookies are used to understand and analyze the key performance indexes of the website which helps in delivering a better user experience for the visitors.
Analytical cookies are used to understand how visitors interact with the website. These cookies help provide information on metrics the number of visitors, bounce rate, traffic source, etc.
Advertisement cookies are used to provide visitors with relevant ads and marketing campaigns. These cookies track visitors across websites and collect information to provide customized ads.


 Related Posts:
Skim Coat Concrete Basement Floor: A Comprehensive Guide
Skim coating a concrete basement floor is an effective way to improve the look and feel of the area. Skim coating is a process that involves applying a thin layer of cement over the existing concrete. The result is a smooth, polished surface that can be used for a variety of purposes. This guide will provide detailed information on skim coating your concrete basement floor.
What Is Skim Coating?
Skim coating is the process of applying a thin layer of cement or mortar over an existing surface. It is often used to improve the texture and appearance of concrete floors. Skim coating can also be used to level out uneven or rough surfaces, such as those in basements, before laying flooring. The resulting surface is smooth and even, and it can be painted or stained if desired.
Benefits of Skim Coating Concrete Basement Floors
Skim coating a concrete basement floor provides several benefits. It can make the surface more attractive, reduce dust and dirt buildup, and make it easier to lay down new flooring. In addition, it can help prevent water damage by creating a waterproof, sealed surface. Skim coating also helps keep the basement cooler in the summer months and warmer in the winter months.
Preparation for Skim Coating Concrete Basement Floors
Before skim coating your concrete basement floor, you’ll need to prepare the area. Begin by cleaning the surface with soap and water to remove any dirt or debris. Then, use a scrub brush or wire brush to remove any loose material from the surface. Next, use a vacuum cleaner with a HEPA filter to ensure that all dust particles are removed from the area before you begin skim coating. Finally, make sure that all cracks and holes are filled with mortar or patching compound before you apply the skim coat.
Materials Needed for Skim Coating Concrete Basement Floors
Once you have prepared the area, you’ll need to gather the materials for skim coating your concrete basement floor. You’ll need a bucket of pre-mixed drywall joint compound or skim coat material, a trowel, a sponge float, a rubber squeegee, a whisk broom, and an edging tool.You may also want to purchase paint or sealer if you plan on painting or sealing the surface after it has been skim coated.
Applying Skim Coat to Concrete Basement Floors
Once you have gathered all of your materials, you can begin applying the skim coat to your concrete basement floor. Start by pouring some of the joint compound or skim coat material into the bucket. Using your trowel, spread the material evenly across the surface in thin layers. Use your sponge float to smooth out any uneven areas and then use your rubber squeegee to remove any excess material from the surface. Finally, use your whisk broom and edging tool to create any desired texture on the surface before allowing it to dry completely.
Finishing Touches After Skim Coating Concrete Basement Floors
Once your skim coat has dried completely, you may choose to add some finishing touches such as painting or sealing it. If you choose to paint it, make sure that you use a paint suitable for concrete surfaces and follow all manufacturer instructions for application. Once painted, you may choose to seal it with a sealer designed specifically for concrete surfaces in order to keep moisture out and protect your floor from wear and tear over time.
FAQs about Skim Coating Concrete Basement Floors
Q: What Is The Best Material To Use For Skim Coating A Concrete Basement Floor?
A: The best material to use for skim coating a concrete basement floor is pre-mixed drywall joint compound or skim coat material. This type of material is designed specifically for use on concrete surfaces and provides excellent results without requiring much effort on your part.
Q: How Long Does It Take To Skim Coat A Concrete Basement Floor?
A: The amount of time it takes to skim coat a concrete basement floor will vary depending on how large the area is and how many layers of material you choose to apply. Generally
Related Posts:
Skim Coat Concrete Basement Floor: A Comprehensive Guide
Skim coating a concrete basement floor is an effective way to improve the look and feel of the area. Skim coating is a process that involves applying a thin layer of cement over the existing concrete. The result is a smooth, polished surface that can be used for a variety of purposes. This guide will provide detailed information on skim coating your concrete basement floor.
What Is Skim Coating?
Skim coating is the process of applying a thin layer of cement or mortar over an existing surface. It is often used to improve the texture and appearance of concrete floors. Skim coating can also be used to level out uneven or rough surfaces, such as those in basements, before laying flooring. The resulting surface is smooth and even, and it can be painted or stained if desired.
Benefits of Skim Coating Concrete Basement Floors
Skim coating a concrete basement floor provides several benefits. It can make the surface more attractive, reduce dust and dirt buildup, and make it easier to lay down new flooring. In addition, it can help prevent water damage by creating a waterproof, sealed surface. Skim coating also helps keep the basement cooler in the summer months and warmer in the winter months.
Preparation for Skim Coating Concrete Basement Floors
Before skim coating your concrete basement floor, you’ll need to prepare the area. Begin by cleaning the surface with soap and water to remove any dirt or debris. Then, use a scrub brush or wire brush to remove any loose material from the surface. Next, use a vacuum cleaner with a HEPA filter to ensure that all dust particles are removed from the area before you begin skim coating. Finally, make sure that all cracks and holes are filled with mortar or patching compound before you apply the skim coat.
Materials Needed for Skim Coating Concrete Basement Floors
Once you have prepared the area, you’ll need to gather the materials for skim coating your concrete basement floor. You’ll need a bucket of pre-mixed drywall joint compound or skim coat material, a trowel, a sponge float, a rubber squeegee, a whisk broom, and an edging tool.You may also want to purchase paint or sealer if you plan on painting or sealing the surface after it has been skim coated.
Applying Skim Coat to Concrete Basement Floors
Once you have gathered all of your materials, you can begin applying the skim coat to your concrete basement floor. Start by pouring some of the joint compound or skim coat material into the bucket. Using your trowel, spread the material evenly across the surface in thin layers. Use your sponge float to smooth out any uneven areas and then use your rubber squeegee to remove any excess material from the surface. Finally, use your whisk broom and edging tool to create any desired texture on the surface before allowing it to dry completely.
Finishing Touches After Skim Coating Concrete Basement Floors
Once your skim coat has dried completely, you may choose to add some finishing touches such as painting or sealing it. If you choose to paint it, make sure that you use a paint suitable for concrete surfaces and follow all manufacturer instructions for application. Once painted, you may choose to seal it with a sealer designed specifically for concrete surfaces in order to keep moisture out and protect your floor from wear and tear over time.
FAQs about Skim Coating Concrete Basement Floors
Q: What Is The Best Material To Use For Skim Coating A Concrete Basement Floor?
A: The best material to use for skim coating a concrete basement floor is pre-mixed drywall joint compound or skim coat material. This type of material is designed specifically for use on concrete surfaces and provides excellent results without requiring much effort on your part.
Q: How Long Does It Take To Skim Coat A Concrete Basement Floor?
A: The amount of time it takes to skim coat a concrete basement floor will vary depending on how large the area is and how many layers of material you choose to apply. Generally