Benefits of DIY Cork Flooring
Are you tired of the same old flooring options and looking for a cost-effective and environmentally friendly alternative? Look no further than DIY cork flooring! Offering a myriad of benefits, cork flooring has become a popular choice for homeowners seeking a unique and sustainable solution. Below are the numerous advantages of DIY cork flooring.
- Enhanced Comfort and Insulation: Cork flooring provides exceptional comfort underfoot due to its natural cushioning properties. The softness of cork makes it a perfect choice for areas where you spend a lot of time standing, such as kitchens or home offices. Additionally, cork acts as an excellent insulator, keeping your feet warm in winter and cool in summer.
- Durability and Resilience: DIY cork flooring is incredibly durable and can withstand heavy foot traffic without showing signs of wear and tear. Its resilience allows it to bounce back from indentations and minor scratches, making it ideal for busy households or commercial spaces. With proper maintenance, cork flooring can last for decades.
- Sound Absorption: One of the standout benefits of cork flooring is its exceptional sound absorption capabilities. The unique cellular structure of cork effectively reduces noise transmission, making it an excellent choice for apartments or rooms where noise reduction is desired. DIY cork flooring can help create a quiet and peaceful environment in your home.
- Allergen-Free and Hypoallergenic: For those with allergies or respiratory sensitivities, cork flooring is an excellent option. Unlike carpets, cork does not trap dust, pollen, or pet dander, making it easier to maintain a clean and allergen-free environment. Additionally, cork contains a natural substance called suberin, which acts as a barrier against mold, mildew, and pests.
- Eco-Friendly Choice: Cork is a sustainable and renewable material, making it an environmentally friendly choice for DIY flooring projects. Cork is harvested from the bark of cork oak trees, which can be done without harming the tree itself. This renewable harvesting process allows the tree to regenerate its bark, making cork a highly sustainable flooring option.
Step-by-Step Guide to DIY Cork Flooring
Prepare the Subfloor: Ensure that the subfloor is clean, level, and free from any moisture or debris. Remove any existing flooring materials and repair any damages if necessary. It is crucial to have a smooth and even surface to achieve a successful installation.
Acclimate the Cork Tiles: Allow the cork tiles to acclimate to the room’s temperature and humidity for at least 48 hours before installation. This step is essential to prevent any expansion or contraction of the tiles after installation.
Measure and Plan the Layout: Measure the room’s dimensions and plan the layout of the cork tiles. Start from the center of the room and work your way outwards. Use spacers to maintain consistent gaps between the tiles and walls.
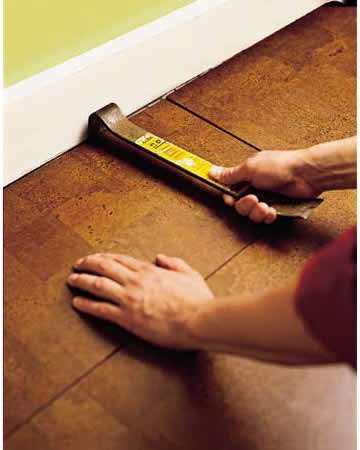
Apply Adhesive and Install the Tiles: Apply a suitable adhesive to the subfloor using a trowel, following the manufacturer’s instructions. Install the cork tiles, pressing them firmly into place. Use a rubber mallet or a rolling pin to ensure proper adhesion and eliminate any air pockets.
Trim and Finish: Trim the cork tiles along the edges of the room using a utility knife or a cork cutter. Install baseboards or molding to cover the expansion gaps. Once the adhesive has fully cured, apply a suitable sealant or finish to protect the cork flooring and enhance its durability.
Clean and Maintain: Regularly clean the cork flooring using a damp mop or a soft brush to remove dirt and debris. Avoid using harsh chemicals or abrasive cleaners that can damage the surface. Follow the manufacturer’s recommendations for specific cleaning and maintenance instructions.

Materials and Tools Needed for DIY Cork Flooring
Cork Tiles: Choose high-quality cork tiles that suit your design preferences and meet your project requirements. Consider factors such as thickness, color, and finish.
Adhesive: Select a suitable adhesive specifically designed for cork flooring installation. Ensure that the adhesive is compatible with both the subfloor material and the cork tiles.
Trowel: A trowel is essential for applying the adhesive evenly onto the subfloor. Choose a trowel size recommended by the adhesive manufacturer.
Utility Knife or Cork Cutter: These tools are necessary for trimming the cork tiles to fit along the edges of the room or around obstacles.
Spacers: Spacers are used to maintain consistent gaps between the cork tiles and the walls, allowing for expansion and contraction.
Rubber Mallet or Rolling Pin: These tools help ensure proper adhesion of the cork tiles to the adhesive, eliminating air pockets and creating a smooth surface.
Measuring Tape and Straight Edge: Accurate measurements and a straight edge are crucial for planning the layout and achieving a professional-looking installation.
Sealant or Finish: Depending on the type of cork tiles chosen, a sealant or finish may be necessary to protect the flooring and enhance its longevity.

Tips and Tricks for DIY Cork Flooring Success
Proper Subfloor Preparation: Ensure that the subfloor is clean, dry, and level before starting the installation. Any irregularities or moisture issues can affect the longevity and performance of the cork flooring.
Acclimate the Cork Tiles: Allow the cork tiles to acclimate to the room’s temperature and humidity for at least 48 hours. This step prevents any expansion or contraction issues after installation.
Use the Right Adhesive: Select an adhesive specifically designed for cork flooring installation. Follow the manufacturer’s instructions for proper application and drying time.
Plan the Layout: Carefully plan the layout of the cork tiles, starting from the center and working your way outwards. This ensures a balanced and visually appealing installation.
Take Care When Trimming: Use a sharp utility knife or a cork cutter to trim the cork tiles. Take your time and make precise cuts to achieve a seamless fit along the edges of the room or around obstacles.
Maintain Consistent Gaps: Use spacers to maintain consistent gaps between the cork tiles and walls. This allows for expansion and contraction and prevents buckling or warping of the flooring.

Cost Savings and Sustainability of DIY Cork Flooring
Affordable Material: Cork flooring is generally more affordable compared to other flooring options such as hardwood or stone. DIY installation further reduces costs by eliminating labor expenses.
Longevity and Durability: Cork flooring is known for its durability and longevity. With proper care and maintenance, it can last for decades, saving you money on replacement costs.
Energy Efficiency: Cork flooring’s natural insulation properties help regulate room temperature, reducing the need for excessive heating or cooling. This can result in lower energy bills and long-term cost savings.
DIY Savings: By undertaking the cork flooring installation yourself, you can save on professional installation fees. This makes cork flooring a cost-effective option for budget-conscious homeowners.
Environmentally Friendly: Cork is a sustainable and renewable material. Harvesting cork bark does not harm the tree, allowing it to regenerate. Choosing DIY cork flooring contributes to a more sustainable and eco-friendly home.
Improved Indoor Air Quality: Cork flooring is hypoallergenic and does not emit harmful volatile organic compounds (VOCs) like some other flooring materials. This promotes better indoor air quality, benefiting your health and well-being.
How to Install a Cork Floor – This Old House

Related Posts:
- White Washed Cork Floor
- How To Clean Cork Floor
- How To Finish Cork Flooring
- Cork Flooring Refinishing
- How To Seal Cork Flooring
- Installing Cork Flooring In A Bathroom
- Cork Floor Tiles For Kitchen
- Finishing Cork Flooring
- Vinyl Flooring Cork
- Basement Cork Flooring