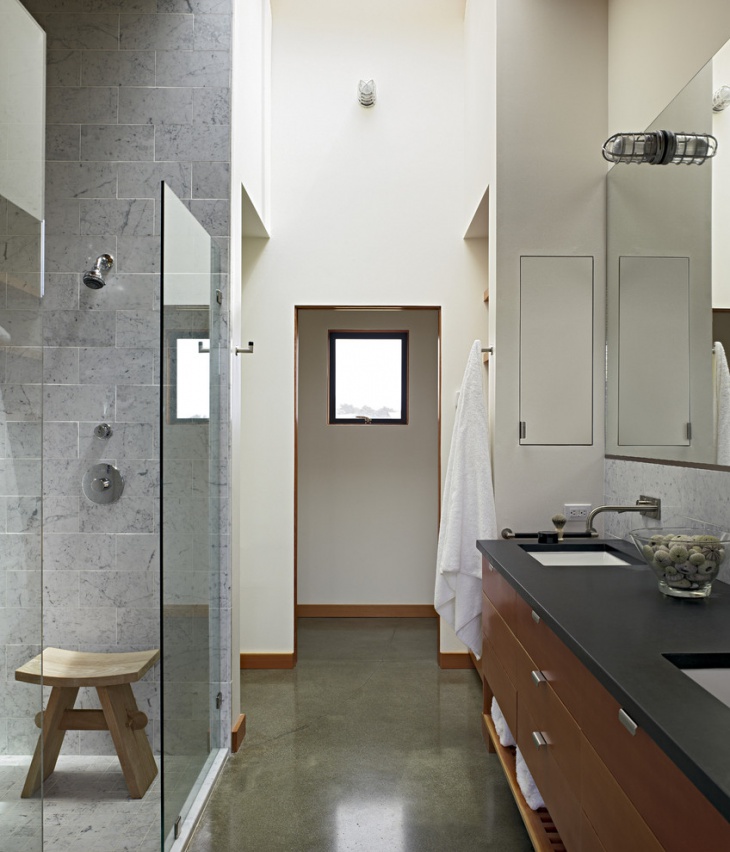
Planning Your Concrete Bathroom Floor: Materials and Tools You’ll Need
When I first decided to install a concrete floor in my bathroom, I quickly realized how important proper planning was. Having all the right materials and tools ready-made the process much smoother. It’s a project that requires attention to detail and some specialized tools, but it’s doable if you’re prepared. Here’s what I found essential for a successful DIY concrete bathroom floor.
- Concrete Mix: The concrete mix is the foundation of this project. I chose a high-quality pre-mixed bag that’s ideal for small-scale flooring projects. If you want a smooth and durable finish, you need a mix that’s designed specifically for floors. Quick-setting concrete is an option if you’re short on time, but standard concrete allows more flexibility in adjusting the surface before it hardens.
- Trowel and Float: These are two of the most crucial tools for applying and smoothing the concrete. The trowel helps spread the mixture evenly across the floor, while the float is used to smooth the surface once the concrete starts to set. I found that investing in a good-quality metal float gave me better control over achieving a smooth finish.
- Concrete Sealer: Since bathrooms are high-moisture environments, sealing the concrete floor is essential to prevent water damage. I opted for a clear, waterproof sealer that enhances the natural look of the concrete. Make sure to choose a sealer that is designed for bathroom use, as not all sealers will hold up against moisture and humidity.
- Level and Measuring Tools: Achieving a level surface is key to preventing water pooling in certain areas of the bathroom. A long, sturdy level was incredibly helpful in making sure the floor was flat, especially when working with an uneven subfloor. You’ll also want to have measuring tools handy to ensure you’re pouring the correct amount of concrete for your space.
- Protective Gear: Safety should always be a priority. I made sure to wear gloves, protective eyewear, and a mask to avoid inhaling concrete dust. These small precautions helped me focus on the task at hand without worrying about safety hazards.
- Optional: Decorative Stains or Pigments: If you want to add a unique touch to your concrete floor, consider decorative stains or pigments. I chose to keep my floor a natural gray, but you can easily customize the color to match your bathroom’s design by adding these to the concrete mix before pouring.

Step-by-Step Guide to Prepping Your Bathroom for a Concrete Floor
Prepping the bathroom was probably the most time-consuming part of this project, but it’s also the most important. A well-prepared surface ensures that your concrete floor will last for years without issues. From clearing out the bathroom to ensuring the subfloor is ready, here’s a step-by-step guide to get your space ready for concrete.
Clear the Space
The first thing I did was empty the bathroom. This included removing the toilet, vanity, and any other fixtures that might get in the way. If you’re replacing an old floor, you’ll also need to remove the existing flooring material, whether it’s tiles, vinyl, or wood. Make sure to clear everything so you’re working with an empty canvas.
Inspect and Repair the Subfloor
Before pouring the concrete, I checked the condition of the subfloor. If you have any cracks, gaps, or uneven spots, you’ll need to fix them before moving forward. I used a self-leveling compound to even out any dips in the floor. This step is crucial because a level subfloor ensures that your concrete will set evenly.
Install a Moisture Barrier
Since concrete is porous, installing a moisture barrier is essential, especially in a bathroom. I laid down a plastic sheeting moisture barrier across the entire floor. This prevents moisture from seeping up through the concrete, which could lead to mold or water damage over time.
Add Insulation (Optional)
If your bathroom tends to get cold, you may want to consider adding insulation beneath the concrete. I didn’t add this to my project, but installing rigid foam insulation can help keep the floor warm, especially if you’re in a colder climate or want to install radiant floor heating.
Mark Your Pouring Area
Once the subfloor was ready, I marked off the area where the concrete would be poured using painter’s tape. This helps keep things organized, especially if you have irregularly shaped spaces or small corners. Having a clearly defined area ensured I didn’t accidentally pour too much concrete in one spot.
Gather Your Tools and Materials
Lastly, I made sure all my tools were ready and within arm’s reach. Once you start pouring the concrete, things move quickly, so having everything prepared ensures you won’t be scrambling in the middle of the project. This final check helped me stay focused and organized throughout the entire process.
Mixing and Pouring Concrete: Achieving a Smooth and Even Finish
Once everything was prepped, it was time for the actual concrete pouring—a process that requires some finesse to get a smooth and even surface. This is where your patience and attention to detail will pay off. I’ll walk you through how I tackled the mixing and pouring process for my bathroom.
Mix the Concrete Correctly
The first step was mixing the concrete, which I did in small batches using a large bucket and a mixing paddle attached to a power drill. I followed the instructions on the bag carefully to get the right consistency—not too watery, but not too dry either. I found that a peanut butter-like consistency worked best for easy spreading while ensuring it would set properly.
Start at the Far Corner
I started pouring the concrete in the farthest corner of the bathroom, working my way towards the door. This ensured I wouldn’t trap myself inside the room. I poured small amounts of concrete at a time, using a trowel to spread it evenly. This method helped me control the thickness and ensure an even application across the floor.
Use a Screed to Level the Surface
Once I had poured a section of concrete, I used a straight-edged screed to level the surface. This tool helped me remove excess material and smooth out any uneven spots. Pulling the screed across the surface in a back-and-forth motion ensured that the concrete was distributed evenly.
Float the Concrete for a Smooth Finish
After screeding, I used a metal float to smooth out the surface of the concrete. This part takes some practice, but with patience, you can achieve a smooth, glass-like finish. I found it helpful to use a light touch when floating to avoid dragging the surface too much. Working in small sections allowed me to focus on getting each area just right.
Let the First Layer Cure
Once the concrete was poured and smoothed, I allowed it to cure for at least 24 hours. Depending on the size of your bathroom, this waiting period could be longer, but it’s crucial to let the concrete set properly before moving on to the next steps. I kept the room well-ventilated to help the curing process.
Apply a Second Layer if Necessary
If the first layer doesn’t achieve the desired thickness or if you notice imperfections, applying a second layer of concrete can fix these issues. I found that one layer was sufficient for my project, but adding a second layer can help reinforce the floor, especially in high-traffic areas like the bathroom.
Polishing and Sealing Your Concrete Bathroom Floor for Durability
After the concrete had cured, the next step was polishing and sealing the surface. This is what transforms the concrete from a raw, rough surface into a smooth and durable floor that’s ready for daily use in a bathroom. Here’s how I tackled this crucial finishing step.
Choose the Right Polishing Equipment
To achieve a smooth finish, I used a concrete polisher with diamond polishing pads. I started with a coarse pad to remove any imperfections and gradually worked my way to finer grit pads for a polished, glossy look. If you don’t have access to a concrete polisher, you can rent one, but I found it worth investing in a small, affordable model for future projects.
Polish in Multiple Stages
Polishing concrete is a multi-step process. I began with a 50-grit pad, then moved up to 100, 200, and finally 400-grit for a high-gloss finish. Each stage of polishing helped refine the surface, making it progressively smoother. It’s important to work slowly and evenly across the entire floor to avoid creating uneven spots.
Clean the Floor Thoroughly
Before sealing, I thoroughly cleaned the polished surface to remove any dust or debris. A vacuum and a damp mop did the trick. This step is critical because any particles left on the surface will get trapped under the sealer and could affect the finish.
Apply a Penetrating Concrete Sealer
For bathroom use, I opted for a penetrating sealer specifically designed for wet environments. This type of sealer penetrates deep into the concrete, providing a long-lasting, waterproof barrier. I applied it with a roller, working in thin, even coats. The sealer not only protects the floor but also enhances the natural beauty of the polished concrete.
Allow the Sealer to Cure
Once the sealer was applied, I let it cure for at least 48 hours before allowing any foot traffic. This waiting period ensures the sealer bonds properly with the concrete, creating a durable, waterproof surface. While it’s tempting to start using the floor right away, patience here is key to long-term durability.
Reapply Sealer Periodically
To maintain the durability and appearance of the concrete, I plan to reapply the sealer every few years, especially in a high-moisture environment like a bathroom. Keeping up with this maintenance ensures the floor will look great and last for years to come.
Incorporating Stains and Decorative Elements into Your Concrete Floor
One of the reasons I love concrete floors is the endless customization options. With stains, pigments, and decorative elements, you can turn a plain concrete floor into a statement piece that complements your bathroom’s aesthetic. Here’s how I added some personality to my concrete floor.
Choose a Stain or Pigment
Stains and pigments offer a wide range of color options for your concrete floor. I chose a subtle gray stain that matched the minimalist style of my bathroom, but you can go for anything from deep earth tones to vibrant blues and greens. Stains penetrate the surface of the concrete, creating a natural, variegated color that won’t chip or peel.
Apply the Stain After Polishing
Once I had polished the concrete, I applied the stain using a sprayer for an even application. Stains work best on smooth surfaces, so polishing beforehand ensures that the color adheres properly. I followed the instructions on the stain carefully, allowing it to sit for the recommended time before wiping away any excess.
Add Decorative Patterns or Designs
If you want to take your concrete floor to the next level, consider adding stencils or scoring designs to the surface. I decided to keep my floor simple, but stencils can create intricate patterns while scoring with a concrete saw allows you to mimic the look of tiles or other designs. This is a great way to personalize the floor without breaking the bank.
Layer Multiple Stains for Depth
For a more dynamic look, I experimented with layering different stains. By applying a second, lighter color on top of the first, I achieved a subtle marbling effect that gave the floor more depth and visual interest. It’s an easy technique that adds a lot of character to the space.
Seal the Stained Surface
After applying the stain, it’s important to seal the concrete to protect the color and ensure it lasts. The sealer enhances the stain’s appearance and adds a glossy or matte finish, depending on your preference. I chose a glossy sealer to make the colors pop, but a matte finish can give a more natural, understated look.
Experiment with Decorative Aggregates
If you’re pouring new concrete, you can also experiment with adding decorative aggregates like glass, stones, or shells. These materials can be polished to create a terrazzo-like effect. While I didn’t include this in my project, it’s a fun way to add texture and color to a concrete bathroom floor.
Tips for Waterproofing and Moisture Protection in a Concrete Bathroom Floor
Waterproofing is essential when installing a concrete floor in a bathroom. Without the right protection, moisture can seep into the concrete, causing damage and potentially leading to mold or mildew. Here’s how I ensured my bathroom floor was fully waterproofed and protected from moisture.
Install a Waterproof Membrane
Before pouring the concrete, I installed a waterproof membrane over the subfloor. This membrane creates a barrier between the concrete and the subfloor, preventing moisture from rising up into the concrete. I used a roll-on membrane, which was easy to apply with a paint roller. This step is crucial, especially in areas like the shower or near the sink.
Choose a High-Quality Sealer
Sealing the concrete is your first line of defense against moisture. I made sure to use a sealer designed specifically for bathrooms and high-moisture environments. These sealers penetrate deep into the concrete and create a waterproof barrier that prevents water from soaking into the floor.
Focus on the Edges and Corners
The edges and corners of the bathroom are particularly vulnerable to moisture, so I paid extra attention to these areas when applying the sealer. I used a small brush to carefully coat the seams where the floor meets the walls, ensuring that no water could seep into these joints.
Regularly Reapply the Sealer
Over time, the sealer can wear down, especially in a bathroom where water is constantly present. To maintain the waterproof barrier, I plan to reapply the sealer every one to two years. This periodic maintenance is a small investment of time that will protect the floor from water damage in the long run.
Check for Leaks and Address Them Immediately
Even with waterproofing measures in place, leaks can happen. I make it a habit to check for any signs of water damage or leaks around the bathroom fixtures. If you spot any water pooling or discoloration on the floor, it’s important to address the issue right away to prevent long-term damage.
Consider Using Waterproof Concrete
For an added layer of protection, you can use waterproof concrete mixes that are specifically designed for wet environments. While I didn’t use this type of concrete for my project, it’s a great option if you want extra assurance that your bathroom floor will stand up to moisture.
Maintenance and Care Tips
Maintaining a concrete bathroom floor is relatively easy, but there are a few key steps to keep in mind if you want your floor to look as good as new for years to come. Here’s how I take care of my concrete floor to ensure it stays clean, polished, and free from damage.
Regular Sweeping and Mopping
To keep the surface free of dirt and debris, I make sure to sweep the floor regularly. This prevents any particles from scratching the polished surface over time. I also mop the floor once a week using a mild cleaner and warm water. Harsh chemicals can damage the sealer, so it’s best to avoid anything too abrasive.
Reapply Sealer Periodically
As I mentioned earlier, reapplying the sealer every one to two years is essential for maintaining the waterproof barrier. I set a reminder to check the condition of the sealer each year and reapply it as needed. This keeps the floor looking shiny and protects it from moisture.
Avoid Dragging Heavy Objects
Concrete is durable, but it can still scratch if you drag heavy objects across the surface. Whenever I need to move furniture or bathroom fixtures, I make sure to lift them instead of dragging them. This simple habit helps prevent any unwanted marks or scratches on the floor.
Clean Up Spills Immediately
Although the concrete is sealed, I still clean up any spills right away to avoid potential staining. This is especially important with products like hair dye, makeup, or harsh cleaning chemicals that could damage the surface if left for too long.
Use Rugs in High-Traffic Areas
To protect the floor from wear and tear in high-traffic areas, I use small rugs near the sink and shower. These rugs not only add a cozy touch to the bathroom but also help protect the floor from water splashes and heavy foot traffic.
Inspect for Cracks and Repair Promptly
Concrete can develop small cracks over time, especially in a high-moisture environment like a bathroom. I make it a point to inspect the floor regularly and address any cracks as soon as they appear. Small cracks can often be filled with a concrete patching compound, preventing them from spreading and causing more significant damage.
DIY Concrete Floor Cheap Home DIYs Design Mom
Installing and finishing a concrete floor
Using Concrete Bathroom Floor and Change the Look of your Bathroom
Concrete Bathroom Floor Designs, Ideas Design Trends
Bathroom Concrete Floor
How to Waterproof Concrete Showers and Tubs – Concrete Decor
How to Self Level Bathroom Floors
How to level a concrete floor with self-leveling concrete
Related Posts:
