When I decided to renovate my home and give it a fresh look, one of the key elements I wanted to upgrade was the flooring. After much research and consulting with experts, I settled on the idea of laying a concrete floor with a membrane. This choice not only provided a durable and long-lasting solution but also offered added benefits like moisture protection and insulation. Let me share my experience and guide you through the process of laying a concrete floor with a membrane.
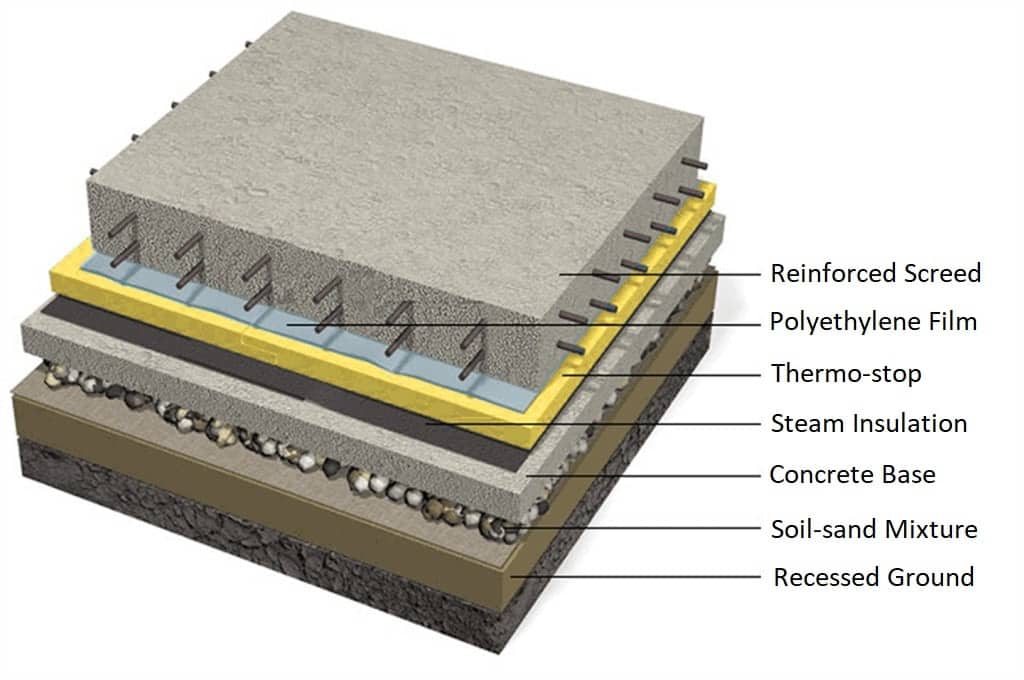
1. Choosing the Right Membrane: The first step in this project was selecting the appropriate membrane for my concrete floor. There are various options available, each with its specific features. I opted for a high-quality, polyethylene membrane that had excellent moisture resistance. This was crucial as my house is located in an area prone to occasional moisture infiltration. Additionally, I considered a membrane with good thermal properties to provide better insulation and prevent heat loss during colder months. When choosing your membrane, it’s essential to assess your specific needs, the location of your property, and the type of concrete flooring you plan to install.
2. Preparing the Substrate: Before laying the membrane, I made sure to prepare the substrate thoroughly. The surface needs to be clean, dry, and free from any debris or loose materials. I carefully removed the old flooring and leveled the surface to ensure an even base. To achieve a strong bond between the membrane and the concrete, I applied a primer on the substrate. This step is crucial as it enhances adhesion and minimizes the risk of air pockets forming between the membrane and the concrete floor.
3. Installing the Membrane: With the substrate ready, I proceeded to install the membrane carefully. Unrolling the membrane and securing it in place required precision to avoid any wrinkles or overlaps that could lead to potential problems later. I used strong adhesives to ensure the membrane adhered firmly to the substrate. It’s essential to take your time during this step and follow the manufacturer’s guidelines to ensure a successful installation.
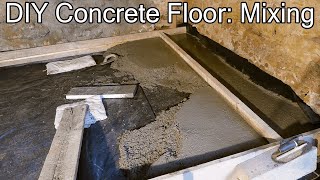
4. Pouring the Concrete: After the membrane was securely in place, it was time to pour the concrete. Before starting, I ensured the concrete mix was of the right consistency, neither too dry nor too watery, to guarantee a smooth and even surface. Pouring the concrete evenly across the area and using a trowel to level it required some physical effort but was a rewarding experience. The membrane acted as an excellent barrier, preventing the concrete from seeping into the substrate and keeping the floor dry and well-insulated.
5. Curing and Maintenance: Once the concrete floor was laid, the curing process was crucial to ensure its strength and longevity. I covered the floor with a curing compound to retain moisture and allow the concrete to set properly. It’s essential to be patient during this stage and avoid any heavy traffic on the floor for at least a few days. After the initial curing period, I regularly maintained the floor by cleaning it with mild detergent and warm water. This not only kept it looking fresh but also ensured that any spills or stains didn’t cause damage.
DIY Concrete Floor: Pouring Slab 3/3
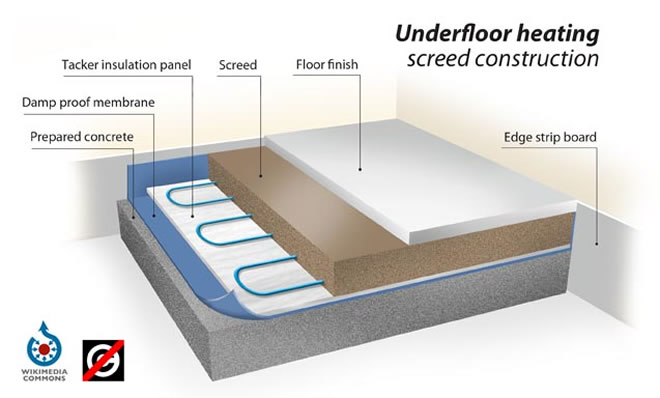
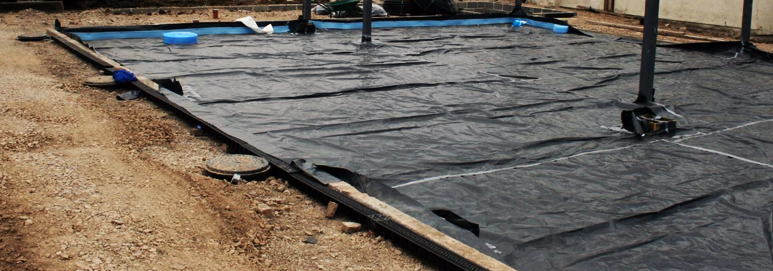
Installation of rigid floor insulation on ground floor concrete
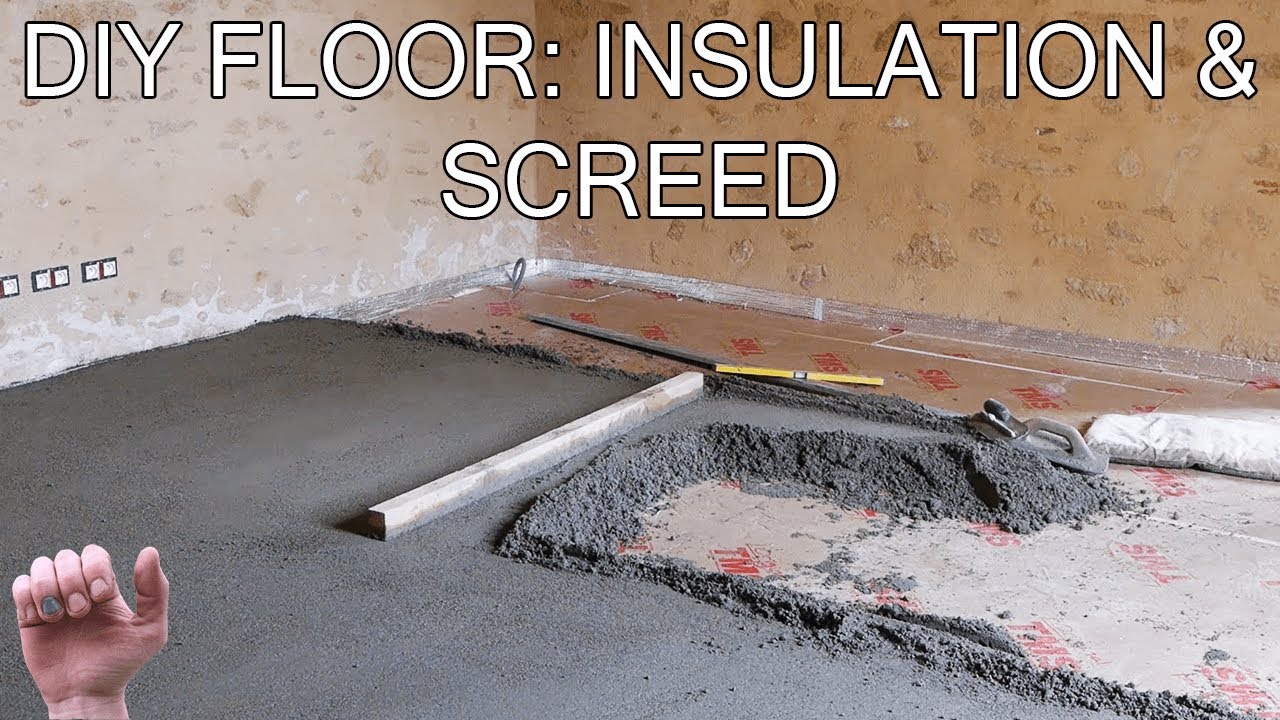
How to Build a Floor – Insulation and Screed
How to Install Tile Over Concrete – GreenBuildingAdvisor
Laying a Concrete Floor with Membrane
If you are looking for a durable and low-maintenance flooring solution, laying a concrete floor with membrane is the perfect choice. Not only is it a long-lasting and effective way to cover your floors, it also provides an excellent seal that can resist moisture and other elements. In this article, we will outline the steps necessary for laying a concrete floor with membrane, as well as provide answers to some commonly asked questions about this type of flooring.
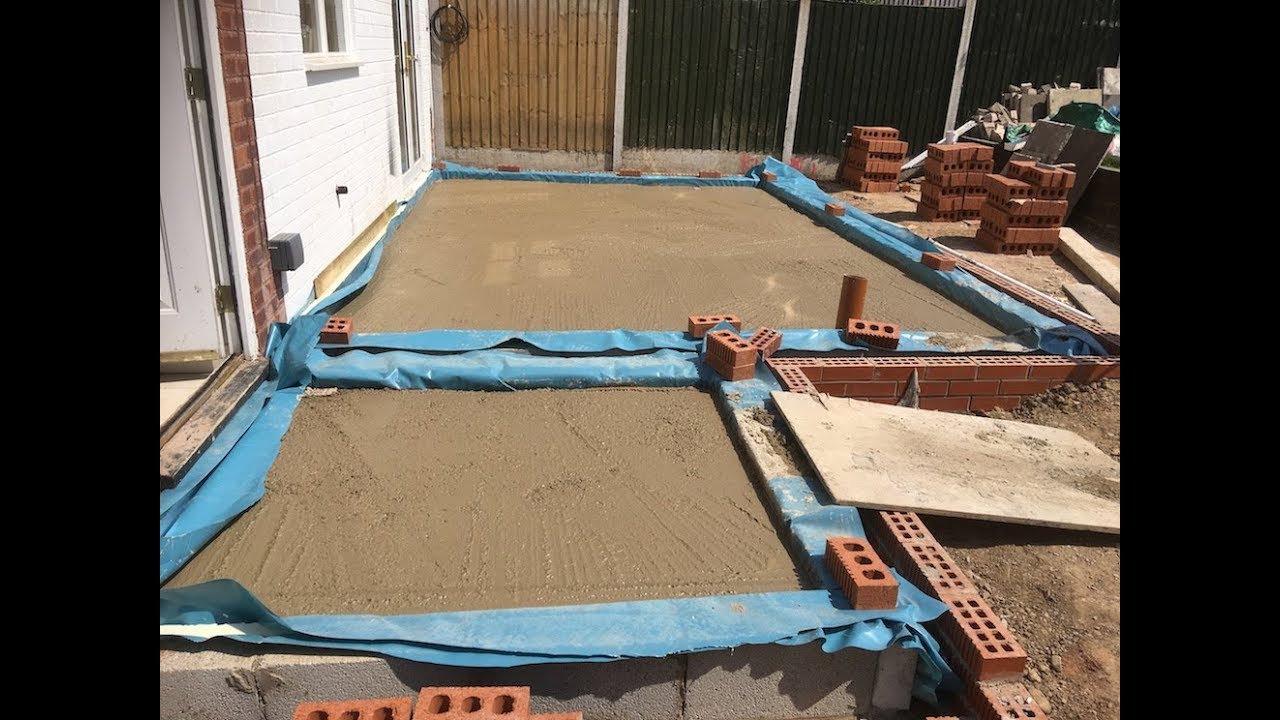
Preparing the Area
The first step in laying a concrete floor with membrane is to prepare the area. This includes removing any existing flooring materials, such as carpet, tile, or hardwood. It is also important to ensure that the floor is completely level before proceeding. Once the area has been cleared and leveled, it is time to begin laying the concrete.
Mixing and Applying the Concrete
The next step is to mix and apply the concrete. This is best done with a concrete mixer, but if one isn’t available, it can also be done by hand. Once the concrete has been mixed to the desired consistency, it should be spread evenly across the surface of the floor. Be sure to smooth out any lumps or bumps, as these can create problems when applying the membrane later.
Applying the Membrane
Once the concrete has been applied and allowed to dry, it is time to apply the membrane. This should be done with a paint roller or trowel in order to ensure an even coverage. It’s important that all cracks and crevices are fully covered in order to ensure that no moisture can get through. After applying the membrane, it should be allowed to dry before continuing with the next step.
Adding Finishing Touches
Finally, you can add finishing touches such as sealant or wax in order to further protect your newly laid concrete floor with membrane. Adding these final touches will help ensure that your floor remains durable and low-maintenance for years to come.
FAQs About Laying a Concrete Floor With Membrane
Q: How long does it take for a concrete floor with membrane to dry?
A: The drying time for a concrete floor with membrane will vary depending on factors such as temperature and humidity levels in the area. Generally speaking, it should take anywhere from 24-48 hours for the concrete to fully dry before applying the membrane.
Q: Is there any special equipment needed for laying a concrete floor with membrane?
A: While not required, having a concrete mixer on hand can make the process of mixing and applying the concrete much easier and more efficient. Additionally, having tools such as a paint roller or trowel can help ensure even coverage when applying the membrane.
Q: What type of sealant or wax should be used on a concrete floor with membrane?
A: When selecting a sealant or wax for your newly laid concrete floor with membrane, it’s important to use one that is specifically designed for this type of application. Make sure that it is rated for use on both interior and exterior surfaces in order to best protect your floors from moisture and other elements.
Q: Are there any special considerations that need to be taken when laying a concrete floor with membrane?
A: Yes, it’s important to make sure that all cracks and crevices are completely sealed in order to prevent any moisture from seeping through. Additionally, be sure that all surfaces are thoroughly cleaned before applying any sealant or wax in order to ensure proper adhesion.
Conclusion
Laying a concrete floor with membrane is an effective and long-lasting way to cover your floors while still providing excellent protection from moisture and other elements. By following these steps outlined above, you can easily lay your own concrete floor with membrane quickly and efficiently. With proper care and maintenance, this type of flooring can last for many years without needing any major repairs or replacements.
We use cookies on our website to give you the most relevant experience by remembering your preferences and repeat visits. By clicking “Accept All”, you consent to the use of ALL the cookies. However, you may visit "Cookie Settings" to provide a controlled consent.
This website uses cookies to improve your experience while you navigate through the website. Out of these, the cookies that are categorized as necessary are stored on your browser as they are essential for the working of basic functionalities of the ...
Necessary cookies are absolutely essential for the website to function properly. These cookies ensure basic functionalities and security features of the website, anonymously.
Cookie
Duration
Description
cookielawinfo-checkbox-analytics
11 months
This cookie is set by GDPR Cookie Consent plugin. The cookie is used to store the user consent for the cookies in the category "Analytics".
cookielawinfo-checkbox-functional
11 months
The cookie is set by GDPR cookie consent to record the user consent for the cookies in the category "Functional".
cookielawinfo-checkbox-necessary
11 months
This cookie is set by GDPR Cookie Consent plugin. The cookies is used to store the user consent for the cookies in the category "Necessary".
cookielawinfo-checkbox-others
11 months
This cookie is set by GDPR Cookie Consent plugin. The cookie is used to store the user consent for the cookies in the category "Other.
cookielawinfo-checkbox-performance
11 months
This cookie is set by GDPR Cookie Consent plugin. The cookie is used to store the user consent for the cookies in the category "Performance".
viewed_cookie_policy
11 months
The cookie is set by the GDPR Cookie Consent plugin and is used to store whether or not user has consented to the use of cookies. It does not store any personal data.
Functional cookies help to perform certain functionalities like sharing the content of the website on social media platforms, collect feedbacks, and other third-party features.
Performance cookies are used to understand and analyze the key performance indexes of the website which helps in delivering a better user experience for the visitors.
Analytical cookies are used to understand how visitors interact with the website. These cookies help provide information on metrics the number of visitors, bounce rate, traffic source, etc.
Advertisement cookies are used to provide visitors with relevant ads and marketing campaigns. These cookies track visitors across websites and collect information to provide customized ads.


 Related Posts: