Types of Tile Flooring: From Ceramic to Natural Stone
Tile flooring is a popular choice for many homeowners due to its durability, versatility, and aesthetic appeal. There are various types of tile flooring available, each with its unique characteristics. In this section, we will explore some of the most common types of tile flooring to help you make an informed decision for your home.
Ceramic Tiles
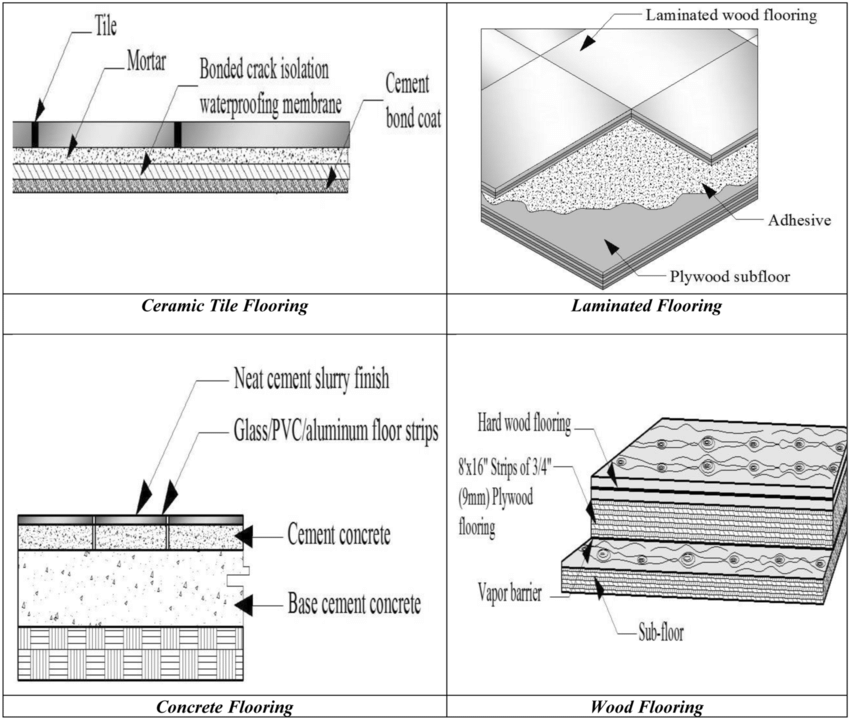
Ceramic tiles are made from clay and other natural materials, which are fired at high temperatures. They are widely used due to their affordability and wide range of designs. Ceramic tiles can be glazed or unglazed, with glazed tiles offering more color and pattern options. These tiles are ideal for areas with low to moderate traffic, such as bathrooms and kitchens.
Porcelain Tiles
Porcelain tiles are a type of ceramic tile, but they are made from more refined clay and fired at higher temperatures. This makes them denser, more durable, and less porous than regular ceramic tiles. Porcelain tiles are suitable for high-traffic areas and outdoor use due to their resistance to moisture and staining. They also come in a variety of designs, including options that mimic natural stone.
Natural Stone Tiles
Natural stone tiles, such as marble, granite, slate, and travertine, offer a luxurious and timeless look. Each type of natural stone has its own unique appearance and characteristics. Marble is known for its elegance and veining, while granite is extremely durable and resistant to scratches. Slate offers a rustic look, and travertine provides a more earthy, warm feel. Natural stone tiles require regular sealing to maintain their beauty and prevent staining.
Glass Tiles
Glass tiles are a sleek and modern option that can add a touch of sophistication to any space. They are often used in backsplashes, accent walls, and shower enclosures. Glass tiles are available in a wide range of colors and finishes, including clear, frosted, and textured options. While they are not as durable as ceramic or porcelain tiles, they are easy to clean and maintain.
Cement Tiles
Cement tiles, also known as encaustic tiles, are handmade using cement, pigments, and mold. They are known for their intricate patterns and vibrant colors. Cement tiles are durable and can be used in both indoor and outdoor settings. However, they require sealing to prevent staining and should be maintained regularly to preserve their appearance.
Metal Tiles
Metal tiles are a contemporary choice that can add an industrial or modern touch to your space. They are typically made from stainless steel, aluminum, or copper and are used in backsplashes and accent walls. Metal tiles are easy to clean and maintain, but they can be prone to scratches and dents.

Understanding Tile Ratings and Grades
When choosing tile flooring, it’s essential to understand tile ratings and grades to ensure you select the right type for your needs. These ratings provide information about the tile’s durability, hardness, and suitability for different areas. Here, we will break down the various tile ratings and grades to help you make an informed decision.
PEI Rating
The Porcelain Enamel Institute (PEI) rating measures the hardness and durability of glazed ceramic tiles. The PEI rating scale ranges from 0 to 5:
- PEI 0: Suitable for walls only
- PEI 1: Suitable for light foot traffic (e.g., bathrooms)
- PEI 2: Suitable for moderate foot traffic (e.g., residential kitchens)
- PEI 3: Suitable for all residential areas
- PEI 4: Suitable for all residential and light commercial areas
- PEI 5: Suitable for heavy commercial areas
MOHS Hardness Scale
The MOHS hardness scale measures the scratch resistance of tiles, particularly natural stone tiles. The scale ranges from 1 (softest) to 10 (hardest). For example, talc is rated at 1, while diamond is rated at 10. When selecting tiles, choose a MOHS rating that suits the intended use and traffic level of the area.
Water Absorption Rate
The water absorption rate indicates how much water a tile can absorb. It is crucial for determining the tile’s suitability for wet areas, such as bathrooms and outdoor spaces. The classifications are:
- Non-vitreous: Absorbs more than 7% water (not suitable for wet areas)
- Semi-vitreous: Absorbs 3-7% water (suitable for indoor use)
- Vitreous: Absorbs 0.5-3% water (suitable for indoor and outdoor use)
- Impervious: Absorbs less than 0.5% water (ideal for wet areas and outdoor use)
COF Rating
The Coefficient of Friction (COF) rating measures the slip resistance of a tile surface. Higher COF values indicate better slip resistance. Tiles with a COF rating of 0.5 or higher are suitable for residential areas, while those with a COF of 0.6 or higher are recommended for commercial spaces.
Grade Classification
Tile grades indicate the quality and suitability of tiles for various applications. They are generally classified into three grades:
- Grade 1: Highest quality, suitable for walls and floors
- Grade 2: Suitable for walls and light to moderate foot traffic
- Grade 3: Suitable for walls only, may have minor defects
Breaking Strength
Breaking strength measures the amount of force a tile can withstand before breaking. It is essential for tiles used in high-traffic areas or commercial settings. Tiles with a higher breaking strength are more durable and resistant to impact.
Preparation and Installation: What You Need to Know
Proper preparation and installation are crucial for achieving a beautiful and long-lasting tile floor. In this section, we will guide you through the essential steps and considerations to ensure a successful tile installation project.
Assessing the Subfloor
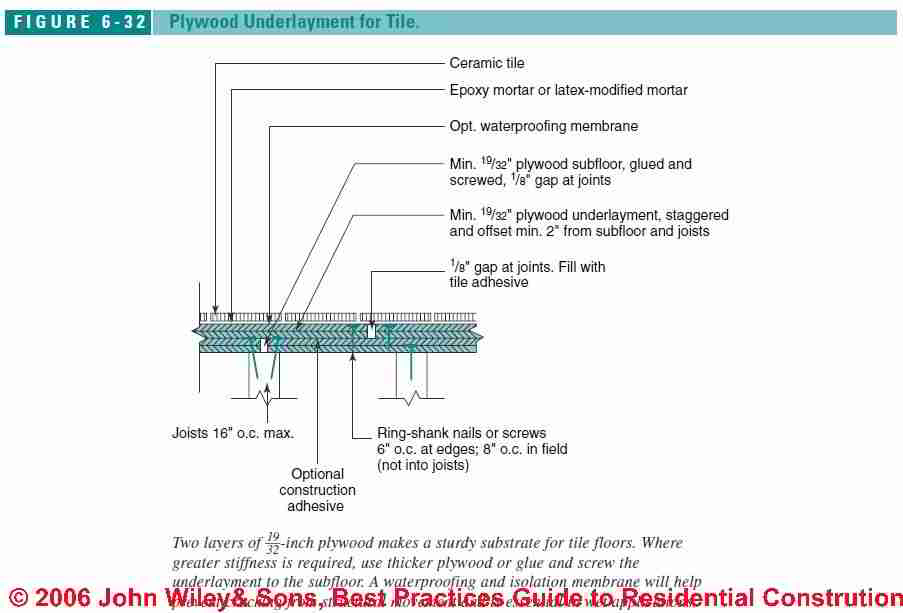
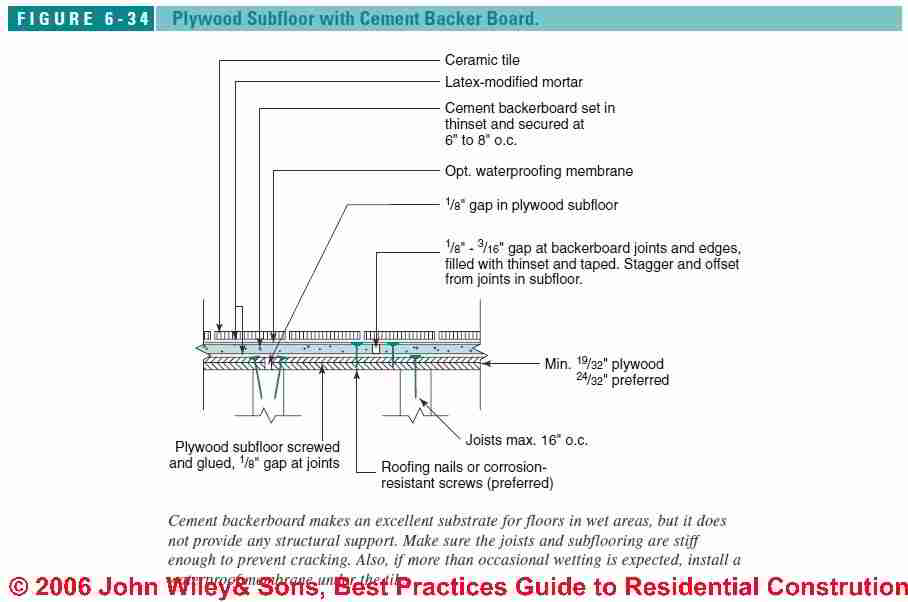
The first step in tile installation is assessing the subfloor to ensure it is clean, dry, level, and structurally sound. A stable subfloor prevents tiles from cracking or shifting over time. Depending on the type of tile and the location, you may need to install an underlayment, such as cement backer board or a waterproof membrane, to provide a suitable surface for the tiles.
Gathering Tools and Materials
Having the right tools and materials on hand is essential for a smooth installation process. Common tools include a tape measure, tile cutter or wet saw, notched trowel, level, spacers, rubber mallet, and grout float. You’ll also need materials such as tile adhesive (thin-set mortar), grout, and tile sealer if required. Make sure to choose high-quality products to ensure a durable installation.
Planning the Layout
Before you start laying tiles, plan the layout to minimize cuts and ensure a balanced appearance. Begin by dry-fitting the tiles in a grid pattern, starting from the center of the room and working outward. This allows you to make adjustments and visualize the final look. Use chalk lines or a laser level to mark reference lines on the subfloor, ensuring straight and even rows.
Applying the Adhesive
Mix the tile adhesive according to the manufacturer’s instructions and spread it on the subfloor using a notched trowel. Work in small sections to prevent the adhesive from drying out before you can set the tiles. Press each tile firmly into the adhesive, using spacers to maintain consistent gaps for grout lines. Check for levelness regularly and make adjustments as needed.
Grouting the Tiles
Once the adhesive has cured (usually 24 hours), remove the spacers and mix the grout. Apply the grout using a grout float, pressing it into the joints at a 45-degree angle. Remove excess grout with a damp sponge, rinsing frequently to keep the sponge clean. Allow the grout to set for the recommended time, then buff the tiles with a dry cloth to remove any remaining haze.
Sealing and Final Touches
If your tiles or grout require sealing, apply the appropriate sealer once the grout has fully cured. This step helps protect against stains and moisture. Inspect the installation for any missed areas or imperfections and make necessary touch-ups. Finally, allow the sealer to dry completely before using the newly tiled area.

Maintenance and Cleaning Tips
Proper maintenance and cleaning are essential for keeping your tile floors looking beautiful and lasting for years. In this section, we will share some practical tips and best practices to help you care for your tile flooring effectively.
Regular Sweeping and Vacuuming
One of the simplest ways to maintain your tile floors is to sweep or vacuum them regularly. This helps remove dirt, dust, and debris that can scratch the surface over time. Use a soft-bristle broom or a vacuum with a hard floor setting to avoid damaging the tiles. Aim to sweep or vacuum at least once a week or more frequently in high-traffic areas.
Mopping with a Mild Cleaner
Mopping your tile floors with a mild cleaner helps keep them clean and free of grime. Use a pH-neutral cleaner specifically designed for tile surfaces to avoid damaging the finish. Avoid using harsh chemicals or abrasive cleaners, as they can cause discoloration or etching. Mop the floors at least once a week or as needed, and always rinse with clean water to remove any residue.
Dealing with Spills and Stains
Promptly cleaning up spills and stains is crucial to prevent them from setting and causing permanent damage. For liquid spills, blot the area with a clean, dry cloth to absorb as much as possible. For stains, use a soft cloth or sponge and a gentle cleaner to lift the stain without scrubbing too hard. For tougher stains, you may need to use a specialized tile cleaner or seek professional help.
Sealing Grout Lines
Grout is porous and can absorb dirt and moisture, leading to discoloration and potential damage. To protect your grout, apply a grout sealer every 6-12 months, depending on the type of sealer used and the level of traffic. Sealing the grout helps prevent stains and makes it easier to clean. Follow the manufacturer’s instructions for the best results.
Preventing Scratches and Damage
Preventing scratches and damage to your tile floors involves a few proactive measures. Place doormats at entryways to catch dirt and debris before they reach your floors. Use furniture pads or glides under the legs of chairs and tables to avoid scratching the tiles. Avoid dragging heavy objects across the floor, and be cautious with sharp or abrasive items that could cause damage.
Deep Cleaning and Professional Maintenance
Periodic deep cleaning can help maintain the appearance and longevity of your tile floors. This involves using a more thorough cleaning method, such as steam cleaning or using a commercial-grade tile cleaner. For heavily soiled or stained floors, consider hiring a professional tile and grout cleaning service. Professional maintenance can help restore the original luster of your tiles and address any underlying issues.
Design Ideas and Patterns for Stunning Tile Floors
Tile flooring offers endless design possibilities, allowing you to create stunning and unique looks for your home. In this section, we will explore various design ideas and patterns to inspire your next tile flooring project.
Classic Subway Tile
Subway tiles are a timeless choice that can add a clean and elegant look to any space. Typically used in kitchens and bathrooms, subway tiles can be arranged in various patterns, such as the traditional offset (brick) pattern, herringbone, or vertical stack. The simplicity and versatility of subway tiles make them a popular option for both modern and traditional designs.
Geometric Patterns
Geometric patterns can add a bold and contemporary touch to your tile floors. Popular geometric designs include hexagons, chevrons, and Moroccan-inspired shapes. These patterns can be used to create striking feature areas, such as entryways or kitchen backsplashes. Mixing different colors and finishes can enhance the visual impact and create a unique look.
Mosaic Tiles
Mosaic tiles are small tiles, often made of glass, ceramic, or natural stone, that are arranged to form intricate patterns and designs. They are commonly used for backsplashes, shower enclosures, and accent walls. Mosaic tiles can be used to create detailed and artistic designs, adding a touch of luxury and sophistication to your space.
Checkerboard Pattern
The classic checkerboard pattern is a timeless design that adds a sense of elegance and nostalgia to any room. Traditionally using black and white tiles, this pattern can also be created with different color combinations to suit your décor. The checkerboard pattern is particularly effective in kitchens, bathrooms, and entryways, providing a bold and eye-catching look.
Herringbone and Chevron Patterns
Herringbone and chevron patterns are popular choices for adding a dynamic and stylish touch to tile floors. Both patterns involve arranging rectangular tiles in a zigzag formation, but the herringbone pattern has a staggered arrangement, while the chevron pattern has a continuous V shape. These patterns can be used to create a sense of movement and sophistication in any space.
Large-Format Tiles
Large-format tiles are a modern trend that can create a sleek and seamless look in your home. These tiles, often measuring 24 inches or larger, reduce the number of grout lines, giving the floor a more continuous and open appearance. Large-format tiles are ideal for contemporary designs and can be used in living rooms, kitchens, and bathrooms to make the space feel larger and more cohesive.

Common Issues and Solutions for Tile Flooring
While tile flooring is durable and long-lasting, it can encounter some common issues over time. In this section, we will discuss these problems and provide practical solutions to help you maintain your tile floors in top condition.
Cracked or Broken Tiles
Cracked or broken tiles can occur due to heavy impact, improper installation, or subfloor movement. To fix a cracked or broken tile, you will need to remove the damaged tile and replace it with a new one. Carefully chisel out the damaged tile and clean the area before applying new adhesive and setting the replacement tile. Allow the adhesive to cure, then grout the new tile to match the surrounding tiles.
Loose or Hollow-Sounding Tiles
Loose or hollow-sounding tiles are often caused by insufficient adhesive coverage or subfloor issues. To fix this problem, remove the loose tile and clean the area thoroughly. Apply new adhesive and reset the tile, ensuring even coverage. If multiple tiles are affected, it may indicate a more significant issue with the subfloor, requiring professional assessment and repair.
Stained or Discolored Grout
Grout can become stained or discolored over time due to dirt, moisture, and cleaning products. To clean stained grout, use a mixture of baking soda and water or a commercial grout cleaner. Apply the cleaner to the grout lines, scrub with a brush, and rinse thoroughly. For severe discoloration, consider applying a grout stain or colorant to refresh the appearance.
Mold and Mildew Growth
Mold and mildew can develop in damp areas, such as bathrooms and kitchens, where moisture is prevalent. To prevent mold and mildew, ensure proper ventilation and keep the area dry. Clean affected areas with a mixture of water and vinegar or a commercial mold cleaner. For severe infestations, you may need to replace the affected grout and tiles and address any underlying moisture issues.
Efflorescence
Efflorescence is a white, powdery residue that appears on the surface of tiles due to soluble salts in the mortar or grout. It is usually caused by moisture drawing the salts to the surface. To remove efflorescence, use a mixture of water and vinegar or a commercial efflorescence remover. Address any moisture issues to prevent recurrence, such as improving ventilation and sealing the grout.
Uneven or Lippage Tiles
Uneven tiles, or lippage, occur when the edges of adjacent tiles are not flush. This can be caused by an uneven subfloor or improper installation. To fix the lippage, you may need to remove the affected tiles and level the subfloor before reinstalling them. For minor lippage, using a leveling compound or grinding down high spots can help achieve a smoother surface.
Floor systems with section details Download Scientific Diagram
Floor Intersection Details Architectural Standard Drawings

Ceramic Tiling – Finishes – Download Free CAD Drawings

Floor Tile Installation Methods

Pin by sara on arch Ceramic floor tile, Ceramic floor tiles

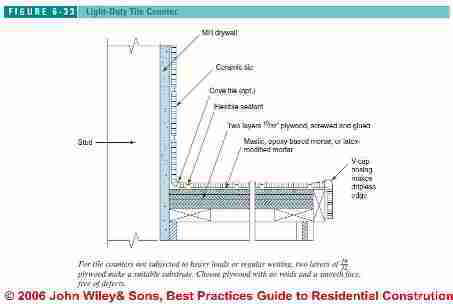
Floor-Framing Details for Tile Flooring

Floor-Framing & Subfloor Details for Ceramic or Stone Tile Flooring
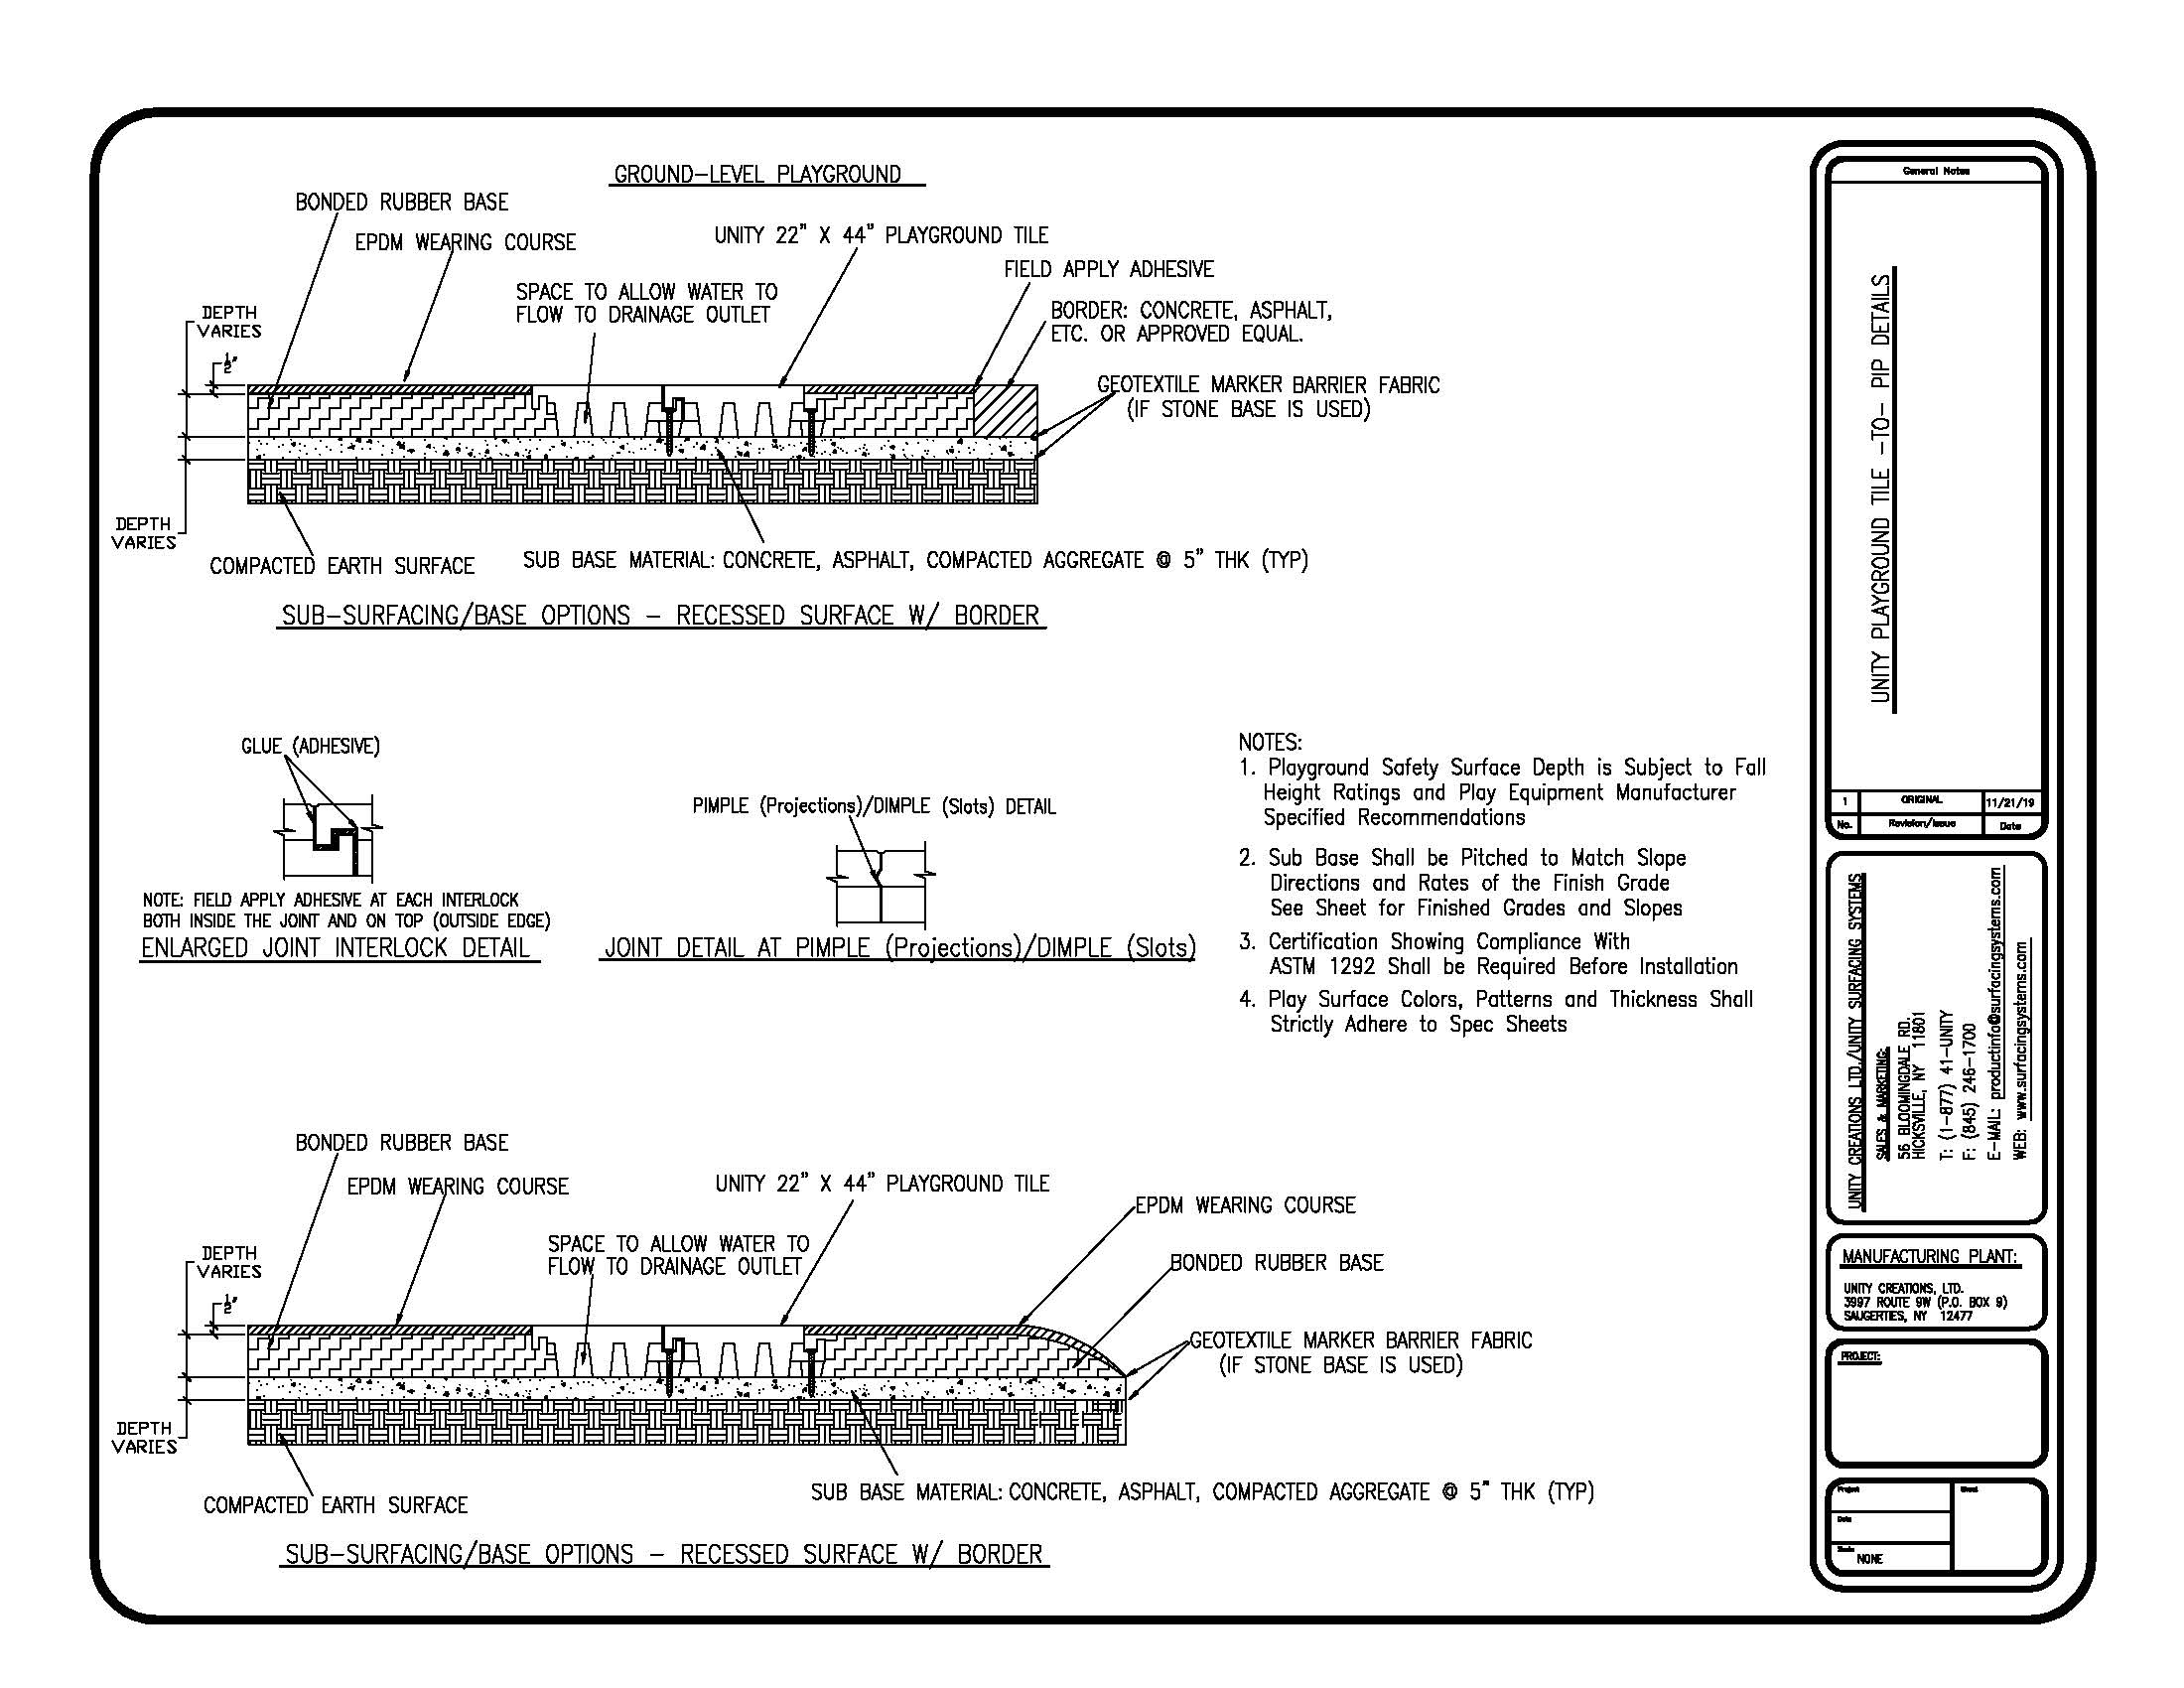
Safety Surfacing Details Rubber Flooring Details Interlocking
Related Posts: