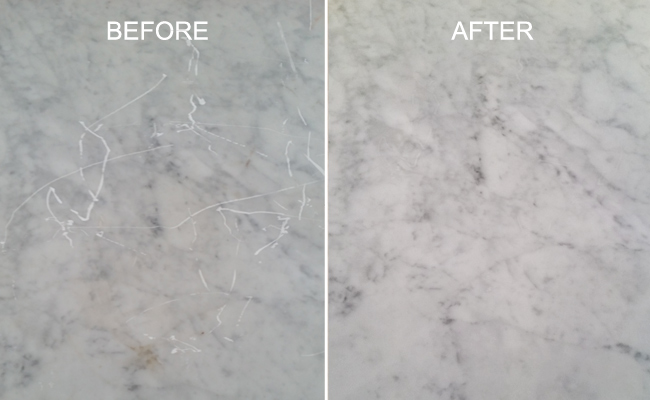
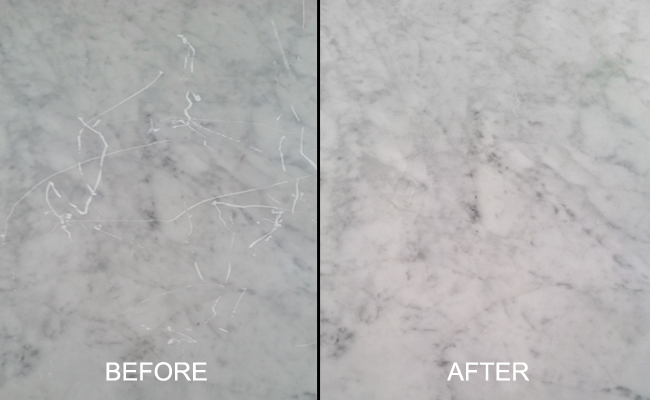
Last summer, I experienced every marble floor owner’s worst nightmare when my moving company dragged a heavy dresser across my beautiful Carrara marble entryway, leaving deep scratches that made my heart sink. What started as a moment of panic turned into an educational journey through the intricate process of marble restoration.
I discovered that marble scratch repair is both an art and a science, requiring patience, proper techniques, and sometimes professional intervention. Through trial and error, research, and hands-on experience, I learned to assess damage levels, choose appropriate repair methods, and restore my floors to their original glory. My experience taught me valuable lessons that I’m excited to share with fellow marble enthusiasts facing similar challenges.
Understanding Different Types of Marble Scratches
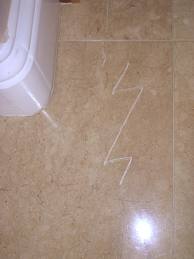
My first step involved learning to categorize the various scratches marring my beautiful floor surface. Surface scratches appeared as light marks that didn’t catch my fingernail when I ran it across them, indicating damage only to the polished surface layer. These superficial marks were the easiest to address and gave me confidence to tackle more challenging repairs throughout my restoration journey.
Deep scratches proved more problematic, catching my fingernail and extending into the marble substrate itself. These gouges required more aggressive repair techniques and multiple stages of refinishing to achieve satisfactory results.
I discovered that scratch depth determines the complexity of repair work and the tools needed for successful restoration of the damaged surface area.
Etching presented a different challenge altogether, appearing as dull spots where acidic substances had chemically reacted with the marble surface.
Unlike physical scratches, etching requires polishing rather than filling, and I learned to distinguish between mechanical damage and chemical damage through careful visual and tactile examination of each affected area on my floors.
.jpg)
Essential Tools and Materials for DIY Repair
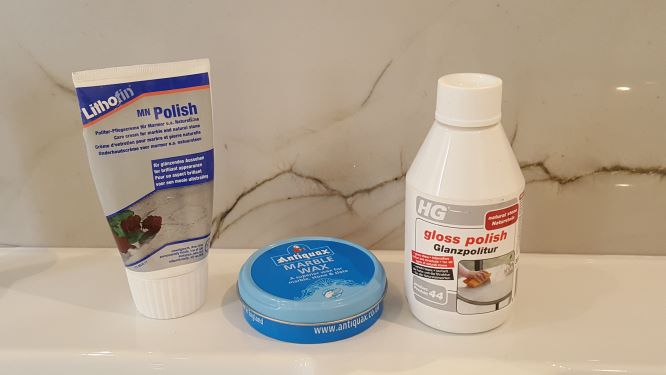
My repair arsenal began with diamond polishing pads in various grits, starting from coarse 50-grit for deep scratches down to fine 3000-grit for final polishing. I invested in a variable-speed angle grinder and learned to control pressure and movement patterns to avoid creating additional damage during the restoration process. Water became my constant companion for cooling and debris removal during grinding operations.
Marble polishing compound and powder proved essential for achieving that mirror-like finish that makes marble floors so desirable. I experimented with different brands and formulations, eventually settling on products specifically designed for Carrara marble to match my floor’s characteristics. Felt polishing pads and buffing wheels completed my polishing setup for fine detail work.
Safety equipment became non-negotiable after my first repair attempt left me covered in marble dust and nursing sore knees. I invested in quality knee pads, dust masks, safety glasses, and plastic sheeting to contain the mess and protect surrounding areas. Proper ventilation and dust collection made the repair process much more manageable and safer for extended work sessions.
Step-by-Step Scratch Repair Process
My repair process begins with a thorough cleaning of the scratched area using pH-neutral stone cleaner to remove all dirt and residue that could interfere with proper assessment and repair work. I mark the scratch boundaries with painter’s tape to maintain focus and prevent accidental damage to the surrounding undamaged marble during the intensive restoration process.
Starting with the coarsest grit necessary for the scratch depth, I work the diamond pad in circular motions with light pressure, frequently checking progress to avoid over-grinding. Each successive grit removes scratches from the previous grit while creating finer scratches that eventually disappear with final polishing. Patience during this stage determines the quality of the final results.
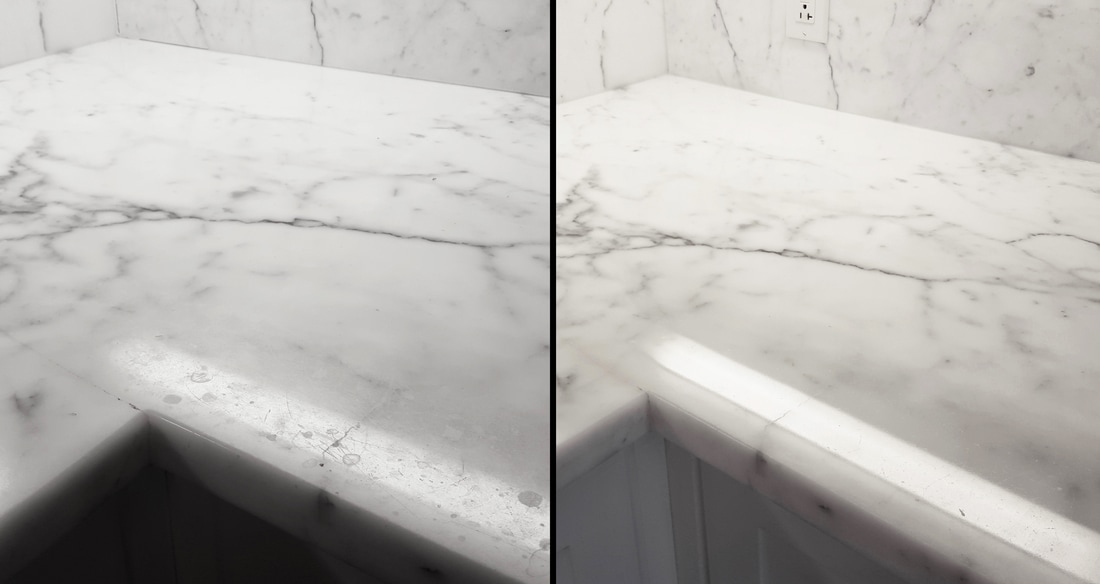
The final polishing stage requires marble compound applied with felt pads, working systematically to achieve a consistent sheen across the repaired area. I buff in overlapping circles until the repaired section matches the surrounding floor’s gloss level. Proper cleanup and sealing complete the process, protecting the newly restored surface from future damage and staining.
![]()
Professional vs DIY Repair Decisions
I learned to assess my skills honestly against the complexity of each repair situation before committing to DIY approaches. Simple surface scratches and minor etching fall within most homeowners’ capabilities with proper tools and patience. However, extensive damage, valuable antique marble, or high-visibility areas often justify professional intervention to ensure satisfactory results and avoid costly mistakes.
Cost considerations played a major role in my decision-making process for each repair project. Professional marble restoration typically costs $3-7 per square foot, while DIY repairs cost significantly less in materials but require substantial time investment. I calculated the value of my time against potential professional fees and the risk of making costly errors during amateur repair attempts.
My confidence grew with each successful repair, but I still consult professionals for complex jobs involving multiple types of damage or large areas requiring consistent results. Building relationships with local stone restoration specialists provides valuable resources for advice, tool rental, and backup support when DIY projects exceed my skill level or available time.
Preventing Future Marble Floor Damage
Prevention strategies now dominate my marble maintenance routine after experiencing the frustration and expense of scratch repair. I installed high-quality entrance mats both inside and outside doorways to trap dirt and grit that acts like sandpaper on marble surfaces. Regular mat cleaning and replacement prevents accumulated debris from negating their protective benefits during daily use.
Furniture protection became a top priority following my moving day disaster experience. I applied felt pads to all furniture legs and bases, replacing them regularly as they wear down and lose effectiveness. Moving furniture requires lifting rather than dragging, and I use furniture sliders for heavy pieces that need repositioning during cleaning or rearranging activities.
Daily maintenance habits now include immediate cleanup of spills, especially acidic substances like wine, citrus juices, and cleaning products that can etch marble surfaces. I keep absorbent towels strategically placed throughout areas with marble flooring and educate family members about proper spill response techniques to minimize damage potential from everyday accidents and mishaps.
Long-term Marble Floor Care Strategies
Annual professional sealing has become a cornerstone of my marble maintenance program, providing crucial protection against stains and some types of surface damage. I schedule this service during spring cleaning season when I can address any minor repairs before sealing and ensure optimal protection throughout the year. Quality sealers can significantly reduce scratch visibility and prevent stain penetration.
Regular professional cleaning and maintenance every 2-3 years helps maintain the floor’s appearance and addresses minor issues before they become major problems requiring extensive repair work. Professional technicians can spot potential problems early and provide treatments that extend the floor’s lifespan while maintaining its beautiful appearance through specialized equipment and expertise.
I maintain detailed records of all maintenance, repairs, and treatments performed on my marble floors, including product brands, dates, and areas addressed. This documentation helps track the effectiveness of different approaches and provides valuable information for future maintenance decisions and professional service providers who work on my floors over time.
Can I repair deep marble scratches myself, or do I need professional help?
Deep marble scratches can be repaired by determined DIYers with proper tools and patience, but success depends on your skill level and available time. I successfully repaired several deep scratches using diamond pads and polishing compounds, though it required multiple weekend sessions to achieve professional-looking results. Consider the scratch location and your experience level, professional help may be worth the investment for high-visibility areas or valuable marble installations requiring perfect results.
What’s the difference between marble scratches and etching, and how do I treat each?
Marble scratches are physical gouges you can feel with your fingernail, while etching appears as dull spots from acid damage that feel smooth to touch. I treat scratches with progressive diamond pad grinding followed by polishing, while etching requires only polishing compounds to restore the surface shine. Identifying the damage type correctly determines the repair approach, using wrong methods can worsen the problem and create additional work requiring professional intervention.
How much does marble scratch repair typically cost?
DIY marble scratch repair costs $50-200 for tools and materials depending on damage extent, while professional repair ranges from $200-800 per room. My initial tool investment paid for itself after repairing multiple scratches over time, but professional work ensures consistent results for valuable or highly visible installations. Consider the learning curve and time investment against professional costs, especially for extensive damage requiring specialized equipment and expertise for optimal results.
What tools do I absolutely need for basic marble scratch repair?
Essential tools include diamond polishing pads in multiple grits, a variable-speed angle grinder, marble polishing compound, and safety equipment including dust masks and eye protection. I also recommend knee pads, plastic sheeting for mess control, and quality felt buffing pads for final polishing stages. Start with basic scratch repair kits available online, then expand your tool collection based on experience and the types of repairs you encounter most frequently in your home.
How long does it take to repair marble scratches properly?
Simple surface scratches take 1-2 hours to repair properly, while deep scratches can require 4-8 hours of work spread across multiple sessions. My first repair took an entire weekend as I learned proper techniques and made several mistakes requiring correction. Experience significantly reduces repair time, but rushing the process compromises results and may create additional damage requiring more extensive work to achieve satisfactory appearance and durability.
Can marble scratch repair products damage my floors if used incorrectly?
Yes, improper use of abrasive pads or excessive pressure can create additional scratches or remove too much material, worsening the original damage. I learned this lesson early when aggressive grinding created a depression requiring professional leveling to fix properly. Always start with the finest grit that addresses the scratch, use light pressure, and test techniques in inconspicuous areas before working on visible surfaces to avoid costly mistakes during repair attempts.

Marble Scratch Repair BiO Tile u0026 Grout Restoration
DIY No.2 – Stone Care Tips and Tricks – How to Remove Scratches
Dirty and Scratched Travertine Tiles Burnished in Hunt – Berkshire

How to Repair Scratches in a Marble Table Top DoItYourself.com
Related Posts: