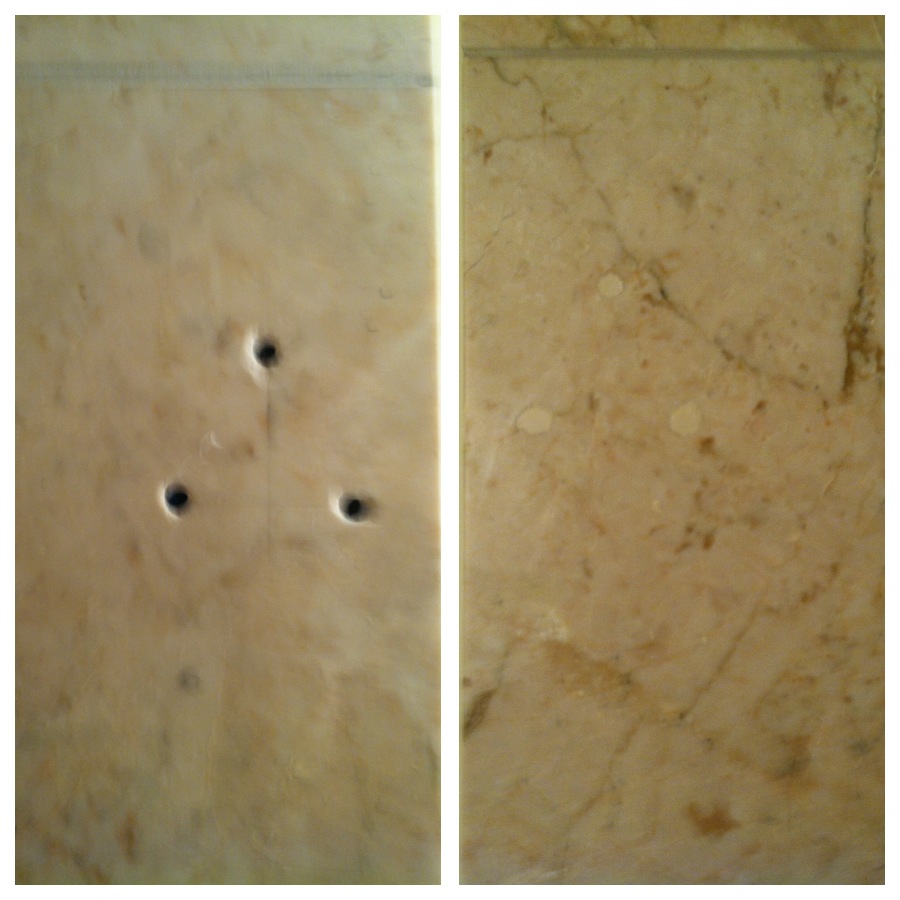
Marble flooring is known for its elegance and durability. However, over time, it may develop holes due to various reasons. Before proceeding with any repairs, it is essential to identify the types of holes in marble flooring. Let me guide you through the different types of holes commonly found in marble floors.
Pinpoint Holes: Pinpoint holes are tiny, shallow holes that resemble the size of a pinhead. These holes are often the result of air bubbles that formed during the marble’s formation process. They are typically evenly distributed across the surface and do not pose a significant structural threat.
Pitting: Pitting refers to larger and deeper holes that can range in size from a few millimeters to several centimeters. Pitting occurs when the surface of the marble is eroded or corroded due to chemical reactions or exposure to acidic substances. These holes can be more challenging to repair and may require professional assistance.
Fissures: Fissures are natural cracks or fractures in the marble that occurred during its formation. They are different from cracks caused by external factors and are typically harmless. Fissures can add character to the marble and are not usually repaired unless they pose a tripping hazard.
Chips: Chips are small pieces of marble that have broken off from the surface. They can occur due to impact or heavy objects falling on the floor. Chips are more common around high-traffic areas or near furniture legs. Repairing chips involves filling the void and matching the color and texture of the surrounding marble.
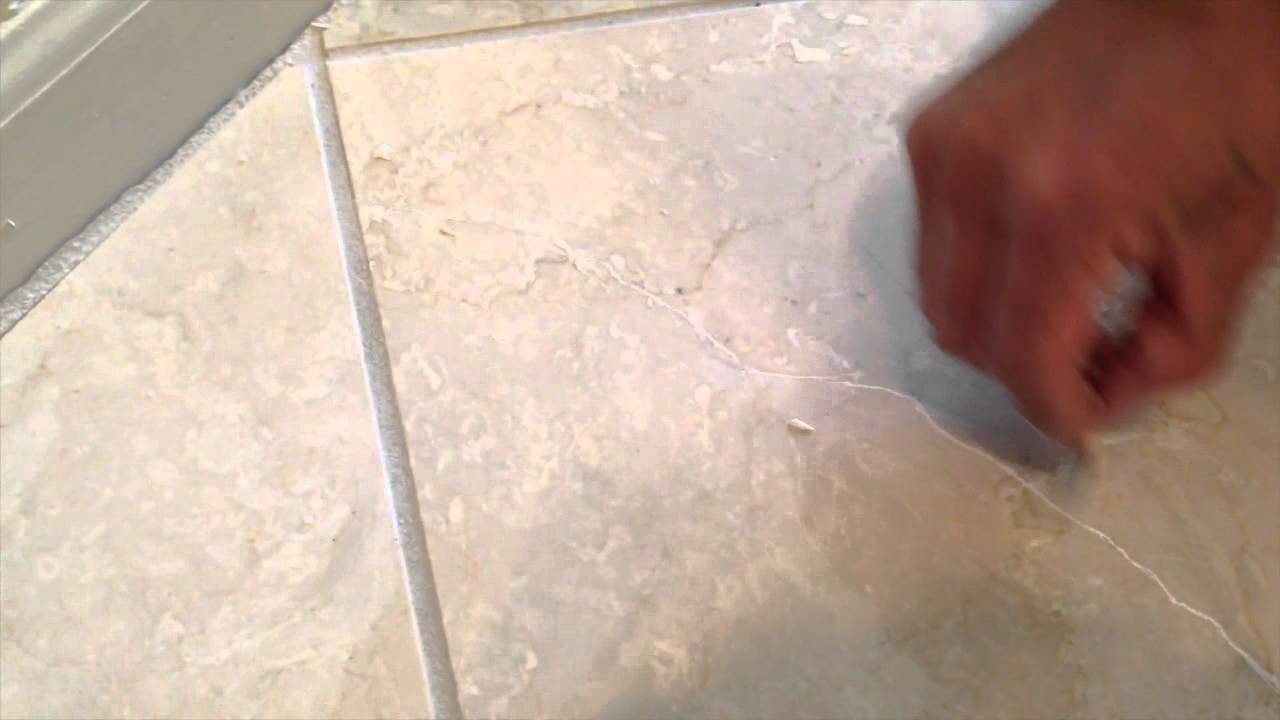
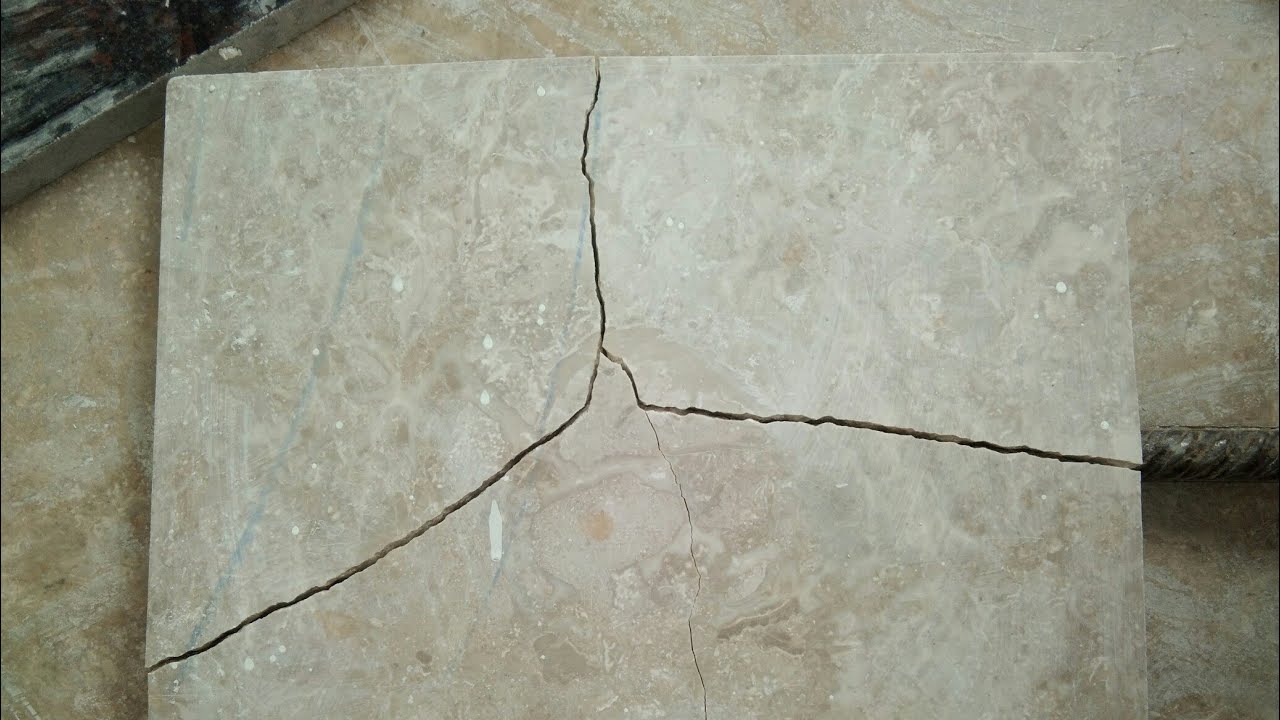
Cracks: Cracks in marble flooring can be caused by various factors, such as settling of the building, temperature fluctuations, or structural issues. These cracks can be small hairline cracks or more significant fractures that extend through the entire thickness of the marble. Repairing cracks often requires professional intervention to ensure a structurally sound and aesthetically pleasing result.
Preparing the Necessary Tools and Materials
Once you have identified the types of holes in your marble flooring, the next step is to gather the necessary tools and materials for the repair process. Proper preparation is essential for achieving a seamless and long-lasting result. Follow this guide to help you through the tools and materials you will need to fix holes in your marble floor.
Tools:
Safety goggles and gloves: Protect yourself by wearing safety goggles and gloves to prevent any injuries during the repair process.
Dust mask: A dust mask will help you avoid inhaling dust particles that may be generated during the repair.
Drill with diamond drill bits: You will need a drill with diamond drill bits to create holes for injecting the repair material into larger cracks or voids.
Chisel and hammer: These tools are necessary for removing any loose or damaged marble around the holes or cracks.
Putty knife or scraper: A putty knife or scraper will come in handy for applying and smoothing the repair material.
Sandpaper: Sandpaper of varying grits will be needed to sand down the repaired areas and blend them with the surrounding marble.
Polishing pads: Polishing pads will help restore the shine and smoothness of the repaired surface.
Materials:
Epoxy or polyester resin: Depending on the size and depth of the holes or cracks, you will need an epoxy or polyester resin for filling and bonding the damaged areas.
Marble dust or pigment: To match the color of the repair material with your marble floor, you may need marble dust or pigment.
Cleaning solution: Use a mild cleaning solution specifically formulated for marble to clean the repair area before and after the repair process.
Marble sealer: A marble sealer will help protect the repaired areas from future damage and maintain the overall integrity of the marble floor.
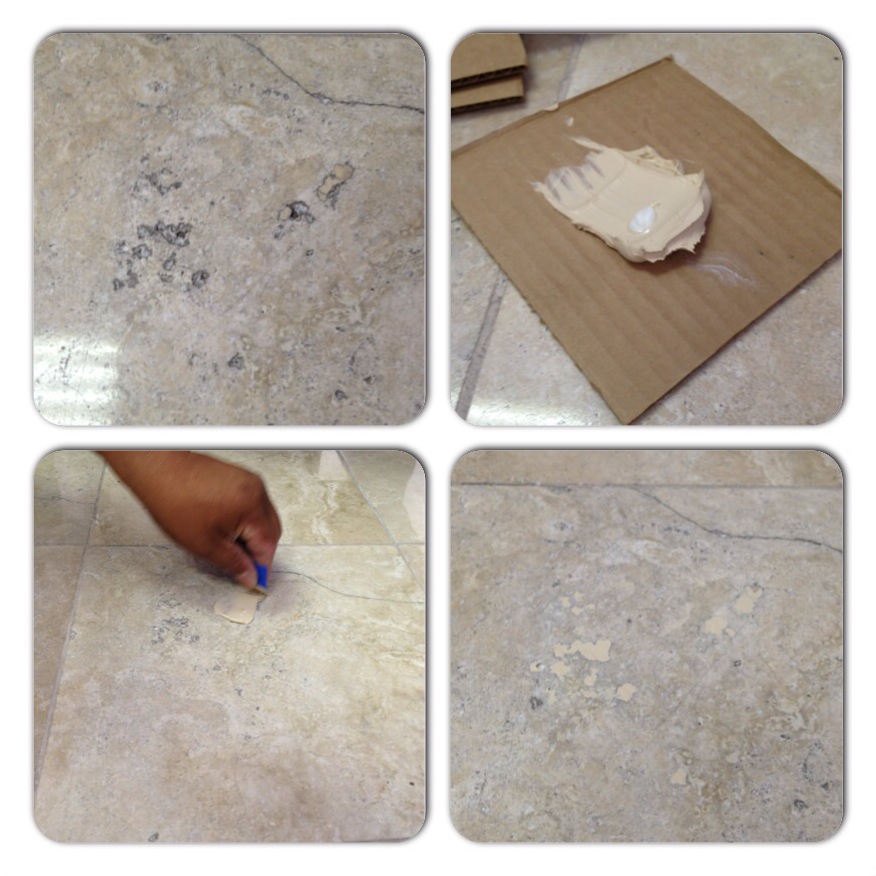
Step-by-Step Guide to Filling Small Holes in Marble Floors
Small holes in marble floors can be unsightly and compromise the overall appearance of your space. Fortunately, filling these small holes is a relatively straightforward process that you can do yourself. Below we provide you with a step-by-step guide to filling small holes in marble floors.
Clean the Area: Start by thoroughly cleaning the area around the small holes. Use a mild cleaning solution specifically formulated for marble to remove any dirt, debris, or stains. Ensure the surface is completely dry before proceeding to the next step.
Mix the Repair Material: Prepare the repair material according to the manufacturer’s instructions. Typically, this involves mixing epoxy or polyester resin with marble dust or pigment to match the color of your marble floor. Mix the components thoroughly until you achieve a smooth and consistent paste-like consistency.
Apply the Repair Material: Using a putty knife or scraper, apply the prepared repair material into the small holes. Ensure the holes are completely filled, and the material is evenly distributed. Smooth out the surface of the repair material to match the surrounding marble.
Allow the Material to Cure: Allow the repair material to cure according to the manufacturer’s instructions. This can take several hours or even overnight. Avoid stepping on or placing any objects on the repaired areas during the curing process to ensure optimal results.
Sand the Repaired Areas: Once the repair material has fully cured, use sandpaper of fine grit to sand down the repaired areas. Start with a higher grit sandpaper and gradually move to a finer grit to achieve a smooth and seamless finish. Be cautious not to damage the surrounding marble while sanding.
Polish and Seal: After sanding, use polishing pads to restore the shine and smoothness of the repaired areas. Start with a lower grit polishing pad and gradually move to a higher grit for a polished finish. Once the desired level of polish is achieved, apply a marble sealer to protect the repaired areas and enhance their longevity.
Repairing Larger Holes and Cracks in Marble Flooring
While small holes in marble floors can be relatively easy to repair, larger holes and cracks require a more involved approach. Repairing these larger imperfections is crucial to maintaining the structural integrity and aesthetic appeal of your marble flooring. Let me guide you through the process of repairing larger holes and cracks in marble flooring.
Assess the Damage: Before proceeding with the repair, carefully assess the extent of the damage. Determine whether the hole or crack requires professional assistance or if it can be repaired using DIY methods. Larger holes or cracks that extend through the entire thickness of the marble may require professional intervention.
Prepare the Area: Clean the area around the hole or crack using a mild cleaning solution specifically formulated for marble. Remove any loose or damaged marble around the imperfection using a chisel and hammer. Ensure the surface is clean and free of debris before proceeding.
Create Holes for Injection: For larger cracks or voids, you will need to create holes for injecting the repair material. Use a drill with diamond drill bits to create small holes along the length of the crack or around the perimeter of the hole. These holes will allow the repair material to flow and bond with the existing marble.
Mix and Apply the Repair Material: Prepare the repair material, such as epoxy or polyester resin, according to the manufacturer’s instructions. Mix the components thoroughly, and if necessary, add marble dust or pigment to match the color of your marble floor. Apply the repair material into the hole or crack, ensuring it fills the void completely.
Inject the Repair Material: Using a syringe or specialized injection tool, carefully inject the repair material into the drilled holes. Start from the bottom and gradually work your way up, ensuring that the material fills the crack or hole entirely. Continue injecting until the material begins to overflow from adjacent holes.
Smooth and Level the Surface: Once the repair material is in place, use a putty knife or scraper to smooth and level the surface. Ensure the repair material is flush with the surrounding marble. Remove any excess material and clean the surface before the material fully cures.
Allow the Material to Cure: Give the repair material sufficient time to cure and harden. Follow the manufacturer’s instructions for the recommended curing time. Avoid stepping on or placing any objects on the repaired area until it is fully cured.
Sand, Polish, and Seal: After the repair material has fully cured, use sandpaper of varying grits to sand down the repaired area. Start with a coarser grit and gradually move to a finer grit to achieve a smooth and seamless finish. Polish the area using polishing pads to restore its shine. Finally, apply a marble sealer to protect the repaired area and maintain its longevity.
Finishing Touches: Polishing and Sealing the Repaired Areas
After successfully repairing holes and cracks in marble flooring, it is essential to give attention to the finishing touches. Polishing and sealing the repaired areas will not only enhance the visual appeal but also provide protection and longevity to your marble floor. Below is a guide to help you through the steps of polishing and sealing the repaired areas.
Clean the Repaired Areas: Before proceeding with polishing and sealing, thoroughly clean the repaired areas. Use a mild cleaning solution specifically formulated for marble to remove any dust, debris, or residue from the repair process. Ensure the surface is clean and dry before moving forward.
Start with Coarser Grit Polishing Pads: Begin the polishing process by using coarser grit polishing pads. Attach the polishing pad to a handheld polisher or a floor buffer machine. Work the pad in circular motions over the repaired areas, gradually moving from one section to another. This step will help smooth the surface and remove any imperfections left from the repair.
Progress to Finer Grit Polishing Pads: Once you have achieved a satisfactory level of smoothness with the coarser grit polishing pad, switch to a finer grit pad. Repeat the circular motion polishing process, gradually moving from one section to another. This step will refine the surface and bring out the natural shine of the marble.
Clean and Inspect the Surface: After polishing with the finer grit pad, clean the surface again to remove any polishing residue. Inspect the repaired areas closely to ensure a seamless blend with the surrounding marble. If necessary, repeat the polishing process with an even finer grit pad to achieve the desired level of shine.
Apply a Marble Sealer: Once you are satisfied with the polishing results, it is crucial to apply a marble sealer to the repaired areas. Marble sealers help protect the marble from stains, moisture, and other potential damage. Follow the manufacturer’s instructions for the application of the sealer. Use a brush or a clean cloth to evenly apply the sealer to the repaired areas. Allow the sealer to dry completely before stepping on or placing any objects on the surface.
Regular Maintenance: To maintain the quality and appearance of your repaired marble floor, it is important to follow a regular maintenance routine. Clean the floor with a pH-neutral marble cleaner and avoid using harsh chemicals that could damage the surface. Place protective mats or rugs in high-traffic areas to minimize wear and tear. Regularly inspect the repaired areas for any signs of damage or wear and address them promptly.
Repair hole in marble tile DIY Home Improvement Forum
Honing and Filling Holes in Travertine – Set In Stone Restoration
PUTTY YOU HOLES AND CRACKS ON MARBLE FLOORS WITHOUT SANDING
Travertine, Marble and Limestone Repairs
Marble tiles — Repairing of chipped and cracked floor
Travertine Holes Holes in Travertine Tiles Travertine Tiles
flooring – What to use to fill holes in floor tile in kitchen
How to Easily Repair Holes, Cracks, or Chips in Marble and Natural Stone
We use cookies on our website to give you the most relevant experience by remembering your preferences and repeat visits. By clicking “Accept All”, you consent to the use of ALL the cookies. However, you may visit "Cookie Settings" to provide a controlled consent.
This website uses cookies to improve your experience while you navigate through the website. Out of these, the cookies that are categorized as necessary are stored on your browser as they are essential for the working of basic functionalities of the website. We also use third-party cookies that help us analyze and understand how you use this website. These cookies will be stored in your browser only with your consent. You also have the option to opt-out of these cookies. But opting out of some of these cookies may affect your browsing experience.
Necessary cookies are absolutely essential for the website to function properly. These cookies ensure basic functionalities and security features of the website, anonymously.
Cookie
Duration
Description
cookielawinfo-checkbox-analytics
11 months
This cookie is set by GDPR Cookie Consent plugin. The cookie is used to store the user consent for the cookies in the category "Analytics".
cookielawinfo-checkbox-functional
11 months
The cookie is set by GDPR cookie consent to record the user consent for the cookies in the category "Functional".
cookielawinfo-checkbox-necessary
11 months
This cookie is set by GDPR Cookie Consent plugin. The cookies is used to store the user consent for the cookies in the category "Necessary".
cookielawinfo-checkbox-others
11 months
This cookie is set by GDPR Cookie Consent plugin. The cookie is used to store the user consent for the cookies in the category "Other.
cookielawinfo-checkbox-performance
11 months
This cookie is set by GDPR Cookie Consent plugin. The cookie is used to store the user consent for the cookies in the category "Performance".
viewed_cookie_policy
11 months
The cookie is set by the GDPR Cookie Consent plugin and is used to store whether or not user has consented to the use of cookies. It does not store any personal data.
Functional cookies help to perform certain functionalities like sharing the content of the website on social media platforms, collect feedbacks, and other third-party features.
Performance cookies are used to understand and analyze the key performance indexes of the website which helps in delivering a better user experience for the visitors.
Analytical cookies are used to understand how visitors interact with the website. These cookies help provide information on metrics the number of visitors, bounce rate, traffic source, etc.
Advertisement cookies are used to provide visitors with relevant ads and marketing campaigns. These cookies track visitors across websites and collect information to provide customized ads.


 Related Posts: