Why It’s Important to Remove Wax Buildup
Wax buildup on floors can be a common problem, especially in areas with high foot traffic. Over time, layers of wax can accumulate, resulting in a dull and dirty appearance. However, removing wax buildup is not just about aesthetics; it is also crucial for maintaining the integrity and longevity of the floor. Let’s find out why it’s important to remove wax buildup and how to do it effectively.
- Preserving the Floor’s Appearance: One of the main reasons to remove wax buildup is to restore the floor’s natural shine and beauty. Wax can trap dirt, dust, and grime, making the floor look dull and unattractive. By removing the accumulated wax, you can reveal the true color and texture of the floor, giving it a fresh and inviting appearance.
- Preventing Slippery Surfaces: Wax buildup can create a slippery surface, posing a safety hazard for anyone walking on the floor. This is particularly risky in high-traffic areas like hallways or commercial spaces. By removing the wax, you can restore the floor’s traction and reduce the likelihood of accidents caused by slips and falls.
- Allowing for Proper Cleaning and Maintenance: Wax buildup can hinder the effectiveness of regular cleaning routines. When layers of wax are present, cleaning agents may not penetrate the surface as intended, resulting in ineffective cleaning. By removing the wax, you can ensure that your regular cleaning efforts yield better results, making it easier to maintain a clean and hygienic environment.
- Preventing Damage to the Floor: Wax buildup can have long-term negative effects on the floor’s surface. As dirt and debris accumulate within the wax layers, they can scratch and wear down the floor, leading to permanent damage. By removing the wax buildup, you can prevent such damage and extend the lifespan of your flooring.
- Preparing for New Wax Application: If you regularly wax your floors, removing old wax buildup is essential before applying a fresh coat. Leaving old wax layers intact can result in an uneven application, making it harder for the new wax to adhere properly. By removing the old wax, you create a clean and smooth surface, ensuring a more even and effective application of the new wax.
Supplies You’ll Need to Remove the Wax
When it comes to removing wax buildup from floors, having the right supplies is essential. The process requires a few specific tools and materials to ensure effective and safe removal. Let’s discuss the supplies you’ll need to remove wax buildup and how to use them.
- Protective Gear: Before you begin, it’s important to prioritize your safety. Wear gloves to protect your hands from any harsh chemicals you may use during the wax removal process. Additionally, consider wearing eye protection to shield your eyes from any splashes or accidental contact with the cleaning solutions.
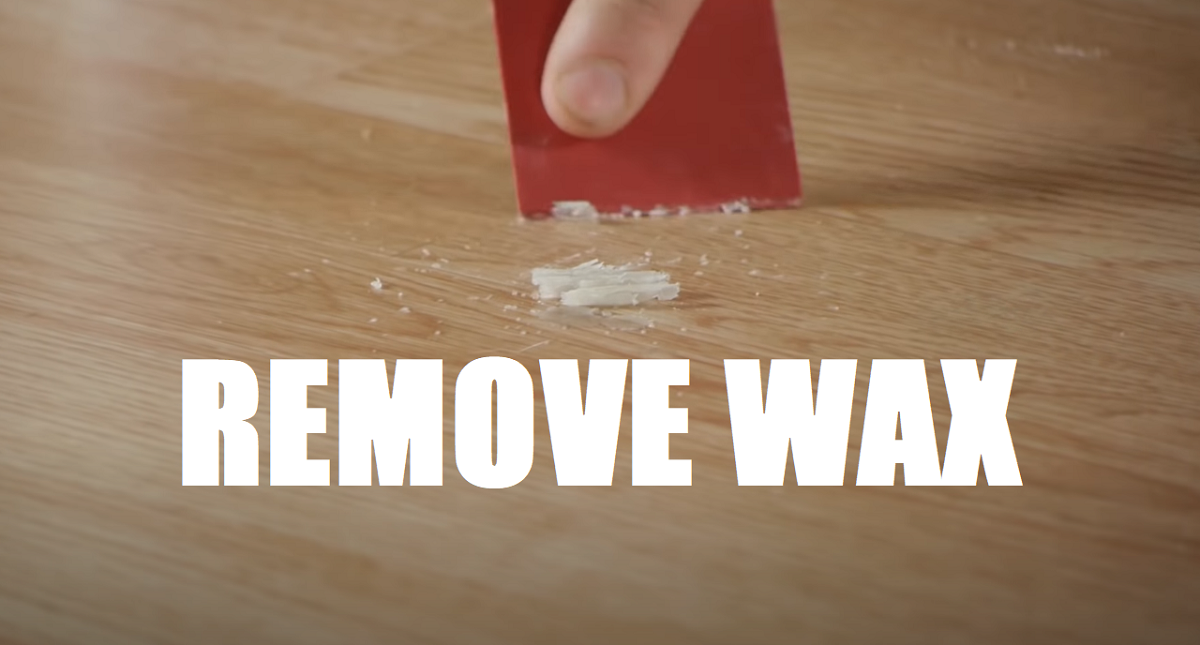
- Scraper or Putty Knife: A scraper or putty knife is a crucial tool for removing the wax buildup from the floor’s surface. Use it to gently scrape away the layers of wax, being careful not to damage the floor underneath. Choose a scraper with a comfortable grip and a sturdy blade to make the process easier.
- Solvent or Wax Stripper: To dissolve and remove the wax effectively, you’ll need a solvent or wax stripper. There are various options available, including commercial wax strippers or homemade solutions like vinegar and water mixtures. Research and choose the most suitable product for your specific flooring material, following the manufacturer’s instructions for proper application and dilution.
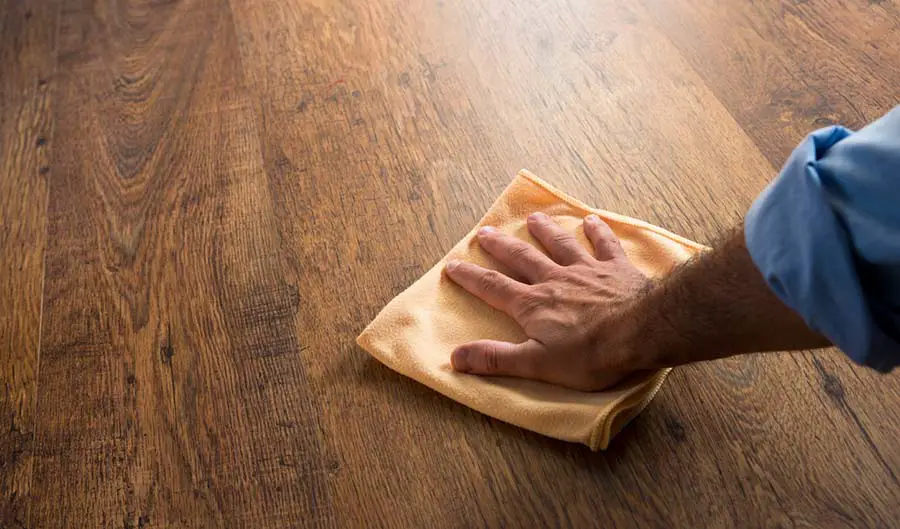
- Clean, Soft Cloths or Mop: Once the wax has been dissolved, you’ll need clean, soft cloths or a mop to wipe away the residue. Avoid using abrasive materials that could scratch the floor’s surface. Opt for microfiber cloths or a gentle mop to ensure a thorough yet safe cleaning process.
- Neutralizing Cleanser: After removing the wax, it’s essential to neutralize any remaining cleaning solution or residue on the floor. This helps restore the pH balance of the floor and ensures that no harmful chemicals are left behind. Look for a neutralizing cleanser specifically designed for your flooring material, and follow the instructions for proper application.
- Floor Polish or Sealer (Optional): Once the wax has been removed, you might consider applying a floor polish or sealer to restore the floor’s shine and protect it from future wax buildup. Choose a product suitable for your flooring material and follow the manufacturer’s instructions for application and drying times.

Preparing the Vinyl Floor for Wax Removal
Vinyl floors are known for their durability and low-maintenance nature. However, over time, wax buildup can occur, diminishing the floor’s appearance and performance. Before you embark on removing the wax, it’s important to properly prepare the vinyl floor to ensure a successful and damage-free process. Below are the steps to prepare your vinyl floor for wax removal.
Clear the Area: Before you begin, remove any furniture or objects from the floor to create a clear and accessible workspace. This prevents obstacles and allows for a more thorough wax removal process.
Sweep or Vacuum the Floor: Start by sweeping or vacuuming the vinyl floor to remove loose dirt, dust, and debris. This step ensures that larger particles won’t interfere with the wax removal process and helps prevent scratching the floor during the scraping stage.
Test a Small Area: Since vinyl floors come in various finishes, it’s crucial to test the wax removal process on a small, inconspicuous area first. This helps you determine the effectiveness of your chosen wax removal method and ensures that it won’t cause any damage or discoloration to the floor.
Dilute the Wax Stripper (If Applicable): If you’re using a commercial wax stripper, follow the manufacturer’s instructions for dilution. Some wax strippers require dilution with water, while others are ready to use. Proper dilution ensures the effectiveness of the product without causing any harm to the vinyl floor.
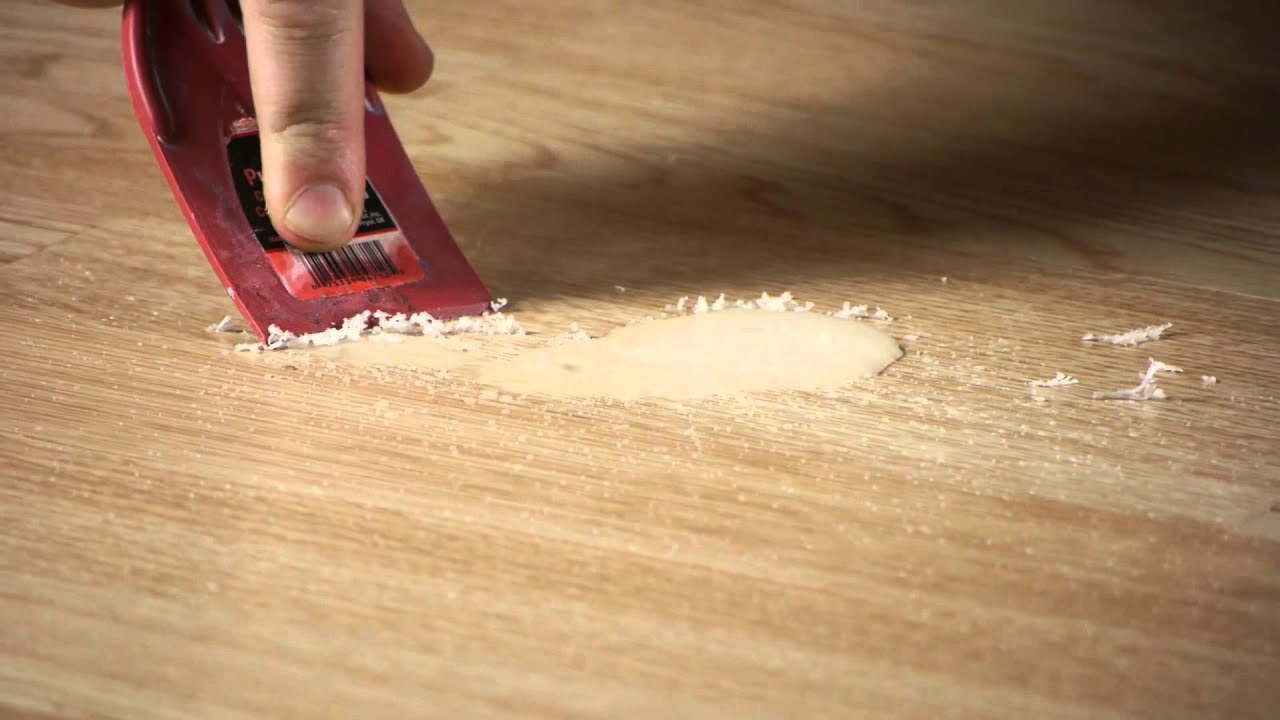
Apply the Wax Stripper: Using a clean mop or a soft cloth, apply the wax stripper to the vinyl floor, focusing on small sections at a time. Allow the stripper to sit on the surface for the recommended time specified by the manufacturer. This gives the product enough time to break down the wax buildup effectively.
Gently Scrub and Remove the Wax: After the wax stripper has had time to work, use a scraper or putty knife to gently scrub away the dissolved wax. Be careful not to apply excessive pressure or use abrasive tools that could damage the vinyl floor. Work in small sections, wiping away the residue with a clean cloth or mop as you go.
Using a Solvent to Dissolve and Remove the Wax
When it comes to removing wax buildup from various surfaces, using a solvent can be highly effective. Solvents are designed to dissolve the wax, making it easier to remove. Here is the process of using a solvent to dissolve and remove wax, ensuring a thorough and efficient cleaning.
Choose the Right Solvent: Selecting the appropriate solvent is crucial for effective wax removal. Different solvents work better on specific types of wax and surfaces. For example, mineral spirits are commonly used on wood surfaces, while isopropyl alcohol is suitable for removing wax from glass or tile. Research the best solvent for your particular surface and wax type to ensure optimal results.
Test a Small Area: Before applying the solvent to the entire surface, it’s important to test it on a small, inconspicuous area. This ensures that the solvent won’t damage or discolor the surface and confirms its effectiveness in dissolving the wax. Follow the instructions provided by the solvent manufacturer for proper application and testing.
Apply the Solvent: Once the test area has been cleared, and the solvent has proven safe and effective, you can proceed with the full application. Use a clean cloth or sponge to apply the solvent to the waxed surface. Work in small sections, allowing the solvent to penetrate and dissolve the wax.
Let the Solvent Sit: After applying the solvent, allow it to sit on the surface for the recommended time specified by the manufacturer. This gives the solvent sufficient time to break down the wax, making it easier to remove.
Gently Scrub and Wipe Away: Once the solvent has had time to work, use a soft brush or cloth to gently scrub the surface, focusing on the areas with dissolved wax. Be cautious not to apply excessive pressure or scrub too vigorously, as this could damage the surface. As you scrub, wipe away the dissolved wax and solvent with a clean cloth or sponge.
Repeat if Necessary: In some cases, particularly with heavy wax buildup, it may be necessary to repeat the solvent application and scrubbing process to completely remove the wax. If there are stubborn areas that still have wax residue, reapply the solvent and gently scrub until the surface is clean.

Polishing and Re-Sealing the Floor After Wax Removal
After successfully removing wax buildup from your floor, it’s important to complete the process by polishing and re-sealing the surface. This step not only enhances the floor’s appearance but also provides an extra layer of protection against future wax buildup. Let’s discuss the importance of polishing and re-sealing the floor and how to do it effectively.
Restoring the Shine: After removing the wax, the floor may appear dull or lackluster. Polishing the floor helps to restore its shine and bring out the natural beauty of the material. Depending on the type of flooring, you can use a suitable polish or buffing solution that is recommended for that specific material.
Enhancing the Surface’s Protection: By re-sealing the floor after wax removal, you add an extra layer of protection to the surface. The sealer acts as a barrier against spills, stains, and dirt, making it easier to clean and maintain the floor in the long run. Choose a sealer that is compatible with your flooring material and follow the manufacturer’s instructions for proper application.
Applying the Polish: Before applying the polish, ensure the floor is clean and free of any debris or residue from the wax removal process. Use a clean mop or applicator pad to apply the polish in small sections, working in even strokes and following the manufacturer’s instructions for drying and buffing times. Be sure to ventilate the area to allow the polish to dry properly.
Buffing the Floor: Once the polish has dried, use a buffing machine or a soft cloth to buff the floor. Buffing helps to evenly distribute the polish, remove any streaks or unevenness, and create a smooth and glossy finish. If using a buffing machine, follow the manufacturer’s instructions for proper usage.
Allowing Sufficient Drying Time: After polishing and buffing, it’s important to allow the floor sufficient drying time before walking on it or placing any furniture back in the space. This helps to prevent any smudging or damage to the freshly polished surface. Refer to the polish manufacturer’s instructions for specific drying times.
Applying the Sealer (If Applicable): If your flooring material requires a sealer, apply it according to the manufacturer’s instructions. Use a clean mop or applicator pad to evenly spread the sealer on the floor, working in small sections. Allow the sealer to dry completely before walking on the floor or placing any objects on it.

Ways to Strip Wax Buildup From Floors

3 Ways to Strip Wax Buildup From Floors

Removing Wax Buildup on Floors? ThriftyFun

How to Remove Candle Wax from a Vinyl Floor
3 Ways to Strip Wax Buildup From Floors

Steps to Remove Wax From Hardwood Floors
How to Remove Candle Wax From Laminate Floors

How to Make Vinyl Plank Floors Shine

How To Remove Wax Buildup From Laminate Floors?

Related Posts: