Importance of Underlayment for Tile Floor Installation
When it comes to installing tile floors, many homeowners focus solely on the tiles themselves and overlook the importance of underlayment. However, underlayment plays a crucial role in the longevity and performance of your tile floor. It provides a stable and level surface, helps with moisture control, and enhances the overall durability of the floor. Let’s talk about the importance of underlayment for tile floor installation.
- Provides Stability and Leveling: Underlayment acts as a solid foundation for your tile floor. It helps to even out any unevenness in the subfloor, ensuring a smooth and level surface. This is particularly important when installing large format tiles, as any imperfections in the subfloor can result in cracked or uneven tiles over time. Underlayment provides stability, preventing tiles from shifting or cracking under pressure.
- Moisture Control: Moisture can be a significant issue when it comes to tile floor installations. Without proper moisture control, moisture can seep into the subfloor, causing damage to both the subfloor and the tiles. Underlayment acts as a moisture barrier, preventing moisture from reaching the tiles. It also helps to regulate moisture levels, reducing the risk of mold or mildew growth. This is especially crucial in areas like bathrooms or kitchens, where moisture levels are higher.
- Enhances Durability: Tiles alone may not be sufficient to withstand heavy foot traffic or impact. Underlayment adds an extra layer of durability to your tile floor, making it more resistant to cracks, chips, and other forms of damage. It absorbs the impact and distributes the weight evenly, reducing stress on the tiles. With underlayment, your tile floor can withstand the test of time and daily wear and tear.
- Reduces Sound Transmission: Tile floors can be noisy, especially in multi-story buildings or areas with high foot traffic. Underlayment helps to reduce sound transmission, providing a quieter and more comfortable environment. It absorbs sound vibrations, preventing them from traveling through the floor and disturbing the occupants of the space.
- Improves Thermal Insulation: Underlayment also provides a layer of thermal insulation, helping to regulate the temperature in your space. It acts as a barrier, preventing cold air from seeping through the floor in winter and keeping the floor cool in summer. This not only enhances the comfort of the space but also helps to reduce energy costs by reducing the need for heating or cooling.
Types of Underlayment for Tile Floors: Which One to Choose?
When it comes to choosing underlayment for your tile floors, there are several options available, each with its own unique features and benefits. The type of underlayment you choose will depend on factors such as the subfloor material, the environment, and your specific needs. Let’s explore different types of underlayment for tile floors and help you determine which one is the best fit for your project.
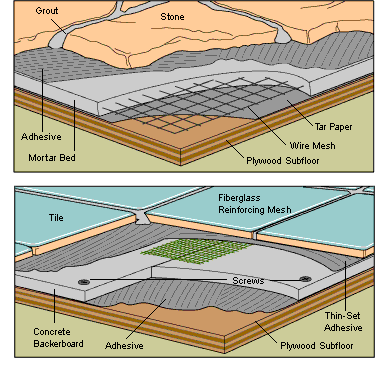
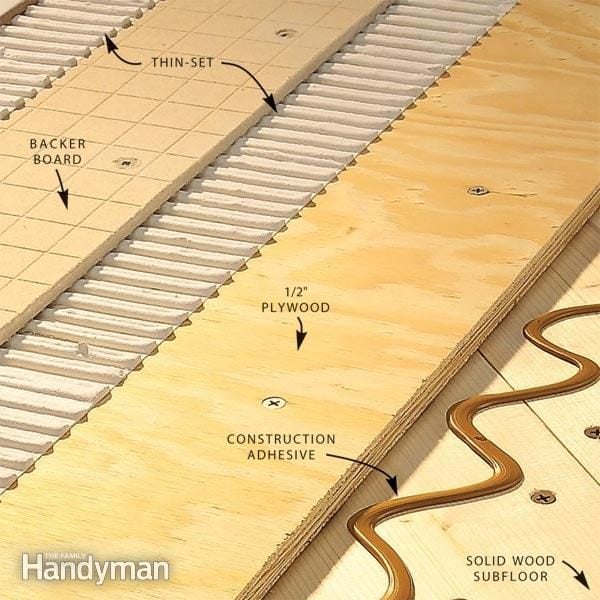
Cement Backer Board: Cement backer board is a popular choice for tile floor underlayment. It is made of cement and reinforcing fibers, providing a sturdy and durable surface for tile installation. Cement backer board is ideal for areas with high moisture levels, such as bathrooms and kitchens, as it is highly resistant to water damage. It also offers excellent stability and can withstand heavy loads. However, it is important to note that cement backer board can be heavy and may require additional support for installation.
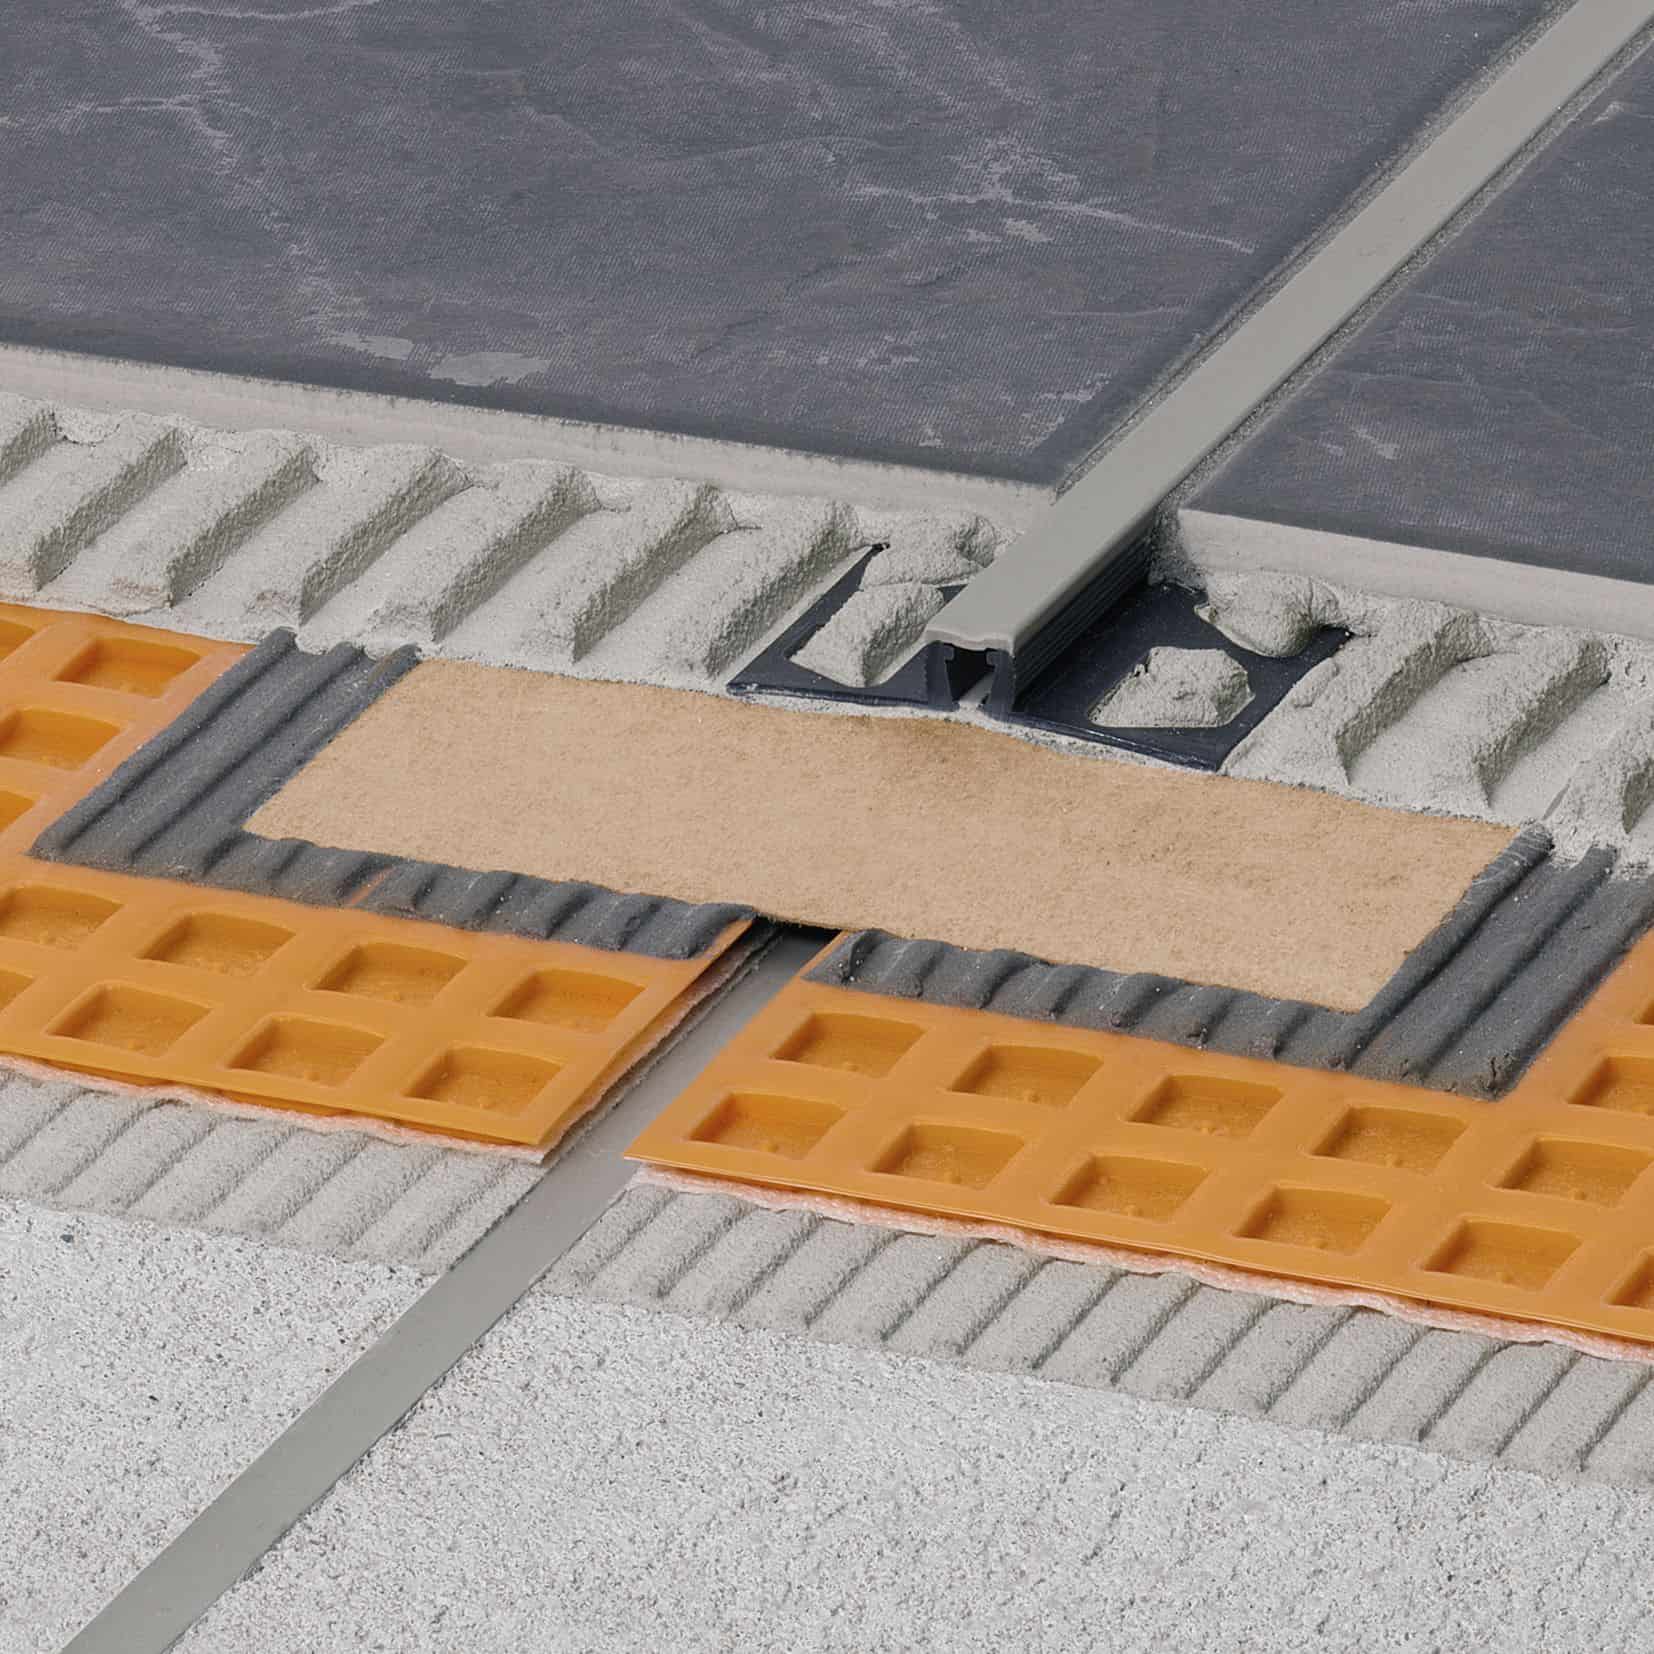
Uncoupling Membrane: An uncoupling membrane is designed to prevent cracks and movement in the subfloor from transferring to the tile floor. It is typically made of a flexible material, such as polyethylene or polypropylene, with a grid pattern on the surface. Uncoupling membranes provide a cushioning effect, absorbing stress and allowing for slight movement without causing damage to the tiles. They are particularly useful in areas with unstable subfloors or where there is a risk of cracking due to movement, such as over concrete slabs.
Foam Underlayment: Foam underlayment is lightweight and easy to install, making it a popular choice for DIYers. It is typically made of polystyrene or polyethylene foam and is available in various thicknesses. Foam underlayment provides insulation, reducing noise and enhancing comfort underfoot. It also helps to even out minor imperfections in the subfloor. However, foam underlayment may not be suitable for areas with high moisture levels, as it is not water-resistant.
Plywood or OSB: Plywood or oriented strand board (OSB) can also be used as underlayment for tile floors. They provide a solid and stable surface for tile installation. Plywood and OSB should be properly installed and secured to the subfloor, with seams staggered and fasteners placed at the appropriate intervals. It is important to choose a plywood or OSB with the right thickness and quality to ensure adequate support for the tiles.
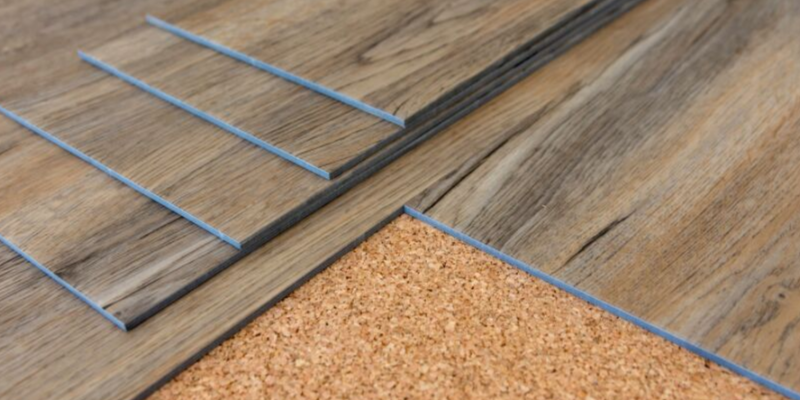
Cork Underlayment: Cork underlayment is an eco-friendly option that offers both insulation and sound reduction properties. It is made from the bark of the cork oak tree and is available in various thicknesses. Cork underlayment provides a comfortable and cushioned feel underfoot, reducing strain on joints. It also helps to reduce noise transmission between floors. However, cork underlayment may not be suitable for areas with high moisture levels, as prolonged exposure to water can cause damage.
Benefits of Using Underlayment for Tile Floors
Using underlayment for tile floors offers a range of benefits that go beyond just providing a stable surface for tile installation. Underlayment can enhance the overall performance, durability, and comfort of your tile floor. Below are various benefits of using underlayment for tile floors and why it is a worthwhile investment for your home.
Improved Tile Floor Longevity: One of the primary benefits of using underlayment for tile floors is that it helps to extend the lifespan of your tiles. Underlayment provides a stable and level surface, reducing the risk of tiles cracking or shifting over time. By preventing direct contact between the tiles and the subfloor, underlayment acts as a protective layer, absorbing impact and distributing weight evenly. This helps to minimize stress on the tiles, ultimately prolonging their lifespan.
Enhanced Moisture Control: Moisture can be a significant concern in areas like bathrooms, kitchens, and basements. Underlayment acts as a moisture barrier, preventing water from seeping into the subfloor and potentially causing damage to the tiles. It also helps to regulate moisture levels, reducing the risk of mold or mildew growth. By using underlayment, you can ensure that your tile floor remains in good condition and free from moisture-related issues.
Increased Comfort and Noise Reduction: Underlayment can significantly improve the comfort of your tile floor. Some types of underlayment, such as foam or cork, provide cushioning and insulation properties, making the floor more comfortable to walk on. These materials absorb impact and reduce strain on joints, making them especially beneficial for areas where you spend a lot of time standing, such as kitchens. Additionally, underlayment helps to reduce noise transmission, creating a quieter and more peaceful environment.
Thermal Insulation: Underlayment also offers thermal insulation benefits for your tile floor. It acts as a barrier, preventing cold air from seeping through the subfloor and keeping the floor warm in colder seasons. This can help to improve energy efficiency and reduce heating costs. On the other hand, underlayment can also help to keep the floor cool in warmer seasons, making it more comfortable underfoot.
Easy Installation and Maintenance: Many types of underlayment are designed to be easy to install, even for DIY homeowners. They often come in rolls or sheets that can be easily cut to fit the desired area. Additionally, underlayment can make tile floor maintenance easier. It provides a protective layer, making it easier to clean and maintain the tiles. It also helps to prevent grout lines from cracking or staining, reducing the need for frequent repairs or replacements.

How to Install Underlayment for Tile Floors
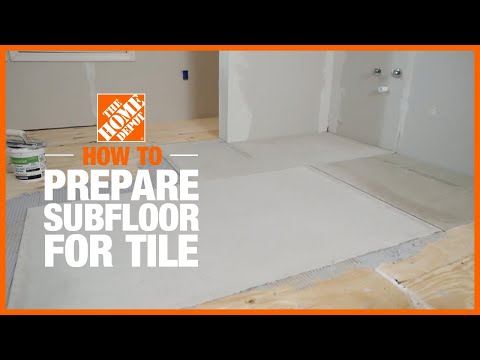
Installing underlayment for tile floors is a crucial step in ensuring a successful and long-lasting tile installation. While the specific instructions may vary depending on the type of underlayment you choose, there are general steps to follow. Follow this step-by-step guide on how to install underlayment for tile floors, giving you the knowledge and confidence to tackle this important task.
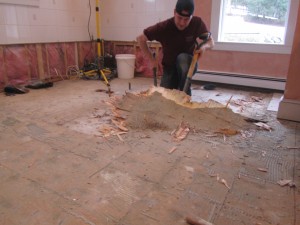
Prepare the Subfloor: Before installing underlayment, it is essential to prepare the subfloor properly. Remove any existing flooring and ensure that the subfloor is clean, dry, level, and free from any debris or imperfections. Repair any cracks or uneven areas, as these can affect the performance of the underlayment and the tiles.
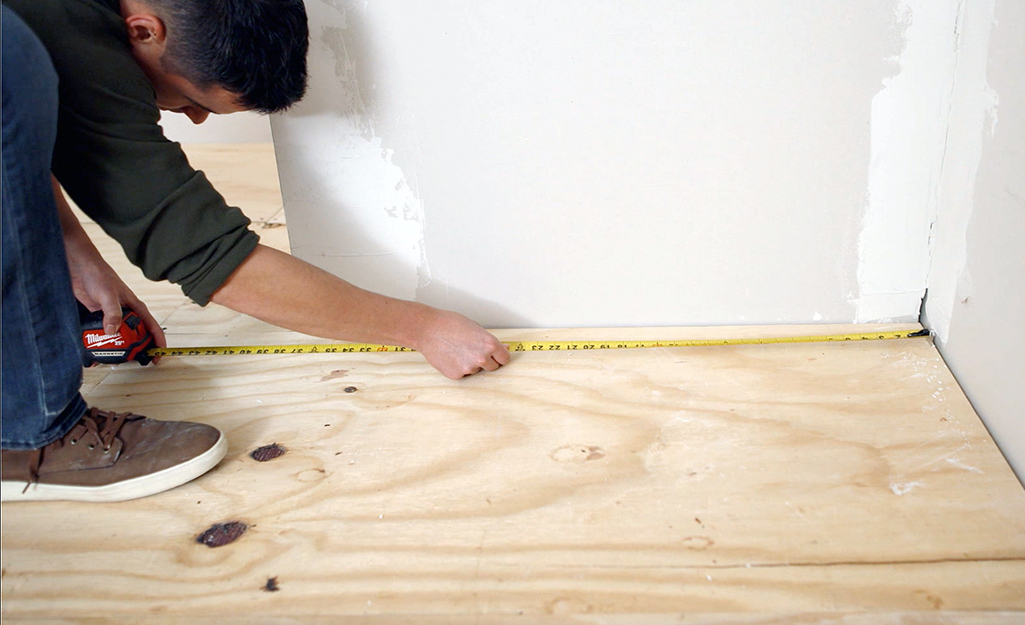
Measure and Cut the Underlayment: Measure the dimensions of the room and cut the underlayment accordingly. Leave a small gap around the edges to allow for expansion. Use a utility knife or a saw to make clean and precise cuts. If using multiple pieces of underlayment, ensure that the seams are staggered to provide added stability.
Lay the Underlayment: Start in one corner of the room and lay the first piece of underlayment, aligning it with the edges of the room. Use nails, screws, or adhesive recommended by the manufacturer to secure the underlayment to the subfloor. Follow the manufacturer’s instructions for the specific type of underlayment you are using.
Secure the Seams: If using multiple pieces of underlayment, secure the seams to ensure a smooth and level surface. Some underlayment types may require adhesive or tape to secure the seams, while others may have a self-adhesive backing. Follow the manufacturer’s instructions for proper seam sealing techniques.
Check for Stability: Once the underlayment is installed, check for stability and ensure that there are no visible gaps or areas that are not properly secured. Walk on the underlayment and apply pressure to ensure that it feels solid and does not shift or make any noise.
Proceed with Tile Installation: Once the underlayment is in place and secure, you can proceed with the tile installation. Follow the recommended tile installation techniques, using the appropriate adhesive and grout. The underlayment will provide a stable and level surface, ensuring that the tiles adhere properly and remain in place.
Remember to consult the manufacturer’s instructions for the specific type of underlayment you are using, as the installation process may vary. Additionally, it is always a good idea to seek professional guidance or consult with a tile installation expert if you are unsure or inexperienced in this process.

Common Mistakes to Avoid When Installing Underlayment for Tile Floors
Installing underlayment for tile floors requires attention to detail and proper technique to ensure a successful and long-lasting tile installation. However, there are common mistakes that many homeowners make during this process, which can compromise the performance and durability of the floor. We will highlight some of the most common mistakes to avoid when installing underlayment for tile floors, helping you achieve a professional-quality result.
Neglecting Subfloor Preparation: One of the most common mistakes is neglecting proper subfloor preparation. Failing to clean, level, and repair the subfloor can lead to uneven underlayment and tile installation. Take the time to remove any existing flooring, clean the subfloor thoroughly, and address any cracks or imperfections. This will provide a solid foundation for the underlayment and ensure a level surface for tile installation.
Incorrect Underlayment Type: Choosing the wrong type of underlayment for your specific project can lead to problems down the line. Each type of underlayment has its own unique properties and suitability for different environments. Make sure to research and select the appropriate underlayment that matches your subfloor material, moisture levels, and specific needs. Consulting with a professional or tile specialist can help you make the right choice.
Poor Sealing of Seams: Properly sealing the seams of the underlayment is crucial to prevent moisture penetration and ensure a stable surface. Many underlayment types require adhesive or tape to secure the seams. Failing to seal the seams properly can result in movement, unevenness, and potential damage to the tiles. Follow the manufacturer’s instructions carefully and ensure that the seams are adequately sealed.
Insufficient Fastening of Underlayment: Improper fastening of the underlayment can lead to shifting, creaking, and instability of the floor. Using the appropriate fasteners, such as nails, screws, or adhesive, is essential to secure the underlayment to the subfloor. Follow the manufacturer’s recommendations for the specific underlayment type you are using, ensuring that the underlayment is firmly and evenly fastened.
Lack of Acclimation Time: Some types of underlayment, such as wood-based products, require acclimation time before installation. Failing to allow the underlayment to acclimate to the room’s temperature and humidity levels can result in expansion, contraction, and potential damage. Follow the manufacturer’s instructions regarding acclimation time to ensure proper installation.
Skipping Professional Guidance: Attempting to install underlayment without proper knowledge or experience can lead to costly mistakes. If you are unsure about any aspect of the installation process or have limited experience, it is always wise to seek professional guidance. Consulting with a tile specialist or hiring a professional installer can help you avoid common mistakes and ensure a successful underlayment installation.

How to Prepare a Subfloor for Tile Installation
Do I need flooring underlayment? How to decide which underlayment
How to Prepare a Subfloor for Tile Installation
How to Install Tile Backer Board on a Wood Subfloor (DIY)
Do You Need to Remove Linoleum Before Laying Tile?

Installing Cement Board Underlayment
Related Posts: