I never expected a floor pattern to stop me in my tracks the way herringbone did. I was browsing a home design blog late one night when I saw a kitchen renovation featuring herringbone vinyl tiles in a warm oak tone, and I immediately started planning how to get that look in my own home. What sold me was learning that vinyl made the whole project achievable without a contractor, a massive budget, or weeks of disruption. If you’ve been drawn to the herringbone look but assumed it was too complicated or expensive, let me share what I discovered after doing it myself in three different rooms.
Why Herringbone Works So Well in Vinyl Tile Form
The herringbone pattern has been used in flooring for centuries, and there’s a reason it keeps coming back. The interlocking zigzag of rectangular tiles creates a visual energy that plain straight-laid floors simply don’t have. It draws the eye along the length of a room, making narrow spaces feel wider and longer rooms feel more dynamic and intentional.
What makes vinyl such a smart material for herringbone specifically is the precision of its manufacturing. Each tile is cut to exact, consistent dimensions, which means the pattern aligns cleanly without the variation you’d encounter cutting natural stone or even real wood. That consistency made my DIY installation go far smoother than I anticipated going in.
Vinyl also forgives the learning curve that comes with any patterned installation. If you make a small error in a section, individual tiles can be lifted and repositioned before the adhesive fully cures. That flexibility took a lot of pressure off me as someone attempting a complex pattern layout for the first time, and it’s something I genuinely appreciated throughout the process.
Choosing Between Peel and Stick vs. Glue-Down Herringbone Tiles
When I started shopping, I found herringbone vinyl tiles available in two main formats: peel and stick, and glue-down. I used peel and stick in my hallway as my first project and glue-down in my kitchen as my second, so I have real experience with both options and honest opinions about each.
Peel and stick tiles are the most beginner-friendly option by a significant margin. You simply remove the backing and press them into place, which made my hallway installation feel almost meditative. The tradeoff is that peel and stick adhesive isn’t as permanent or as strong as dedicated tile adhesive, and in high-traffic areas or rooms with temperature fluctuations, edges can sometimes lift over time.
Glue-down tiles require spreading adhesive with a notched trowel before laying tiles, which adds complexity and mess but produces a much more secure and permanent installation. My kitchen sees heavy daily traffic and the occasional wet mop, so the extra durability of glue-down was worth the messier process. If you’re doing a low-traffic area like a bedroom or home office, peel and stick is a perfectly legitimate and lasting choice.

Planning Your Herringbone Layout Before You Touch a Single Tile
The planning stage is where herringbone projects succeed or fail, and I cannot stress this enough after learning it the slightly hard way on my first project. Unlike straight-laid tile where you can start in a corner and work outward, herringbone requires finding the true center of the room and building outward from there to keep the pattern balanced and symmetrical.
I marked my room’s centerpoint by snapping chalk lines from the midpoints of opposite walls. Where those lines crossed became my anchor point for the first tile. From there, I dry-laid an entire section of the pattern without adhesive to confirm it would look centered and end with reasonable cuts at the walls rather than awkward slivers.
Accounting for the borders was the trickiest part for me. Herringbone creates angled cuts along every wall edge, which requires more precision than straight tile edge cuts. I made a cardboard template for the border cuts and practiced the angles before committing to the actual tiles. That extra preparation saved me from several expensive cutting mistakes that would have added up quickly across all four walls.
Selecting the Right Herringbone Tile Style for Your Space
The pattern itself carries a lot of visual weight, so the tile design you choose either complements that energy or competes with it. I found that simpler, wood-look vinyl tiles in a single tone worked most beautifully in herringbone layouts, because the pattern itself provides all the visual interest the floor needs without adding competing graphic elements.
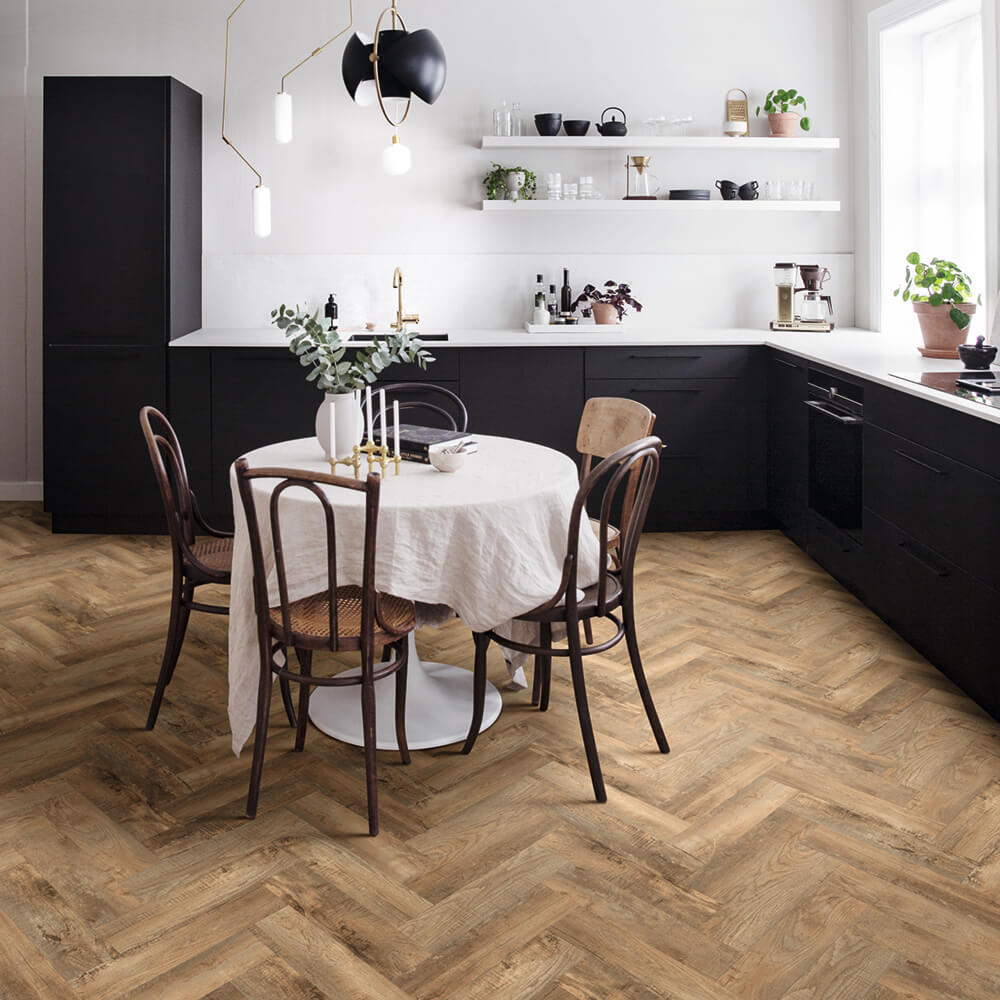
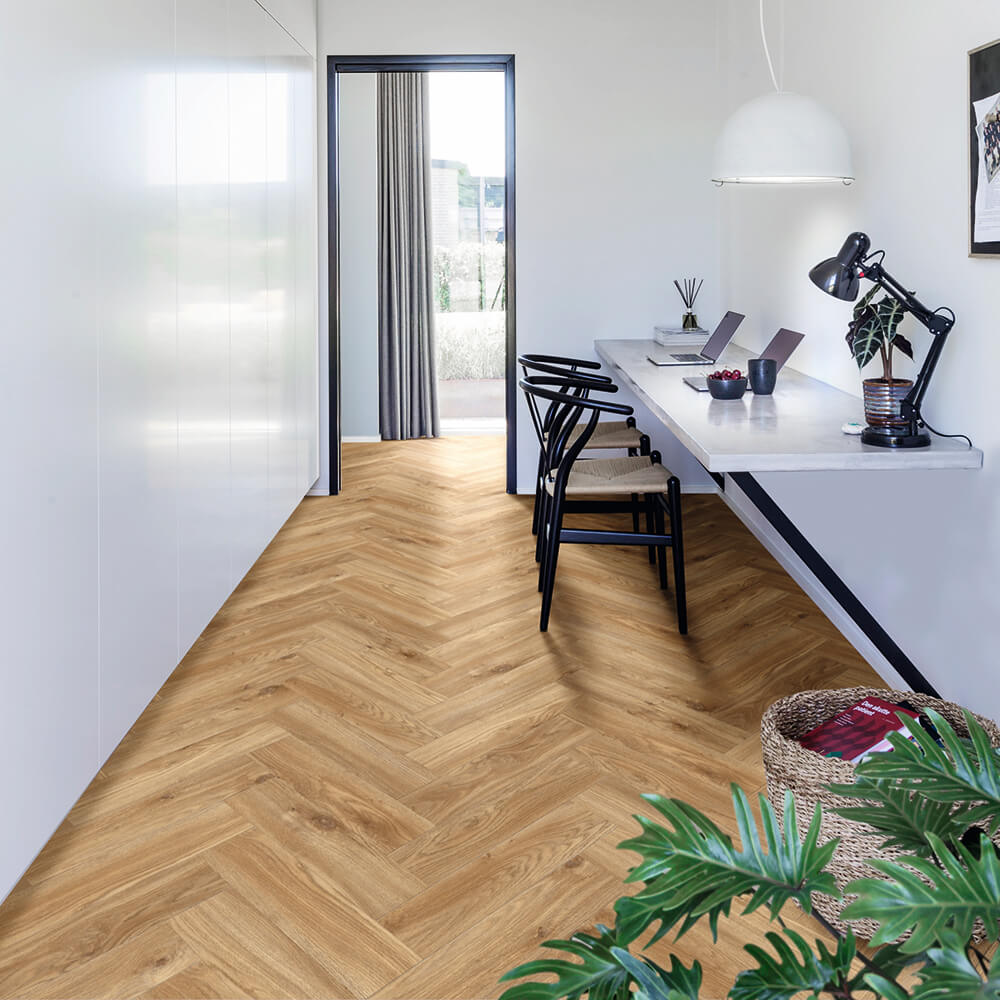
For my hallway, I chose a light ash wood-look tile with subtle grain variation in a creamy white tone. The herringbone pattern in that pale color made the narrow hallway feel significantly wider and brighter than it had with the previous dark carpet. Lighter tones in herringbone tend to open spaces up, while darker tones add drama and intimacy, so your room’s purpose and natural light level should guide that choice.
Stone-look herringbone vinyl is another option worth considering if you want a more formal or timeless appearance. Marble-effect tiles in herringbone have become increasingly popular in bathrooms and entryways. I used a light gray marble-look tile in my powder room and the result looked genuinely elegant for a material that cost me around $2.50 per square foot, which still makes me a little proud every time I walk past it.

Cutting and Installing Herringbone Tiles Like a DIYer Who’s Done It
The cutting demands of herringbone are higher than straight tile layouts, and having the right tools made an enormous difference in my finished results. For vinyl tiles, a sharp utility knife and a metal straightedge handle most straight cuts cleanly. For the angled border cuts that herringbone requires at the walls, I found a miter box set to 45 degrees invaluable for keeping angles consistent.
I installed the tiles working outward from my center point in a V-shape, filling in one quadrant at a time. This method kept the pattern aligned as I progressed across the floor. Pressing each tile down firmly with a rubber grout float helped ensure full contact with the adhesive or subfloor, which prevents edge lifting later.
Seams are the detail that separate a professional-looking herringbone installation from an amateur one. Taking the time to butt each tile edge tightly against its neighbor before pressing down eliminated visible gaps that would have interrupted the pattern flow. I worked slowly in the first hour until my hands understood the rhythm of the layout, and then the installation pace picked up considerably.

Living With Herringbone Vinyl Tiles: Maintenance and Long-Term Reality
Four years after my first herringbone vinyl installation, I can tell you the floors have held up beautifully with basic maintenance. The waterproof nature of vinyl means spills wipe up cleanly without any anxiety, which suits my busy household well. A dry microfiber mop handles daily dust and a damp mop with a pH-neutral cleaner keeps everything looking fresh weekly.
The one maintenance consideration specific to herringbone is that the angled seam lines can collect fine dust and debris more visibly than straight-laid tile. I noticed this mostly in my kitchen where cooking creates more airborne particles. Running the mop at a slight angle that follows the seam direction rather than against it picks up debris more effectively and keeps the pattern looking clean.
I’d also mention that avoiding harsh chemical cleaners matters with vinyl tiles regardless of the pattern. Anything with bleach, ammonia, or abrasive particles can degrade the wear layer over time and dull the surface. Sticking to gentle, vinyl-appropriate cleaners from the start extends the life of the finish considerably. My oldest herringbone installation still looks as good as it did the day I finished it, which is the best endorsement I can give.

Is herringbone vinyl tile harder to install than straight-laid tile?
Yes, it requires more planning and precision, but it’s still very achievable for a careful DIYer. The main challenges are finding the true room center before starting and cutting accurate angles at the borders. I’d recommend dry-laying a full section before committing any adhesive. Take your time on the layout planning and the actual installation goes more smoothly than you’d expect based on how complex the pattern looks.
How much does herringbone vinyl tile typically cost?
Material costs range from about $1.50 to $5 per square foot depending on quality and design. Because herringbone creates angled border cuts, you’ll have more waste than a straight-laid installation, so budget for 15 percent extra material rather than the standard 10 percent. Overall, even with waste accounted for, herringbone vinyl tile remains one of the more affordable ways to achieve a high-impact, pattern-forward floor in any room of your home.

Is herringbone vinyl tile waterproof and suitable for bathrooms or kitchens?
Yes, vinyl is fully waterproof, making it an excellent choice for kitchens and bathrooms. I have herringbone vinyl in my powder room and kitchen and it handles moisture, spills, and damp mopping without any issues. Just make sure seams are pressed tightly together during installation to minimize gaps where moisture could work underneath over time. Glue-down installation is more water-resistant at the seams than peel and stick for wet environments.
How long do herringbone vinyl floor tiles last?
Quality vinyl tiles with a wear layer of 12 mil or more can last 15 to 20 years with reasonable care. My oldest installation is four years in and still looks excellent. Key factors in longevity are avoiding harsh cleaners, protecting from heavy dragged furniture, and keeping the wear layer in good condition. Individual damaged tiles can be replaced without redoing the entire floor, which is a significant practical advantage over continuous sheet flooring options.
Does the herringbone pattern make a room look bigger or smaller?
When laid correctly, herringbone can make a room feel larger and more dynamic. In narrow spaces like hallways, the zigzag pattern draws the eye along the length of the room and creates a sense of width. Lighter tile tones amplify this effect further. In square rooms, herringbone adds visual interest without significantly affecting the perceived size. The pattern works particularly well in smaller spaces where a simple straight-laid floor might feel plain or flat.
Can I install herringbone vinyl tile over existing flooring?
In many cases, yes. Vinyl tile can go over existing hard flooring that is flat, clean, firmly attached, and in good condition. I installed over existing vinyl in my hallway and it worked fine. Avoid installing over flooring with texture, cushion, or significant unevenness since these create an unstable base that affects adhesion and tile alignment over time. Always check the specific product’s installation guidelines since some manufacturers have requirements about acceptable subfloor types and conditions.

Herringbone Vinyl Flooring: 6 Things to Know Before Installation

Related Posts: