When I renovated my outdated kitchen two years ago, I had a tight budget but big dreams for beautiful floors. After extensive research, I chose luxury vinyl tiles and installed them myself over a weekend. The transformation was incredible, turning my worn linoleum into what looks like expensive ceramic tile for a fraction of the cost. Living with these vinyl tiles through daily cooking, spills, dropped dishes, and constant foot traffic has taught me that they’re not just budget-friendly but genuinely practical for real kitchen life.
Choosing Between Peel-and-Stick and Click-Lock Vinyl Tiles
I spent weeks deciding between peel-and-stick vinyl tiles and click-lock luxury vinyl tiles. Peel-and-stick seemed easier and cheaper at $1-2 per square foot, but I worried about longevity and whether they’d stay adhered in a kitchen environment. Click-lock tiles cost more at $3-4 per square foot but offered better durability and the ability to replace individual tiles if damaged. I ultimately chose click-lock for peace of mind.
The installation difference between these two types is significant. Peel-and-stick requires an absolutely perfect subfloor because every imperfection telegraphs through the thin tiles. Click-lock tiles are thicker and more forgiving of minor subfloor irregularities. They also float over the subfloor rather than adhering directly, making them easier to remove or replace if needed. For a kitchen where I might want to update in the future, this flexibility appealed to me.
I’ve talked to friends who chose peel-and-stick for their kitchens with mixed results. Some are perfectly happy after several years, while others experienced tiles lifting at corners or edges, especially near the sink and dishwasher. My click-lock tiles have stayed perfectly in place through two years of kitchen chaos. The extra upfront cost has proven worthwhile through superior performance and the confidence that they’ll last for years to come.
Realistic Tile Patterns and Styles I Considered
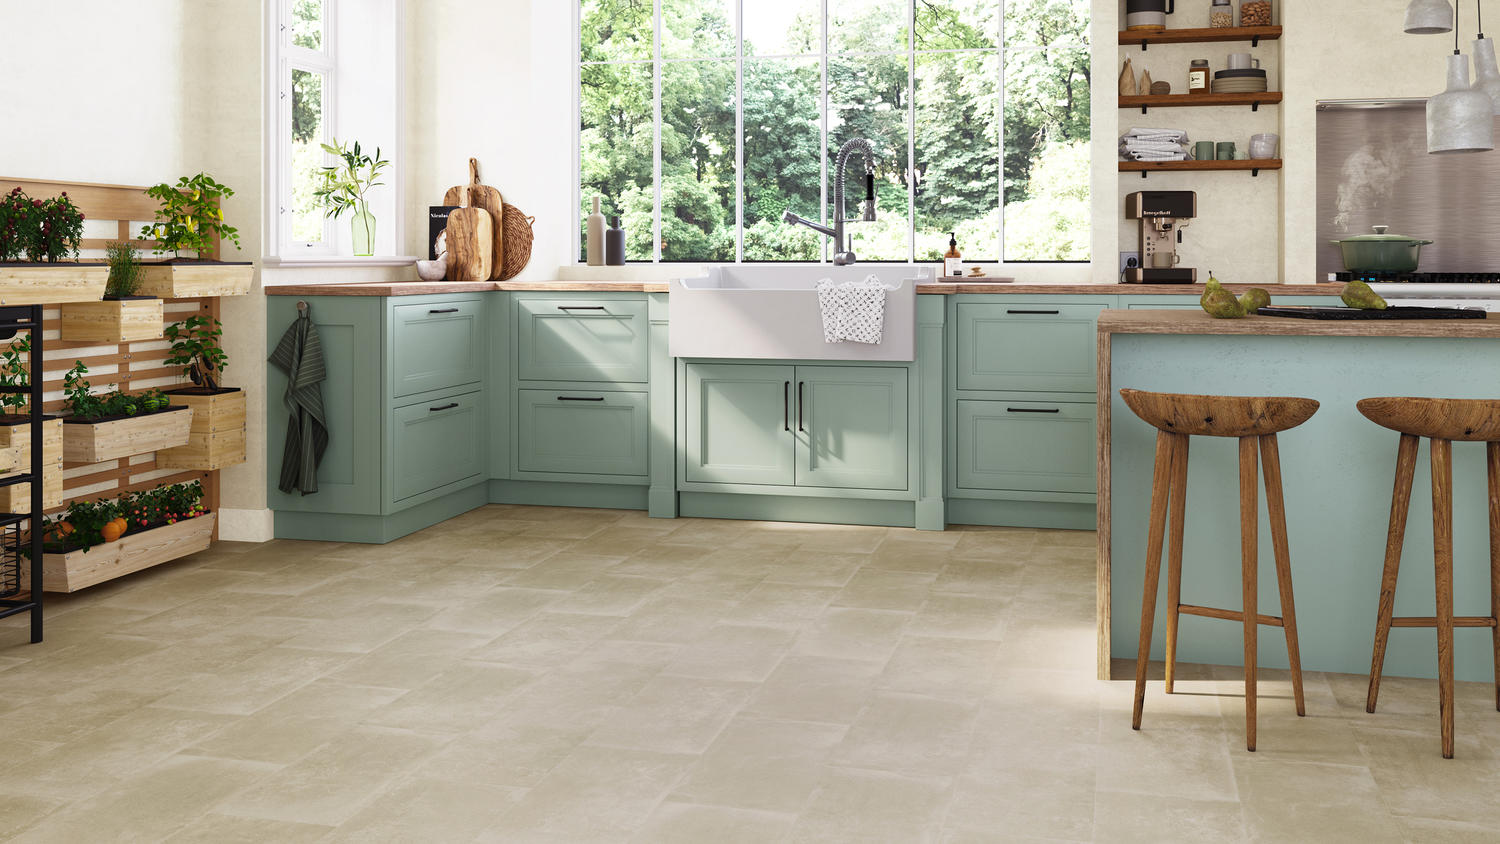
The style options in vinyl tiles amazed me. I originally wanted classic white subway tiles but found vinyl versions that look incredibly convincing from normal viewing distance. I also considered wood-look planks, but ultimately chose a stone-look tile in soft gray tones that complements my white cabinets and stainless appliances. The high-definition printing technology makes these vinyl tiles look authentically like natural materials.
I learned that larger format tiles, like the 12×24 inch ones I chose, create a more upscale appearance with fewer seam lines. Smaller tiles can look busy in a kitchen, while larger formats feel more contemporary and spacious. The size also affected installation time, larger tiles meant I covered the 150 square foot kitchen faster than I would have with standard 12×12 tiles. This practical consideration mattered during my DIY installation weekend.
Pattern selection was strategic for hiding the inevitable kitchen mess. I avoided pure white or very dark tiles that would show every crumb and spill. My medium gray stone-look tiles conceal daily dirt remarkably well, making the kitchen look cleaner between deep cleanings. The subtle variation in the pattern also helps disguise any minor installation imperfections, which was reassuring for a first-time DIY installer like me.

My DIY Installation Experience and Tips
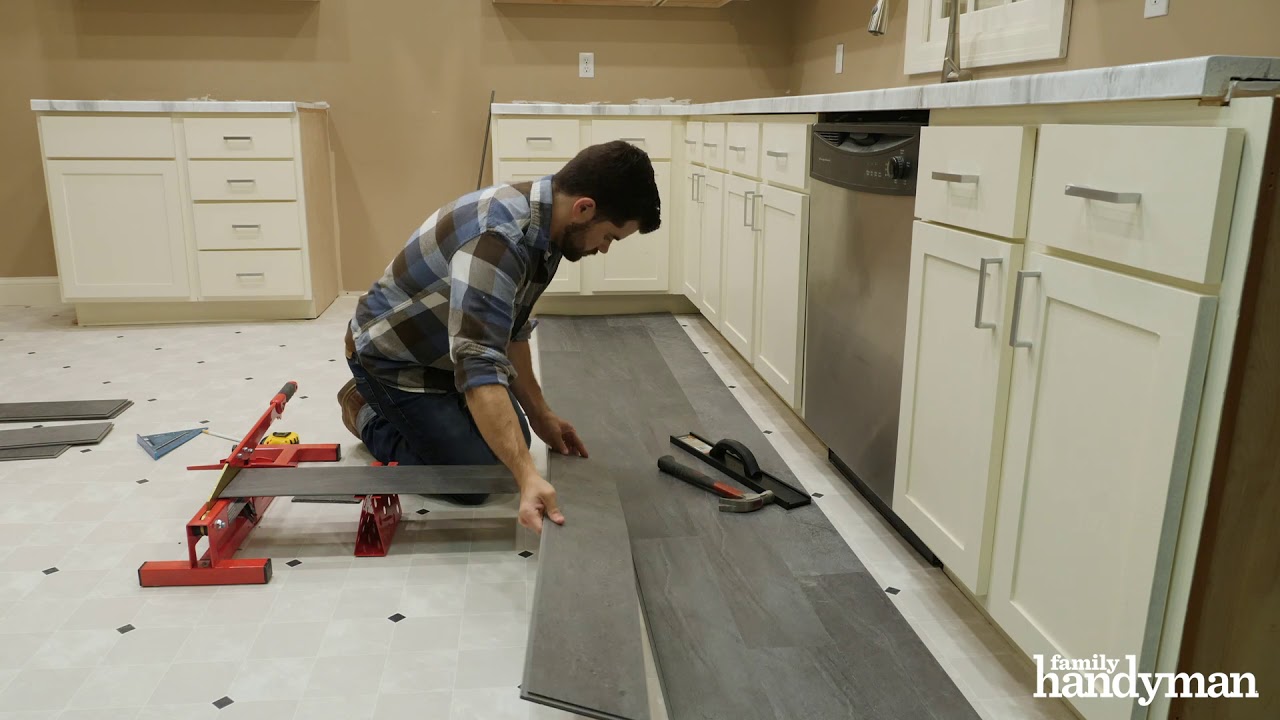
I installed my kitchen vinyl tiles myself in about eight hours spread over a weekend. The click-lock system was genuinely intuitive, snapping planks together securely without adhesive or special tools. I started in the most visible corner and worked toward the less visible areas near appliances. This strategy meant any cutting mistakes or imperfect fits ended up in spots where they’re hidden by the refrigerator or stove.
Subfloor preparation took longer than the actual installation. My old vinyl sheet flooring needed removal, which was tedious but necessary. I filled low spots with floor patch compound and used a leveling compound in one corner where the floor dipped noticeably. This prep work ensured my vinyl tiles laid flat and the locking mechanisms engaged properly. Skipping this step would have caused problems later with tiles popping loose or creating trip hazards.
Cutting tiles around cabinets and doorways challenged me initially. I used a combination of a utility knife for straight cuts and a jigsaw for intricate shapes around pipes and door frames. Creating cardboard templates for complex cuts saved me from wasting expensive tiles on incorrect measurements. The learning curve was gentle enough that by the time I reached the far wall, I felt confident and was working much faster than when I started.

Performance Against Kitchen Spills and Stains
My vinyl tile kitchen floor has handled an impressive array of spills without staining. I’ve dropped tomato sauce, spilled red wine, splattered cooking oil, and dealt with various food disasters. In every case, wiping up the mess promptly left no trace. The waterproof surface doesn’t absorb liquids like grout would, making cleanup infinitely easier than my parents’ ceramic tile kitchen with its perpetually stained grout lines.
The true waterproof test came when my dishwasher leaked overnight, flooding the kitchen with several gallons of water. I discovered the mess in the morning and immediately panicked, thinking I’d need to replace the floor. After soaking up all the water and drying everything thoroughly, the vinyl tiles showed absolutely no damage, swelling, or warping. This incident proved that quality vinyl tiles really are waterproof, not just water-resistant like laminate.
Heat resistance has been adequate for typical kitchen use. I’ve set down moderately hot pots without issues, though I wouldn’t place a pot straight from a 400-degree oven directly on the vinyl. I use trivets for very hot cookware as a precaution. The vinyl hasn’t discolored or melted from the ambient heat in my kitchen, including the area in front of the oven where heat builds up when cooking. This durability has exceeded my expectations for a budget-friendly material.

Maintenance Reality and Long-Term Appearance
Daily kitchen cleanup involves sweeping or vacuuming, and the vinyl tiles make this task easy. Crumbs and debris don’t stick to the smooth surface like they did to my old textured linoleum. A quick pass with a microfiber dust mop each evening keeps the floor looking presentable. This low-maintenance quality has been one of my favorite features, especially during busy weeks when deep cleaning gets postponed.
Weekly mopping with a vinyl floor cleaner keeps the tiles looking fresh. Unlike ceramic tile requiring grout scrubbing, I just spray and wipe the entire floor in about ten minutes. The vinyl’s wear layer resists staining and scuffing, maintaining its appearance despite constant use. I was worried the tiles might dull or yellow over time, but two years in, they still look nearly identical to installation day.
I haven’t needed any special maintenance products or treatments. No waxing, no sealing, no grout maintenance. I use a standard pH-neutral floor cleaner or sometimes just water with a drop of dish soap. This simplicity saves both money and time compared to natural stone or ceramic tile that require more involved care routines. The practical, low-maintenance nature of vinyl tiles makes them perfect for busy kitchens where cleaning time is limited.
Cost Analysis and Value Assessment
My total material cost for 150 square feet of luxury vinyl tiles was about $550, including underlayment and transition strips. Professional installation would have added another $450-600, but DIY kept the project affordable. Comparable ceramic tile would have cost $900-1,200 in materials alone, plus higher installation costs due to the complexity of tile work. The savings allowed me to invest in other kitchen upgrades.
The value extends beyond initial cost savings. The ease of installation meant I wasn’t without a kitchen for days or weeks while contractors worked. I removed old flooring Friday evening, installed new vinyl Saturday, and was cooking on the new floor by Sunday dinner. This minimal disruption was worth significant money to me, avoiding eating out or displacing my family during renovation.
After two years, I calculate the cost per day of my vinyl tile floor at less than a dollar. The durability and continued good appearance suggest these tiles will last at least 10-15 years with normal care, potentially longer. This longevity combined with the low maintenance costs makes vinyl tiles an exceptional value proposition. I’ve recommended them to numerous friends who were also skeptical that inexpensive flooring could look good and perform well.

Are vinyl tiles really durable enough for busy kitchens?
Absolutely. My kitchen sees heavy daily use including cooking, meal prep, and constant traffic from a family of four. After two years, the tiles show minimal wear. The thick wear layer on quality luxury vinyl tiles resists scratches and dents remarkably well. I’ve dropped cast iron pans and kitchen knives without damaging the surface. Choose tiles with wear layers of at least 12-20 mil for best kitchen durability.
How do vinyl tiles handle moisture compared to ceramic tile?
Better in many ways. Vinyl tiles are completely waterproof, while ceramic requires sealed grout that’s prone to staining and moisture penetration. My dishwasher flood proved vinyl’s waterproof capabilities. Cleanup is easier without grout lines to scrub. The one advantage of ceramic is heat resistance, but for typical kitchen use, vinyl performs excellently against water and moisture.

Can I install vinyl tiles over existing kitchen flooring?
Often yes. I installed mine over old vinyl sheet flooring successfully. The existing floor must be smooth, firmly attached, and clean. Remove any loose material or severely damaged sections. Cushioned vinyl or deeply textured floors should be removed. When in doubt, removing old flooring ensures the best result, though it adds time and effort to the project.
Will vinyl tiles look cheap or obviously fake?
Quality luxury vinyl tiles look remarkably authentic. My stone-look tiles fool guests regularly who assume they’re ceramic. The high-definition printing and embossed textures create convincing natural material appearances. Cheap peel-and-stick tiles can look fake, but spending $3-4 per square foot gets you tiles that rival much more expensive materials in appearance.
How long do vinyl kitchen floor tiles actually last?
With proper care, 10-20 years. My tiles are only two years old but show minimal wear suggesting long lifespan. The wear layer thickness affects longevity, thicker wear layers last longer. Commercial-grade vinyl tiles in kitchens can last even longer. This durability makes them cost-effective long-term, not just budget-friendly initially.
Are vinyl tiles safe and healthy for kitchen use?
Modern vinyl tiles are much safer than older vinyl products. I chose low-VOC certified tiles that don’t off-gas harmful chemicals. Look for FloorScore or similar certifications ensuring air quality safety. The waterproof, non-porous surface doesn’t harbor bacteria or mold like porous materials can. They’re as safe as any other kitchen flooring when you choose quality products from reputable manufacturers.

Types of Vinyl Flooring
Vinyl floor home decor

How to Install Floating Vinyl Flooring Over Old Floors
 Related Posts: