When I started planning my kitchen renovation last year, I knew I wanted something that looked sophisticated but could handle the daily chaos of family life. After months of research and countless samples scattered across my counter, I discovered that grey vinyl flooring was exactly what I’d been searching for. It offered the perfect balance of style, durability, and practicality that my busy household needed, all while staying within my budget.
Choosing the Right Shade of Grey for Your Kitchen
Finding the perfect grey tone felt overwhelming at first. I learned that cooler greys with blue undertones work beautifully in kitchens with white cabinets and stainless steel appliances, creating a clean, modern aesthetic. When I held different samples against my existing fixtures, the cooler greys made my space feel larger and more cohesive.
Warmer greys with beige or taupe undertones became my go-to recommendation for kitchens with wood cabinets or brass fixtures. I noticed these shades create a more inviting, cozy atmosphere that still feels contemporary. The key is testing samples in different lighting conditions throughout the day, something I wish I’d known from the beginning.
Medium-toned greys proved to be the most versatile option in my experience. They hide dirt and scratches better than lighter shades, while not showing every speck of dust like darker options. I found this middle ground perfect for my high-traffic kitchen, especially with kids and pets constantly moving through the space.
Luxury Vinyl Tile vs. Vinyl Plank: My Decision Process
Initially, I was torn between luxury vinyl tile (LVT) and vinyl plank flooring. The square tiles reminded me of natural stone and ceramic, offering endless pattern possibilities like herringbone or basketweave. I spent hours arranging sample tiles on my kitchen floor, envisioning different layouts that would complement my island and cabinets.
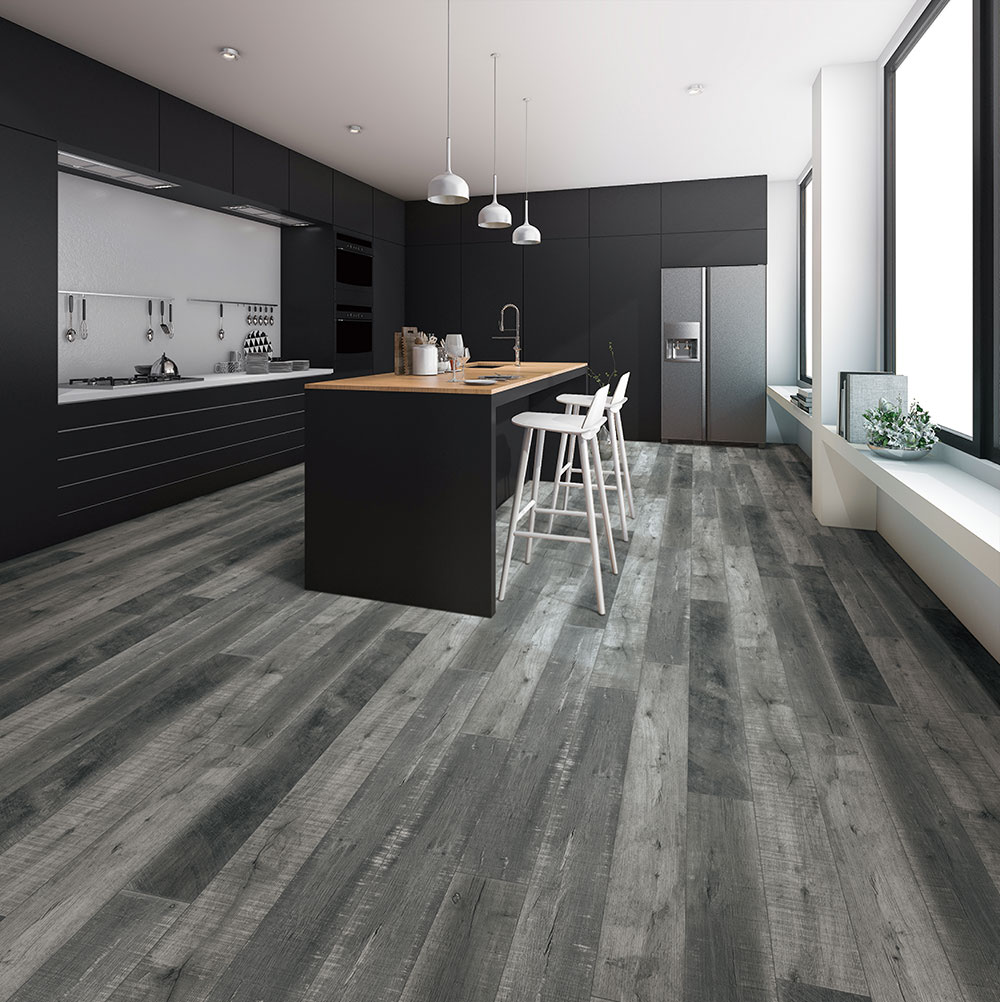
Vinyl planks ultimately won me over because they mimic hardwood so convincingly. The longer format made my galley kitchen appear more spacious, and the wood-look texture added warmth to balance the cool grey tone. I chose planks that were 6 inches wide and 48 inches long, which created clean sight lines throughout the space.
The installation process also influenced my decision. Planks seemed more straightforward for a DIY project, with fewer cuts needed around my kitchen island and appliances. The click-lock system made the installation surprisingly manageable, even for someone like me who’s more comfortable with paintbrushes than power tools.

Waterproof Features That Matter
Living through a dishwasher leak in my previous kitchen taught me the importance of truly waterproof flooring. I discovered that not all vinyl flooring offers the same level of water protection, so I made sure to choose 100% waterproof luxury vinyl that could handle standing water without damage. This peace of mind proved invaluable during my first holiday cooking marathon.
The waterproof core technology impressed me most. Unlike traditional vinyl that can swell or warp when moisture seeps through seams, my grey vinyl flooring maintained its integrity even when I accidentally left the sink running and flooded half the kitchen. The water simply sat on top until I could clean it up, leaving no lasting damage.
Proper installation around water sources became crucial in my experience. I learned to pay special attention to seams near the dishwasher, sink, and refrigerator ice maker. Using the manufacturer’s recommended adhesive and transition strips in these areas prevented any moisture infiltration that could compromise the flooring’s performance over time.

Installation Tips I Wish I’d Known Earlier
Acclimating the flooring to my kitchen’s temperature and humidity for 48 hours before installation made a significant difference in the final result. I stored the boxes in the kitchen itself, not the garage, allowing the material to adjust to the space where it would live permanently. This simple step prevented gaps and buckling that could have occurred later.
Preparing the subfloor properly became my most important lesson. I spent extra time ensuring the surface was completely level, clean, and dry before beginning installation. Any imperfections in the subfloor telegraphed through the vinyl, so I used self-leveling compound in a few spots and thoroughly vacuumed before laying the first plank.
Starting the installation from the longest, straightest wall in my kitchen created the best visual flow. I snapped a chalk line parallel to this wall, accounting for the room’s natural variations. Taking time with the first row ensured all subsequent rows aligned properly, preventing the frustrating adjustments I’d heard other DIYers complain about.

Maintenance and Daily Care Reality Check
My daily cleaning routine with grey vinyl flooring couldn’t be simpler. I sweep or vacuum regularly to prevent grit from dulling the surface, then mop weekly with a pH-neutral cleaner specifically designed for vinyl. I avoid harsh chemicals and excessive water, sticking to slightly damp mopping that leaves the floor clean without over-wetting the seams.
Dealing with stains and spills became much easier than I expected. Coffee, wine, and even my daughter’s art project mishaps were wiped up effortlessly when addressed quickly. For stubborn spots, I use a paste of baking soda and water, letting it sit briefly before gently scrubbing with a soft brush. This approach has kept my grey flooring looking fresh for over a year.
Protecting high-traffic areas required some strategic thinking. I placed mats at the entrance from the garage and in front of the sink to minimize wear patterns. Furniture pads under my kitchen table chairs prevent scratching when they’re moved daily. These simple precautions have maintained the flooring’s appearance despite constant family activity.

Cost Analysis: Budget vs. Premium Options
Budget-friendly grey vinyl options started around $2 per square foot for my 200-square-foot kitchen, but I quickly learned that spending slightly more delivered significantly better results. The mid-range options at $4-5 per square foot offered superior wear layers, more realistic textures, and better click-lock systems that made installation smoother.
Premium luxury vinyl flooring in the $6-8 per square foot range provided features I found worthwhile for a kitchen renovation. The thicker wear layers promised longer life, the designs looked incredibly realistic, and the warranties extended up to 20 years. When I calculated the cost per year of use, the premium option offered better value.
Installation costs varied dramatically based on my approach. Professional installation added $3-4 per square foot to my project, while tackling it myself saved nearly $800. However, the professional installer completed the job in one day compared to my weekend-long effort. For busy families, the time savings might justify the professional installation expense.

How well does grey vinyl flooring hide dirt and pet hair in a busy kitchen?
I’m amazed at how forgiving my grey vinyl is. Medium-toned greys camouflage everyday dust, crumbs, and even my golden retriever’s hair remarkably well. The subtle texture patterns help disguise minor debris between cleanings, making my kitchen look tidier with less effort than my previous tile floor required.
Is vinyl flooring safe for food preparation areas and family kitchens?
Absolutely. My grey vinyl flooring is completely food-safe and non-toxic once installed. I’ve dropped everything from raw chicken to sticky honey on it without concern. The smooth, non-porous surface doesn’t harbor bacteria like some natural materials, and cleaning with standard kitchen disinfectants keeps it hygienic for food prep.

How does luxury vinyl compare to hardwood or tile in terms of comfort underfoot?
Standing at my kitchen counter for long cooking sessions feels much more comfortable on vinyl than my previous ceramic tile. The slight give in the material reduces fatigue on my legs and back. It’s not as soft as cork, but noticeably more forgiving than hard surfaces, which I appreciate during holiday baking marathons.
Will heavy kitchen appliances damage or dent the vinyl flooring?
My refrigerator, range, and dishwasher haven’t caused any damage to the vinyl after more than a year. I used furniture pads under appliances that might get moved occasionally, like my stand mixer. The key is choosing vinyl with adequate thickness and avoiding dragging heavy items across the surface during installation or rearranging.

How long can I expect grey vinyl flooring to last in a high-traffic kitchen?
Based on the manufacturer’s warranty and my research, I expect 15-20 years of good performance from my premium vinyl flooring. The wear layer thickness directly impacts longevity, so investing in better quality pays off over time. My installer showed me 10-year-old vinyl floors that still looked excellent with proper care.
Can I install vinyl flooring over my existing kitchen tiles?
Yes, I installed my grey vinyl directly over the old ceramic tile after ensuring it was firmly attached and level. This saved time and money on demolition. However, any loose tiles needed re-securing, and I filled gaps between tiles with floor patch compound to create a smooth surface for the new vinyl installation.
Luxury Vinyl Tile and Laminate Tile
Modern kitchen. Luxury vinyl plank flooring and glass subway tiled

grey vinyl plank in galley kitchen – Hubs Flooring, Inc

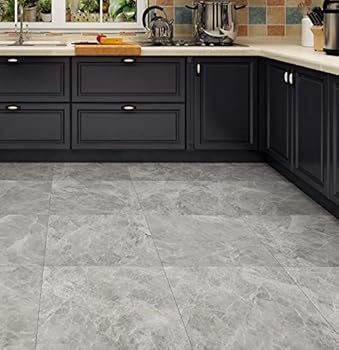
Livelynine Concrete Grey Peel and Stick Floor Tile 12X12 Inch 16 Pack Vinyl Flooring Peel and Stick Waterproof Self Adhesive Floor Tiles for Bathroom
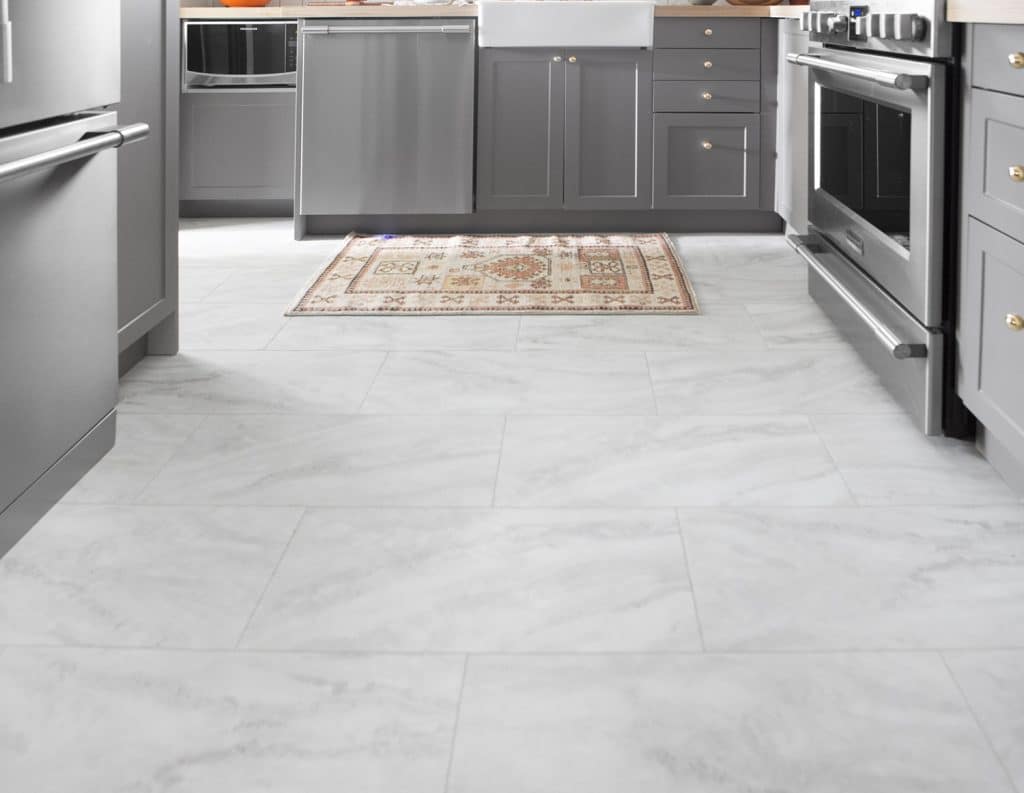
Home Decorators Collection Straiated Stone Grey 12 in. Wide x 24

How to Lay Luxury Vinyl Tile Flooring (LVT) + a feature in TABLE
Related Posts: