Choosing the perfect stain for my hardwood floors turned out to be one of the most challenging yet rewarding decisions I’ve made during my home renovation journey. What initially seemed like a simple color selection quickly became a complex process involving multiple variables, from wood species and existing finishes to lighting conditions and personal preferences. I learned that stain samples are essential for making an informed decision, as colors can vary dramatically between small swatches and actual floor installations. This experience taught me that patience and proper testing are crucial for achieving the beautiful, cohesive look I envisioned for my home.
Understanding Wood Species and Stain Interactions
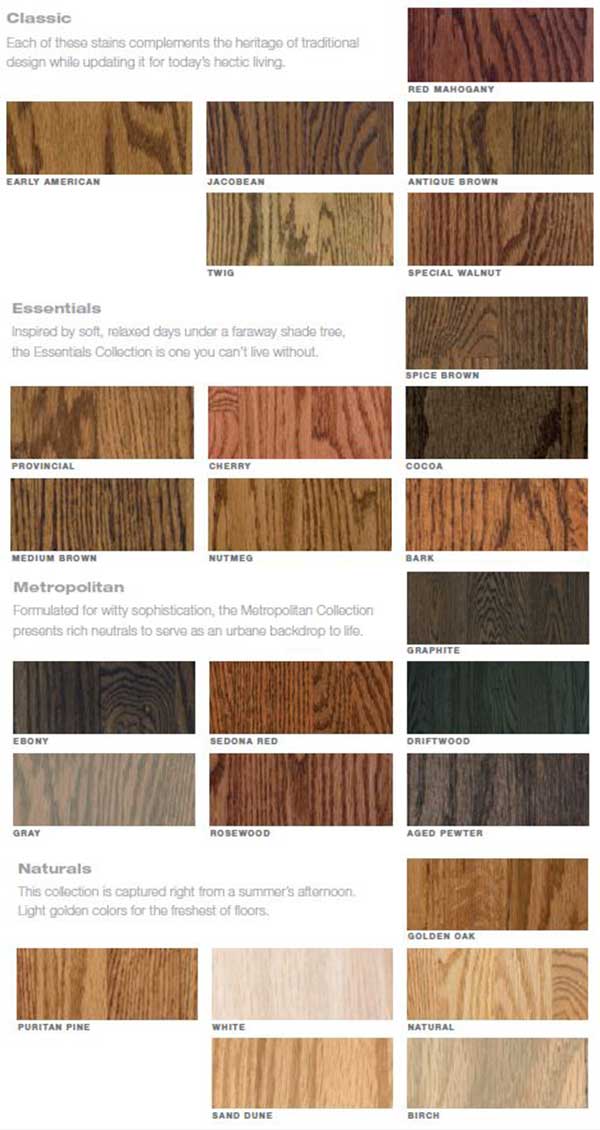
My first major discovery was how differently various wood species accept and display stains. When I tested the same stain on oak versus maple samples, the results were dramatically different in both color intensity and grain visibility. Oak, with its prominent grain pattern, absorbed the stain deeply and created rich, defined lines that enhanced the wood’s natural character. The open grain structure allowed for more stain penetration, resulting in a darker, more dramatic appearance that showcased the wood’s inherent beauty.
Maple presented entirely different challenges when I applied identical stain samples to its surface. The dense, tight grain structure of maple tends to resist stain absorption, creating a more subtle, even coloration that some might consider bland compared to oak’s dramatic grain patterns. I found that achieving the desired color depth on maple often required multiple coats or pre-conditioning treatments to ensure uniform stain acceptance. This taught me that understanding your specific wood species is crucial before selecting stain colors.
Cherry wood samples revealed yet another unique characteristic in my testing process. This species naturally darkens over time when exposed to light, which means the stain color I see today might look completely different in a few years. I learned to factor in this natural aging process when selecting stain colors for cherry floors. The rich, warm tones of cherry paired beautifully with certain stains, but I had to consider how the combination would evolve to avoid future disappointment.
Creating and Testing Sample Boards
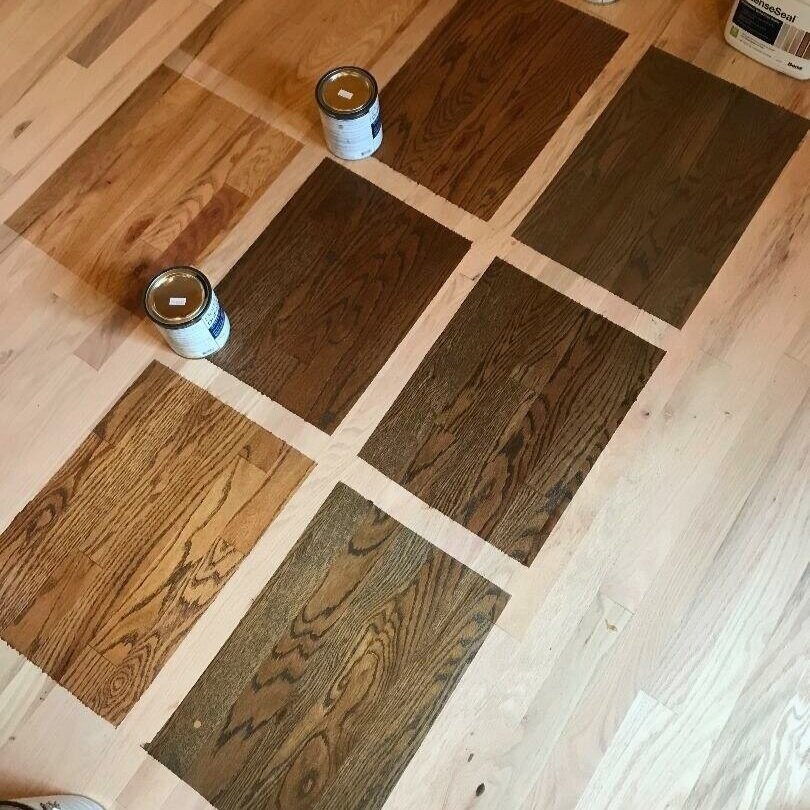
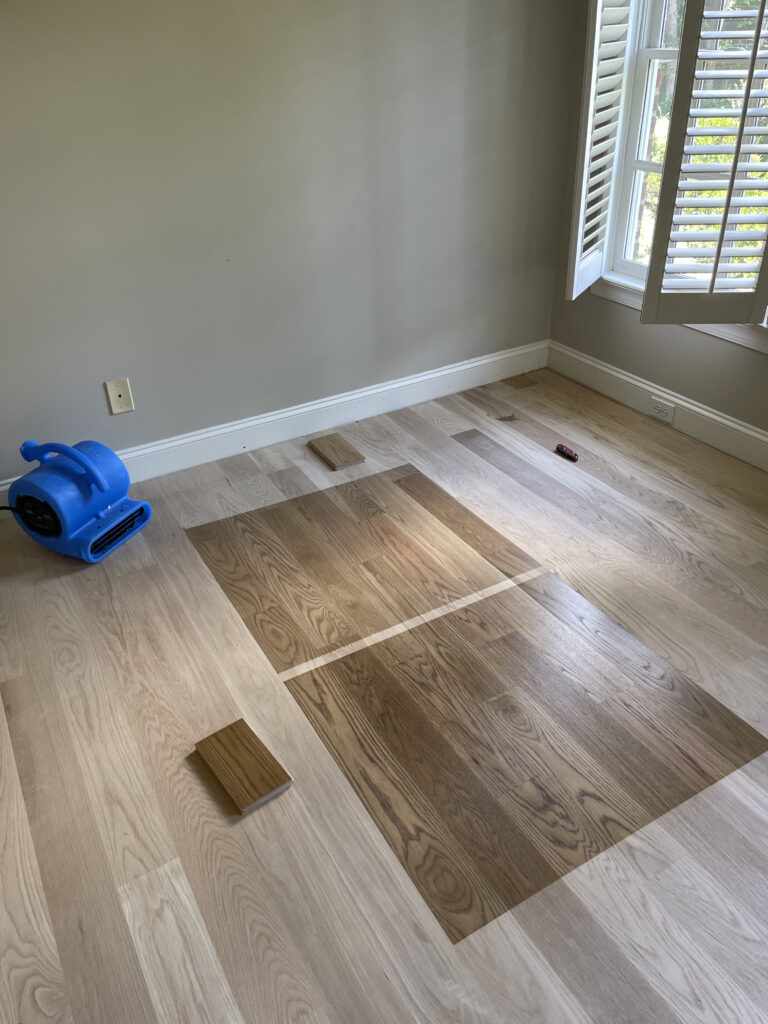
I quickly realized that testing stain samples on actual flooring material was essential for accurate color representation. I obtained several pieces of my exact flooring material and carefully prepared them using the same sanding grits and techniques that would be used on the full floor. This preparation step proved crucial because different sanding grits can affect how the wood accepts stain, potentially altering the final color significantly. I made sure each sample piece was identically prepared to ensure consistent results across all my tests.
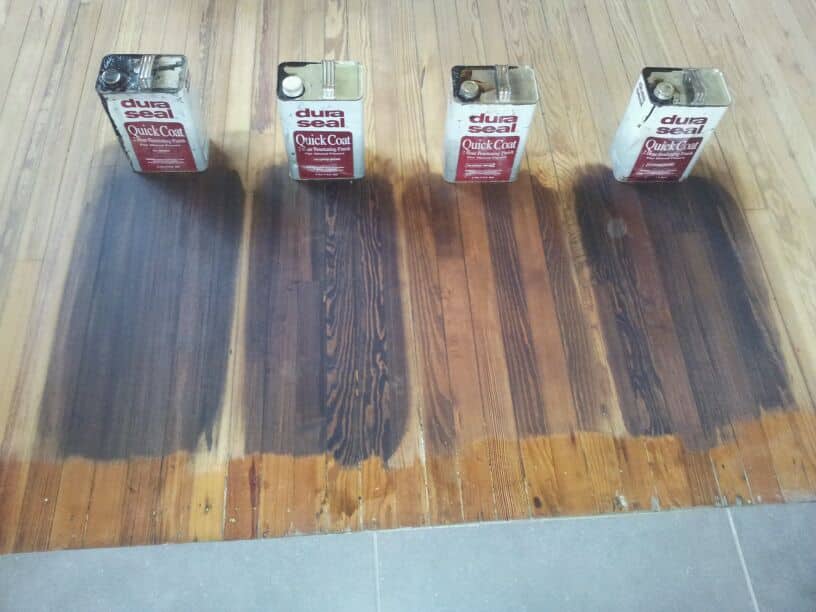
My testing process involved applying stain samples in systematic sections on each board, carefully labeling each section with the specific stain name and application details. I applied the stain using the same techniques and tools I planned to use for the full floor installation, maintaining consistent pressure and timing for each sample. This methodical approach helped me understand how each stain would behave during the actual application process and allowed me to identify any potential issues before committing to a full floor treatment.
Documenting my stain samples became an invaluable part of my decision-making process. I photographed each sample under different lighting conditions throughout the day, noting how colors appeared under natural sunlight, artificial lighting, and various combinations of both. I also kept detailed notes about application techniques, drying times, and any special considerations for each stain type. This documentation proved essential when comparing options and helped me make a more informed final decision about which stain would work best in my specific space.

Lighting Effects on Stain Appearance
The impact of lighting on stain appearance was perhaps the most surprising discovery in my sampling process. Colors that looked perfect under the bright fluorescent lights in the hardware store appeared completely different in my home’s natural lighting conditions. I learned to view my stain samples at different times of day and under various lighting scenarios to get a true sense of how each color would look in my actual living space. This testing revealed dramatic differences that could have led to disappointment if I had relied solely on store lighting.
Morning light streaming through my east-facing windows cast a cool, bluish tone on my stain samples, making warm colors appear more muted and cool colors more prominent. As the day progressed and the light shifted to a warmer, more golden tone, the same stain samples took on entirely different characteristics. I found that colors I initially dismissed in morning light became much more appealing in the warm afternoon sun, while others that looked perfect in the morning appeared too intense later in the day.
Evening lighting presented yet another perspective on my stain samples that I hadn’t anticipated. Under artificial lighting, whether warm incandescent or cool LED bulbs, the stain colors shifted again, sometimes dramatically. I realized that since I spend most of my time at home in the evenings, the appearance of my floors under artificial lighting was just as important as their daytime appearance. This revelation led me to test samples under all the different light fixtures I planned to use in each room before making my final decision.
Considering Room Function and Traffic Patterns
Different rooms in my home required different considerations when selecting stain colors from my sample collection. High-traffic areas like hallways and entryways needed stains that would hide wear patterns and scratches effectively, while formal living spaces could accommodate more delicate or dramatic color choices. I learned that darker stains, while beautiful, tend to show dust and scratches more readily than medium-toned options, making them less practical for busy family areas where maintenance might be challenging.
The function of each room also influenced my stain selection process significantly. In my kitchen, I wanted a stain that would complement the cabinetry and countertops while being practical for a space where spills and heavy use are common. My sample testing revealed that certain stain colors clashed with my existing kitchen elements, while others created a harmonious, cohesive look that enhanced the overall design. This room-by-room analysis helped me understand that a single stain color might not work throughout my entire home.
I also considered the emotional impact of different stain colors when applied to large floor areas. Samples that looked appealing on small test pieces sometimes felt overwhelming when I imagined them covering entire room floors. I learned to visualize how each stain would affect the perceived size and mood of different spaces, selecting lighter colors for smaller rooms to create an open, airy feeling and reserving darker, more dramatic stains for larger spaces where they wouldn’t feel oppressive or cramped.

Matching Existing Elements and Decor
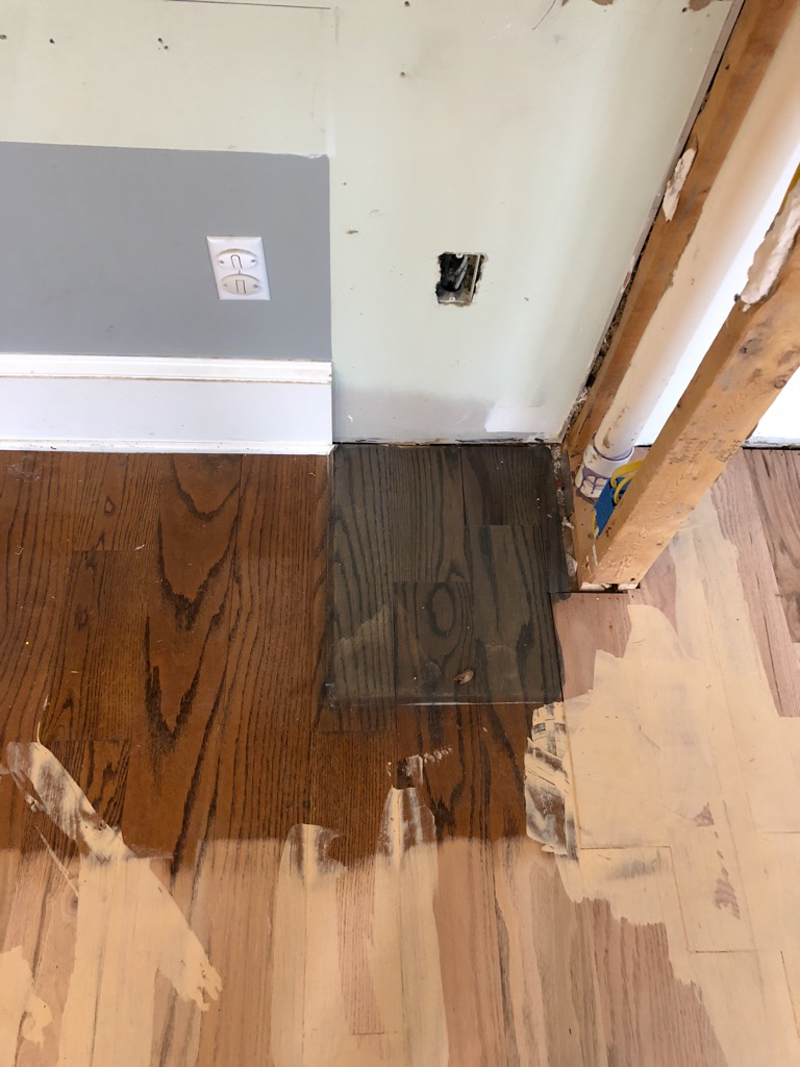
Coordinating my stain samples with existing furniture and decor proved more complex than I initially anticipated. Colors that looked perfect in isolation sometimes clashed terribly with my existing wood furniture, creating a mismatched, uncoordinated appearance that detracted from the overall room design. I learned to test stain samples directly next to my existing furniture pieces, evaluating how the colors interacted and whether they created a cohesive or conflicting visual impact in the space.
My trim and molding colors also played a crucial role in stain selection decisions. I discovered that certain stain colors made my white trim appear yellow or dingy, while others enhanced the crisp, clean appearance I wanted to maintain. Testing samples against painted surfaces revealed how different wood tones could either complement or compete with my existing color scheme. This testing process helped me understand the importance of considering all room elements when selecting floor stain colors.
The undertones in my stain samples became particularly important when matching existing elements. I learned to identify whether stains had red, yellow, or gray undertones and how these undertones interacted with my wall colors, furniture finishes, and decorative accessories. Some stains that appeared neutral in isolation revealed strong undertones when placed in my actual room settings, significantly affecting the overall color harmony. This understanding helped me make more informed decisions about which stains would work best with my existing decor elements.
Final Selection and Application Considerations
After extensive testing and comparison, I developed a systematic approach for making my final stain selection. I narrowed my choices to three top contenders and lived with the samples for several weeks, observing how they looked under different conditions and how my preferences evolved over time. This extended evaluation period helped me move beyond initial impressions and consider how I would feel about each color choice over the long term, ensuring I selected a stain I would love for years to come.
The practical aspects of stain application also influenced my final decision-making process. Some stains required multiple coats or special application techniques that would increase both time and cost for my project. I considered my own skill level and the complexity of achieving consistent results with each stain option. This practical evaluation helped me select a stain that not only looked beautiful but was also achievable within my budget and timeline constraints for the flooring project.
My final selection process included getting input from family members and trusted friends who would regularly spend time in my home. Their fresh perspectives often revealed considerations I had overlooked and helped me evaluate how different stain colors might be perceived by others. I also considered resale value and broad appeal, balancing my personal preferences with choices that would be widely appreciated. This comprehensive evaluation process gave me confidence in my final stain selection and ensured I was making a well-informed decision.
How many stain samples should I test before making a final decision?
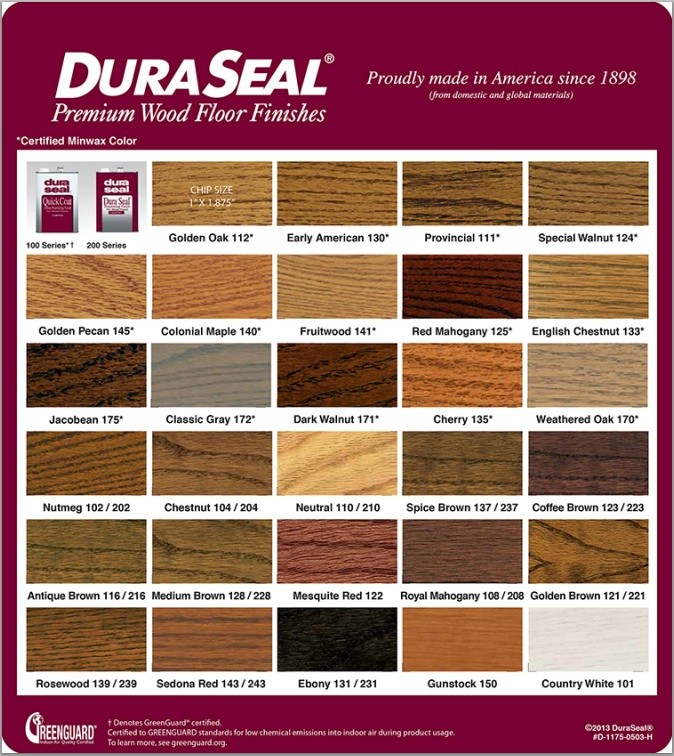
I typically recommend testing at least 5-8 different stain colors to get a good sense of your options and preferences. This range allows you to explore different color families and intensities while not becoming overwhelmed by too many choices. I found that testing fewer than five samples limited my understanding of available options, while testing more than ten became confusing and counterproductive. The key is selecting samples that represent different color directions you’re considering, from light to dark and warm to cool tones.
Should I test stain samples on my actual flooring material or generic wood pieces?
Testing on your actual flooring material is essential for accurate color representation. Different wood species, even within the same general category, can accept stain very differently due to variations in grain structure, density, and natural coloring. I learned this lesson the hard way when samples on generic oak looked completely different from my specific flooring material. The investment in obtaining actual flooring samples for testing pays off significantly in ensuring your final results match your expectations.

How long should I wait between applying the stain and making my final decision?
I recommend living with your stain samples for at least two weeks before making a final decision. This timeframe allows you to observe the samples under various lighting conditions, different weather patterns, and changing daily routines. Colors that initially seem perfect might become tiresome over time, while others that don’t immediately grab your attention might grow on you. I found that my preferences often shifted during this evaluation period, leading to better long-term satisfaction with my final choice.
What’s the best way to document and compare different stain samples?
I developed a systematic documentation process using photographs, written notes, and physical organization of samples. I photographed each sample under different lighting conditions at various times of day, keeping detailed notes about application techniques, drying times, and initial impressions. I also created a comparison chart rating each stain on factors like color appeal, practicality, and compatibility with existing decor. This documentation became invaluable when making my final decision weeks later.

How do I account for the difference between small samples and large floor areas?
Small samples can be deceiving when trying to envision how a stain will look across large floor areas. I learned to create larger test areas whenever possible, using multiple sample pieces arranged together to simulate a bigger surface. I also considered how pattern repetition and grain variation would affect the overall appearance when applied to extensive floor areas. Dark stains that looked sophisticated on small samples sometimes felt overwhelming when I imagined them covering entire rooms, while subtle colors gained impact when multiplied across large surfaces.
Should I consider professional color consultation for stain selection?
Professional color consultation can be valuable, especially for complex projects or when you’re unsure about your color instincts. I found that professionals bring expertise about how different stains perform over time, knowledge of color theory, and experience with various wood species that can save time and prevent costly mistakes. However, since you’ll be living with the floors daily, your personal preferences should ultimately guide the decision. Professional input works best when combined with your own thorough testing and evaluation process to ensure both technical success and personal satisfaction.

How to pick the BEST wood stain for your floors – Bower Power
The Stain we Decided on for Our White Oak Floors
Hardwood Floor Stain colors – Hardwood Floor Refinishing New
Related Posts: