When I decided to finish my basement, I assumed insulating the floor was optional, something people did if they wanted to be extra thorough but not strictly necessary. That assumption cost me an uncomfortable first winter with a finished basement that was noticeably colder than every other room in the house despite the heating system running constantly.
The second winter I went back in and added proper floor insulation, and the difference was so dramatic that I genuinely wished I had done it right from the start. Here is everything I learned through that experience, including what works, what doesn’t, and how to make the right decisions before you’ve already finished the floor above.
Why Basement Floor Insulation Makes Such a Difference
Concrete slabs conduct cold exceptionally well, which is a technical way of saying your basement floor acts like a giant heat sink pulling warmth out of the space constantly. I noticed this most acutely in my finished basement during winter when the room felt chilly even with the thermostat set comfortably. The floor temperature was the issue. Cold floors make entire rooms feel colder than the air temperature reading actually suggests, because your body loses heat rapidly through your feet when they contact a cold surface.
The ground beneath a basement slab stays at a relatively stable temperature year-round, typically somewhere between fifty and sixty degrees Fahrenheit depending on your region and the depth of the slab.
In winter when your basement is heated to sixty-eight or seventy degrees, that temperature differential creates a constant flow of heat downward through the concrete into the earth below. Insulation interrupts that flow and keeps the heat where you actually want it, inside your living space.
Beyond comfort, floor insulation improves energy efficiency in meaningful ways. My heating bills for the basement zone dropped noticeably after I added insulation beneath the subfloor.
The system didn’t have to work as hard to maintain temperature because the floor stopped stealing heat from the room. Over the years, those monthly savings accumulate and offset a significant portion of the insulation cost. It’s one of those home improvements that genuinely pays for itself over time.
Rigid Foam Insulation, The Most Popular Basement Floor Solution
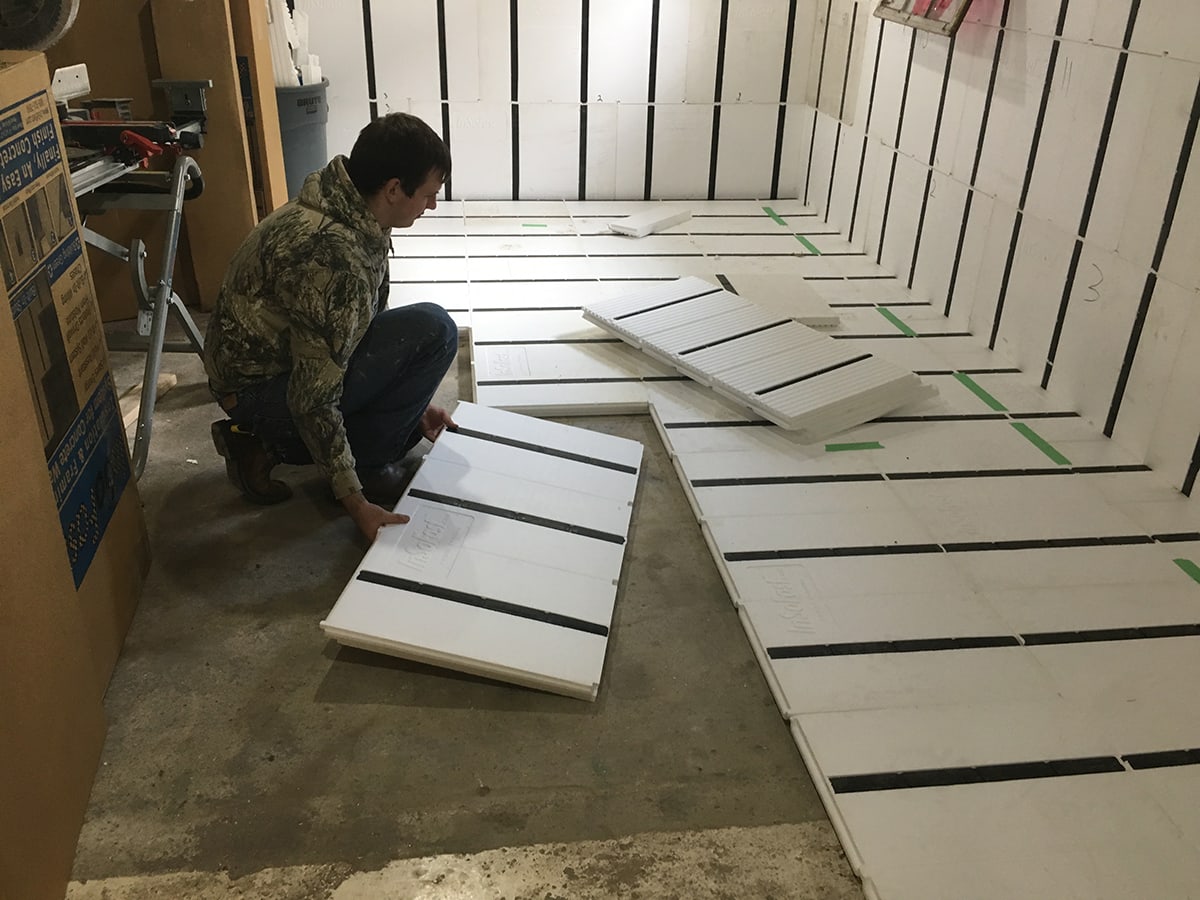
When I did my second attempt at basement floor insulation, I used rigid foam panels, and they have become my unequivocal recommendation for most basement floor applications. Rigid foam is available in several types, including expanded polystyrene, which is commonly called EPS, extruded polystyrene, known as XPS, and polyisocyanurate, often shortened to polyiso. Each has different R-values per inch and moisture resistance characteristics that matter in a basement setting.
XPS is my personal preference for basement floors specifically because it has a higher R-value per inch than EPS and is notably more resistant to moisture absorption. In a basement where moisture vapor transmission through the slab is always a background concern, choosing an insulation material that doesn’t absorb and retain water is genuinely important. XPS typically comes in pink or blue depending on the manufacturer and is widely available at home improvement stores in two-inch thickness, which provides around R-10.
The installation process for rigid foam under a subfloor is straightforward. You lay the panels directly on the concrete slab, cut them to fit around obstructions with a utility knife or circular saw, and tape the seams between panels with foil tape to create a continuous thermal barrier. The subfloor panels or sleepers then go on top of the foam. The whole system raises your finished floor height by roughly two to three inches depending on foam thickness and subfloor type, which is worth planning for at doorways and transitions.
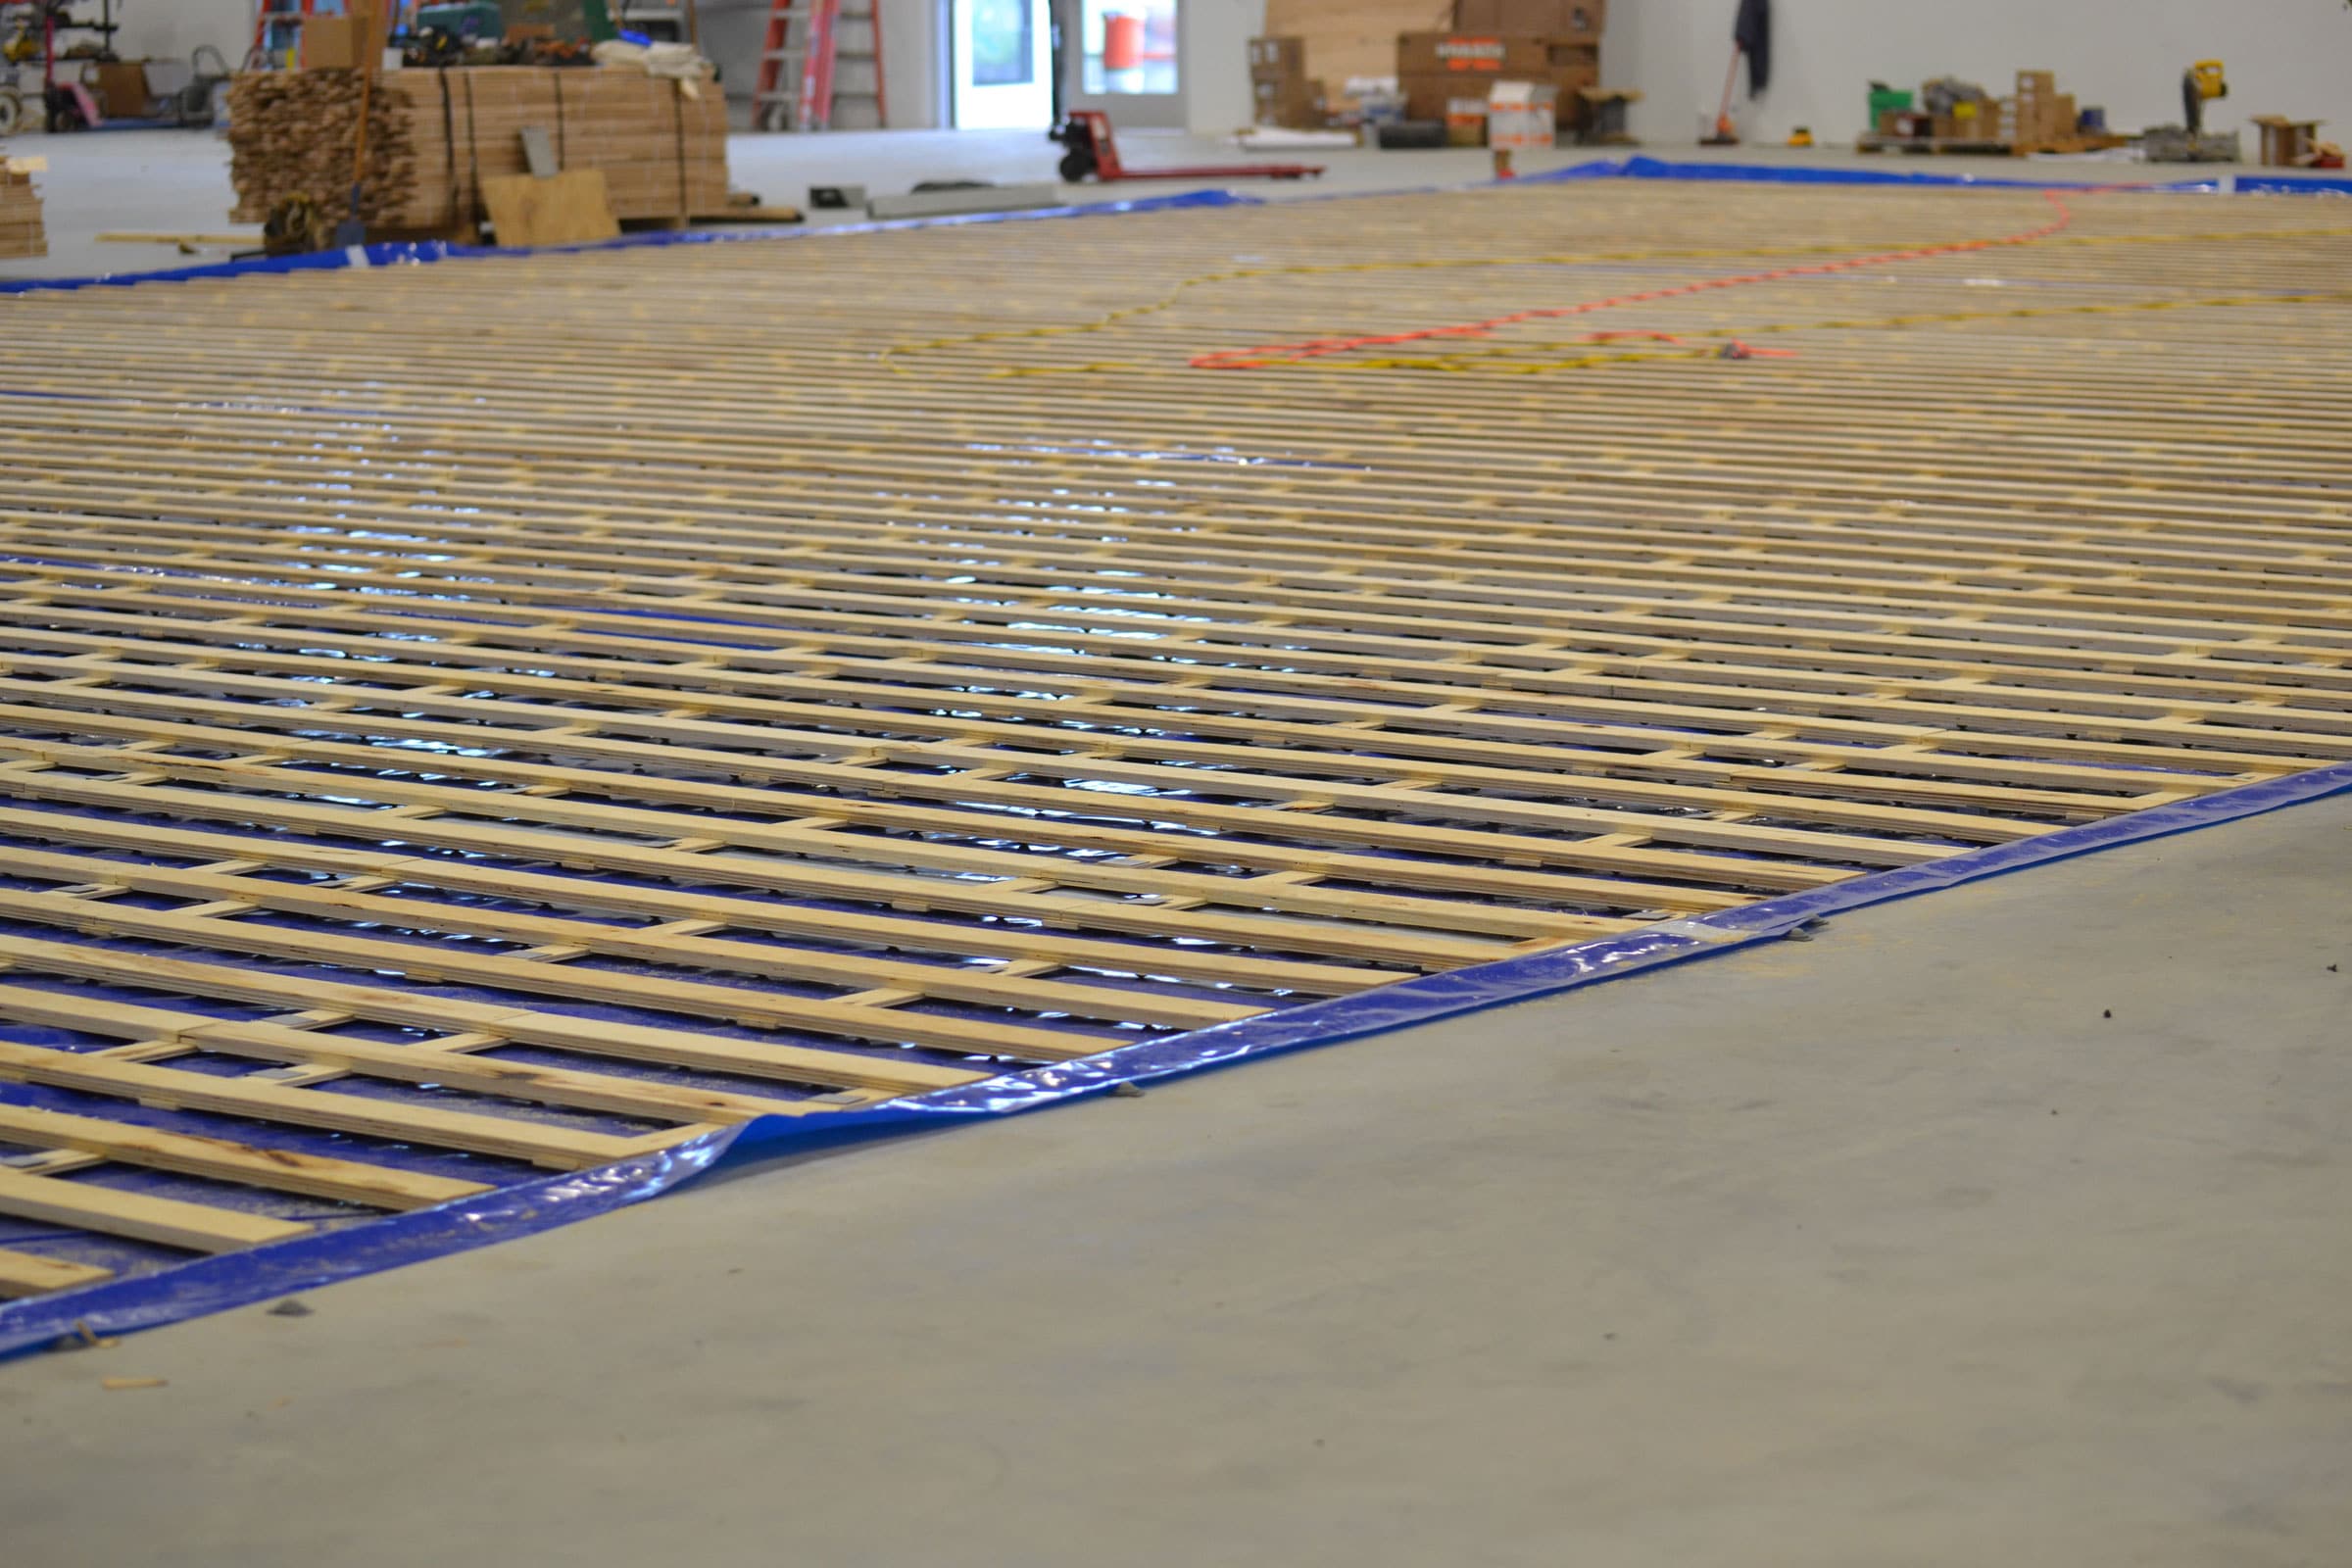
Sleeper Systems and How They Work With Insulation
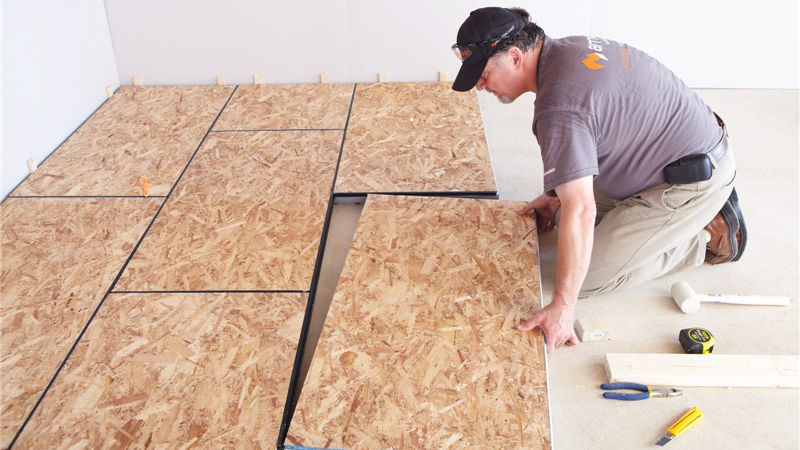
A sleeper system is an approach I used in my initial basement finishing attempt before I added foam, and it works well when combined properly with insulation. Sleepers are strips of pressure-treated lumber laid flat on the concrete slab in parallel rows, typically sixteen inches apart on center. The finished subfloor panels are then nailed or screwed to the sleepers, creating an elevated platform above the concrete.
The space between the sleepers can be filled with rigid foam cut to fit snugly between each row. This fills the thermal gap that would otherwise exist if you ran sleepers alone, and it creates a continuous insulation layer beneath the subfloor. The combination of sleepers, foam between them, and a subfloor above gives you a system that’s structurally solid, well-insulated, and elevated enough to allow air circulation between the concrete and the wood above, which helps manage moisture.
The honest downside of a traditional sleeper system is that it raises the floor height more than some approaches and can be tricky to keep perfectly level if your slab has significant undulation. I had to shim several sleepers in my basement to get a flat surface for the subfloor panels above. It’s manageable but time-consuming. For people who want a flatter result with less shimming, interlocking subfloor panel systems that combine the sleeper and subfloor into a single product are a very convenient alternative.

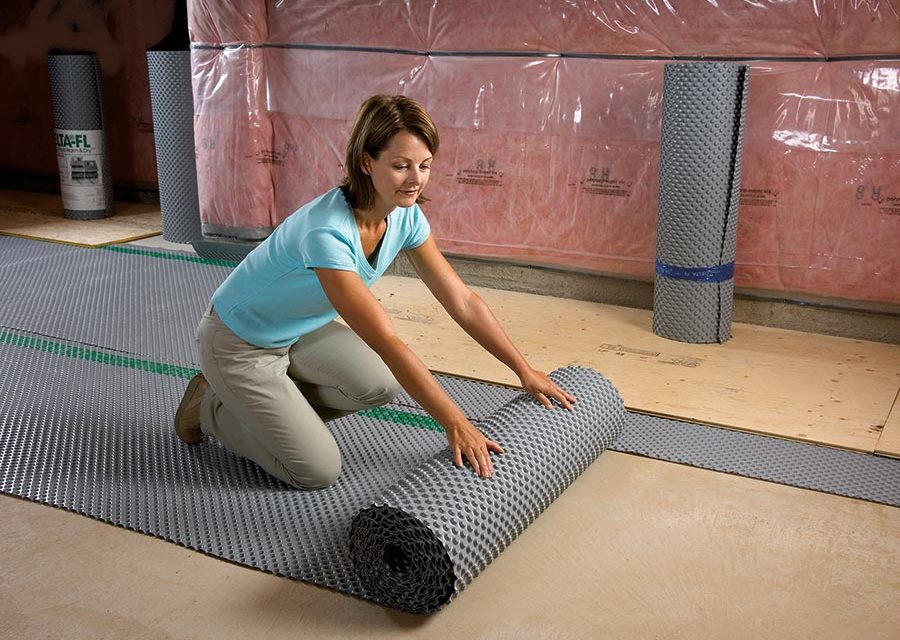
Dimple Mat Systems for Moisture Management and Insulation
Dimple mat is a product I didn’t know existed when I finished my basement the first time, and discovering it on my second attempt genuinely impressed me. It’s a sheet of polyethylene plastic covered in small raised dimples that create a network of tiny air channels between the concrete and whatever goes above it. Those air channels allow moisture vapor that passes through the slab to dissipate rather than getting trapped against wood subfloor panels.
While dimple mat provides some thermal benefit through that air gap, its primary contribution in a basement floor assembly is moisture management rather than insulation. The most effective approach combines dimple mat as a moisture break with rigid foam above it for thermal performance. The dimple mat goes directly on the concrete, the rigid foam lays on top of the dimple mat, and the subfloor panels go above the foam. This layered approach addresses both moisture and cold in a comprehensive way.
I used this combined system in my basement on the second attempt and the results have been excellent. The floor feels genuinely warm and comfortable underfoot, the space maintains temperature much more efficiently, and I have confidence that moisture vapor rising through the slab has somewhere to go rather than being trapped against the wood above. For a finished basement where you’re investing in real flooring on top, this layered approach is the most complete solution available at a reasonable DIY cost.

Spray Foam for Gaps, Edges, and Tricky Spots
Rigid foam panels do the heavy lifting in a basement floor insulation system, but they can’t address every gap and transition by themselves. That’s where canned spray foam becomes an essential companion product. Spray foam expands to fill irregular spaces completely, sealing air gaps that would otherwise allow cold air infiltration and thermal bridging around the perimeter of your insulated floor assembly.
I used spray foam along the perimeter where my rigid foam panels met the basement walls, filling any gaps between the foam edge and the wall surface. These perimeter gaps are a surprisingly significant source of cold air entry in a basement. The concrete wall meets the concrete floor at a right angle where two very cold surfaces come together, and any gap in the insulation at that junction creates a thermal weak point that you can literally feel underfoot in the area above it.
Around penetrations like floor drains, pipes, and electrical conduits that pass through the slab or floor assembly, spray foam provides the only practical way to seal irregular shapes completely. I went around every penetration in my basement floor assembly with spray foam after the rigid panels were in place, and the improvement in thermal performance was noticeable. That attention to detail in sealing transitions and penetrations is what separates a good insulation job from a great one.

Calculating R-Value and How Much Insulation Your Basement Needs
R-value is the measurement of thermal resistance, and knowing how much you need for your basement floor is a legitimate question with a somewhat regional answer. The US Department of Energy recommends different R-values for basement floors depending on your climate zone. In colder northern climates, R-10 to R-15 is typically recommended for basement floors. In milder climates, R-5 to R-10 may be sufficient. Checking your specific climate zone recommendations before buying materials helps you avoid both under-insulating and over-spending.
Two inches of XPS rigid foam delivers approximately R-10, which hits the minimum recommendation for most cold climate zones. Adding a third inch brings you to around R-15, which is worth considering if you want maximum comfort and energy efficiency in a very cold climate or if the basement is going to be a primary living space used year-round. The incremental cost of an extra inch of foam is relatively modest compared to the labor savings of doing it all in one project rather than going back later.
I want to be honest about something I learned the hard way: R-value alone doesn’t tell the complete story of basement floor performance. Air sealing and moisture management matter as much as the insulation’s thermal rating. A well-sealed R-10 assembly will outperform a poorly sealed R-15 assembly in real-world conditions. Spending time on seaming, perimeter sealing, and penetration details is as important as choosing the right thickness of foam, and it doesn’t cost much beyond a few extra cans of spray foam and a roll of foil tape.
Do I really need to insulate my basement floor if I’m adding finished flooring?
Yes, if comfort and energy efficiency matter to you. Finished flooring alone doesn’t provide meaningful thermal resistance. Carpet adds a small amount, but without insulation between the concrete and any finished floor, the slab still conducts cold into the space constantly. I skipped floor insulation on my first attempt and paid for it with a cold, uncomfortable basement all winter. Adding insulation made the single biggest improvement in how livable the finished space actually felt.
What is the best insulation to use under a basement subfloor?
Extruded polystyrene rigid foam, commonly called XPS, is my top recommendation. It offers good R-value per inch, excellent moisture resistance, and easy DIY installation. Two inches provides approximately R-10, which meets most cold climate recommendations for basement floors. Pair it with a dimple mat moisture barrier beneath the foam and you have a comprehensive system that manages both cold and moisture vapor transmission effectively. EPS is a more affordable alternative with slightly lower moisture resistance.

How much does basement floor insulation cost for a typical basement?
For a typical five-hundred-square-foot basement, two-inch XPS rigid foam panels run roughly three hundred to five hundred dollars in materials. Adding a dimple mat moisture barrier adds one hundred to two hundred dollars. Subfloor panels above the insulation add another five hundred to eight hundred dollars. The complete DIY system typically runs one thousand to fifteen hundred dollars in materials for a standard basement. That investment pays back through lower heating bills and dramatically improved comfort over the life of the finished space.
Will insulating my basement floor raise the ceiling height significantly?
Yes, it will reduce your ceiling height somewhat. A typical assembly using dimple mat, two-inch rigid foam, and three-quarter-inch subfloor panels raises the finished floor height by roughly three inches total. In a basement with standard eight-foot ceilings, that reduction is barely noticeable and acceptable. In a basement with lower ceilings, every inch matters more. Thinner foam combined with a lower-profile subfloor system can reduce the total height impact if headroom is a genuine concern in your specific space.
Can I insulate my basement floor if it has minor moisture issues?
Mild moisture vapor transmission is normal in most basement slabs and is manageable with the right insulation assembly. Use a dimple mat moisture barrier beneath the foam and choose XPS foam over EPS for better moisture resistance. For any active water intrusion, meaning visible seepage, efflorescence on walls, or past flooding, address those issues professionally before installing any insulation or finished flooring. Insulating over an active moisture problem traps water and leads to mold and structural damage that costs far more to repair than the original moisture problem.
How long does basement floor insulation last?
Rigid foam insulation, when properly installed and protected beneath a subfloor, essentially lasts indefinitely. XPS and EPS foam panels don’t degrade, rot, or lose significant R-value over decades when kept dry and protected from UV exposure and physical damage. The subfloor panels above the foam will eventually need replacement depending on conditions and traffic, but the insulation beneath should outlast multiple subfloor installations. It’s genuinely a one-time investment that provides thermal benefit for the entire life of the structure above it.
What’s the Best Way to Insulate a Basement Slab

Underslab Retrofits: Sealing Slabs WATERPROOF! Magazine
How to Install a Basement Vapor Barrier
Insulation for Existing Crawl Space Floors Building America
Related Posts: