When I first started refinishing hardwood floors five years ago, I thought stain was just about making wood darker or lighter. How wrong I was. Through numerous projects in my own home and by helping friends transform their spaces, I’ve discovered that stain selection can significantly alter a room’s personality, from warm and cozy to sleek and modern. My journey through various stain colors, application techniques, and finish combinations has taught me that the right stain choice can transform even builder-grade oak into the appearance of expensive custom flooring.
Understanding Wood Species and Stain Compatibility
My first major lesson came when I applied the same stain to oak and maple floors, expecting similar results. Oak’s open grain structure absorbs stain deeply, creating rich, consistent color throughout each plank. Maple’s tight grain resists stain penetration, often resulting in blotchy, uneven coloring that looks amateur despite careful application. This discovery led me to research how different wood species interact with various stain formulations before starting any project.
Pine flooring presented unique challenges during my cabin renovation project. The alternating hard and soft grain patterns create dramatic color variations within single boards when stained. Light stains emphasize these natural patterns beautifully, while dark stains can make pine look muddy and inconsistent. I learned to embrace pine’s character rather than fight it, choosing stains that complement rather than obscure the wood’s natural beauty and grain patterns.
Exotic hardwoods like Brazilian cherry taught me patience and respect for natural wood colors. These species often have inherent beauty that staining can diminish rather than enhance. I discovered that clear protective finishes sometimes showcase exotic woods better than any stain could. When staining is necessary, lighter applications preserve the wood’s natural character while adding subtle color enhancement. This approach maintains the premium appearance that exotic species naturally possess.
Popular Stain Colors and Their Visual Impact
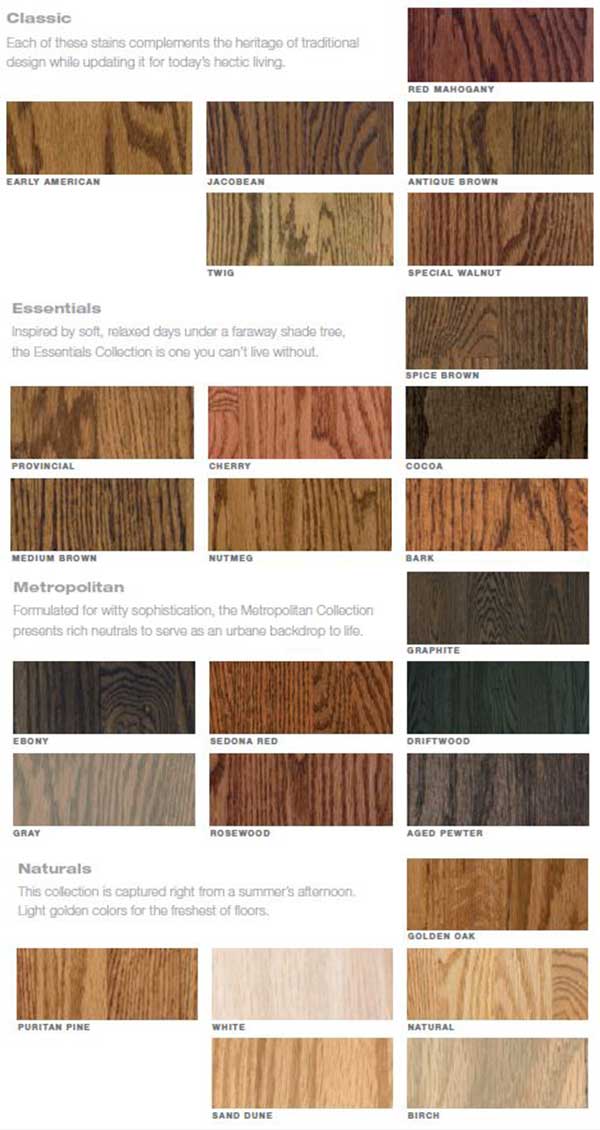
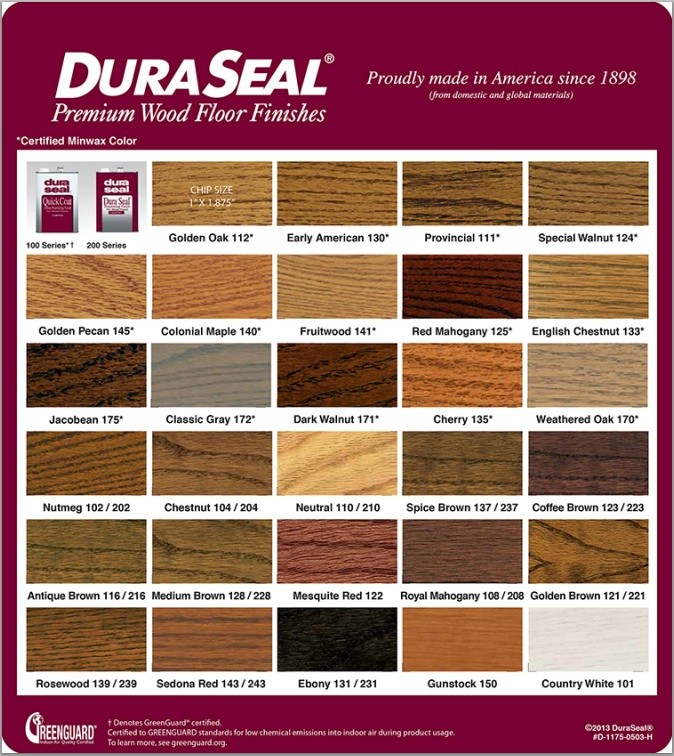
Gray stains became my obsession after seeing their transformative power in contemporary homes. Cool gray tones create modern, sophisticated appearances that complement current design trends perfectly. I’ve used various gray formulations, from subtle weathered gray to bold charcoal, each producing dramatically different moods. The key is matching gray intensity to room size and lighting conditions, as dark grays can overwhelm smaller spaces while light grays may appear washed out in large areas.
Warm brown stains remain timeless classics that work in virtually any setting. My experience with traditional walnut and espresso colors shows their versatility across different decorating styles. Rich chocolate browns create cozy, inviting atmospheres perfect for family rooms and bedrooms. Medium browns offer flexibility, working well with both traditional and contemporary furniture styles. I’ve found that warm browns are forgiving choices for first-time stain users.
Natural and honey-toned stains preserve wood’s inherent beauty while adding subtle color enhancement. These lighter options work exceptionally well in smaller spaces, creating airy, open feelings without overwhelming the room. I particularly love how honey stains bring out oak’s natural grain patterns while maintaining brightness. Natural stains require careful application to avoid blotchiness, but the results showcase wood’s authentic character beautifully when done properly.
Application Techniques and Professional Tips
Surface preparation determines stain success more than any other factor in my experience. I spend extensive time sanding floors to consistent grits, usually finishing with 120-grit paper for optimal stain penetration. Skipping grits or using worn sandpaper creates uneven surfaces that absorb stain inconsistently. Dust removal between sanding stages prevents contamination that shows as light spots after staining. This preparation phase consumes significant time but ensures professional-looking results.
Stain application timing requires careful attention to prevent lap marks and color variations. I work in manageable sections, maintaining wet edges throughout the process. Fast-drying stains demand quick work and proper planning to avoid overlapping marks. I’ve learned to work with room lighting patterns, completing sections that flow naturally rather than arbitrary divisions. Temperature and humidity affect drying times significantly, requiring adjustment of working speeds accordingly.
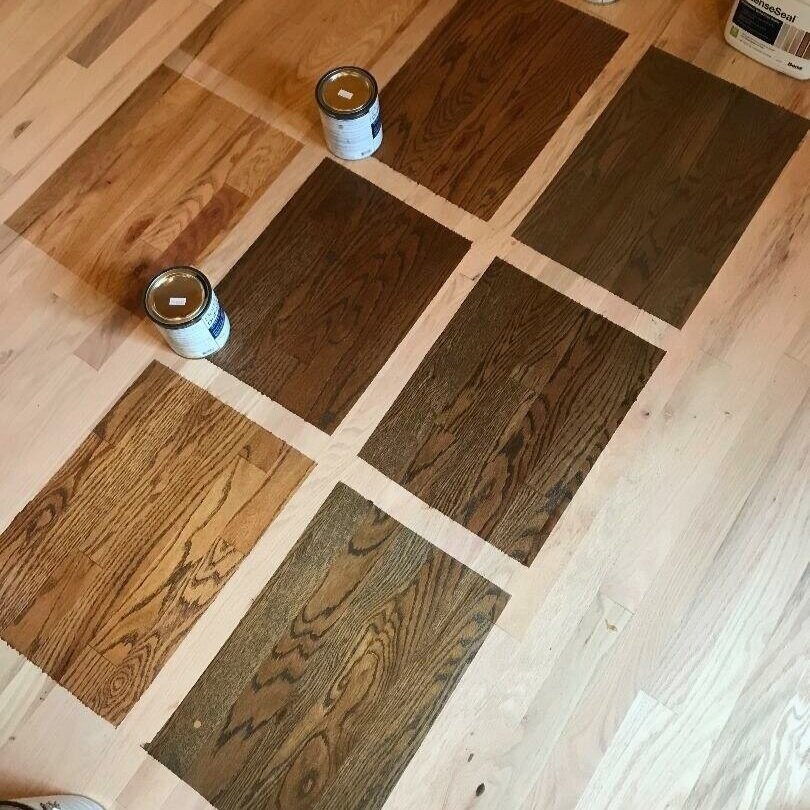
Blending techniques help achieve consistent color across large areas and between different wood pieces. I use foam brushes for initial application, followed by clean rags for evening out color intensity. Working diagonally to grain direction during initial application prevents streaking, while final passes follow grain patterns. Multiple light coats produce better results than single heavy applications, allowing better color control and reducing the risk of over-saturation that appears blotchy.
Dealing with Stain Mistakes and Corrections
My biggest stain disaster happened when I applied dark walnut stain too heavily, creating an almost black appearance that looked nothing like the sample. Panic set in until I discovered that immediate sanding could remove excess stain before it fully penetrated. Working quickly with fine-grit sandpaper and clean rags, I managed to lighten the color significantly. This experience taught me the importance of testing stain coverage rates and working in thin layers.
Blotchy stain application plagued my early projects until I learned proper wood conditioning techniques. Pre-stain conditioner helps woods like pine and maple accept stain more evenly, preventing the splotchy appearance that ruins otherwise careful work. I now use conditioner religiously on problematic species, even though it adds time and cost to projects. The consistent results justify this extra step, especially on visible areas where appearance matters most.
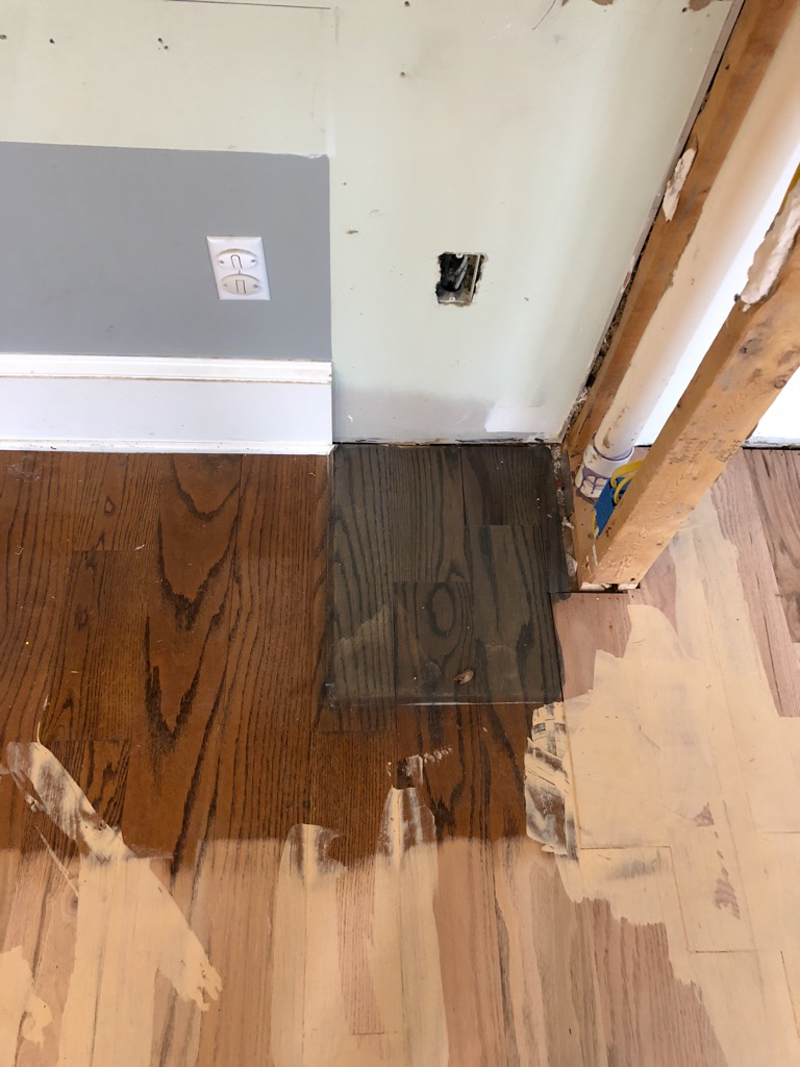
Color matching between new and existing floors requires patience and experimentation. I mix custom stain colors by blending commercial stains until achieving the desired match. This process involves multiple test applications on sample boards, adjusting ratios until colors align perfectly. Natural aging affects existing floor colors, so matching requires accounting for these changes. I keep detailed records of successful color formulations for future reference and touch-up work.
Protective Finishes and Long-Term Performance
Polyurethane finishes provide excellent protection for stained floors while maintaining color clarity over time. I prefer water-based polyurethanes for their clarity and low odor, though oil-based versions offer superior durability in high-traffic areas. The finish choice affects stain appearance, with some finishes adding amber tones that alter carefully selected colors. I always test finish and stain combinations on sample boards before committing to full floor applications.
Wax finishes create beautiful natural appearances but require more maintenance than modern alternatives. I use paste wax on antique floors where authenticity matters more than convenience. The warm glow that wax provides complements traditional stain colors beautifully, creating period-appropriate appearances. However, wax requires regular reapplication and limits future finish options, making it unsuitable for high-traffic areas or busy households.
Penetrating oil finishes enhance wood grain patterns while providing moderate protection. These finishes soak into wood rather than forming surface films, creating very natural appearances that complement stain colors perfectly. I use penetrating oils on floors where natural beauty takes precedence over maximum protection. The maintenance requirements are higher than polyurethane, but the aesthetic results justify the extra effort in appropriate applications.

Cost Considerations and Value Analysis
Stain costs vary dramatically based on quality and coverage requirements. Premium stains cost more per gallon but often provide better coverage and more consistent results than budget alternatives. I’ve learned that buying quality stains saves money long-term through better performance and fewer application problems. The labor investment in floor preparation and application far exceeds material costs, making quality stains worthwhile investments for lasting results.
Professional staining services cost significantly more than DIY approaches but guarantee consistent results and save considerable time. I recommend professional services for high-visibility areas or when working with expensive wood species, where mistakes prove costly. DIY staining works well for utility areas or when learning techniques on less critical projects. The skill development from DIY projects pays dividends on future renovations and maintenance work.
Long-term value analysis favors quality stains and proper application techniques over budget shortcuts. Well-stained floors maintain their appearance for decades with proper care, while poor stain jobs require expensive corrections or complete refinishing. I’ve seen quality stain work add significant value to homes, especially when colors complement current design trends. The investment in proper staining pays returns through both daily enjoyment and eventual resale value.
How long should I wait between applying the stain and the protective finish coats?
Stain drying time varies significantly based on wood species, environmental conditions, and stain type. I typically wait 8-12 hours minimum before applying finish coats, though some stains require 24 hours for complete drying. Oil-based stains need longer drying times than water-based alternatives. Testing stain dryness by touching inconspicuous areas helps determine readiness for finish application. Rushing this process can cause finish adhesion problems and cloudy appearances that require expensive corrections.
Can I change my hardwood floor color without complete refinishing?
Changing floor color typically requires complete sanding and refinishing, as new stain won’t penetrate through existing finish coats. I’ve successfully darkened floors by applying darker stains over lightly sanded surfaces, but lightening requires complete stain removal. Screen and recoat processes can refresh existing stain colors but won’t change them significantly. The investment in proper color change usually justifies complete refinishing for best results and longest-lasting appearance.
Which stain colors are most likely to go out of style quickly?
Neutral colors like medium browns and natural tones remain timeless and resist style changes better than trendy colors. I’ve seen gray stains gain popularity recently, but their longevity remains uncertain. Extreme colors like very dark or very light stains may date more quickly than moderate tones. Classic colors provide safer long-term investments, while trendy colors work better in homes where periodic updates are expected and budget allows for regular changes.
How do I prevent lap marks when staining large floor areas?
Preventing lap marks requires careful planning and consistent technique throughout the application process. I work in manageable sections while maintaining wet edges where sections meet. Using consistent pressure and coverage patterns helps achieve uniform appearance. Working with proper lighting reveals potential problems before they become permanent. Fast-drying stains demand quicker work speeds and sometimes require additional helpers to maintain wet edges across large areas successfully.
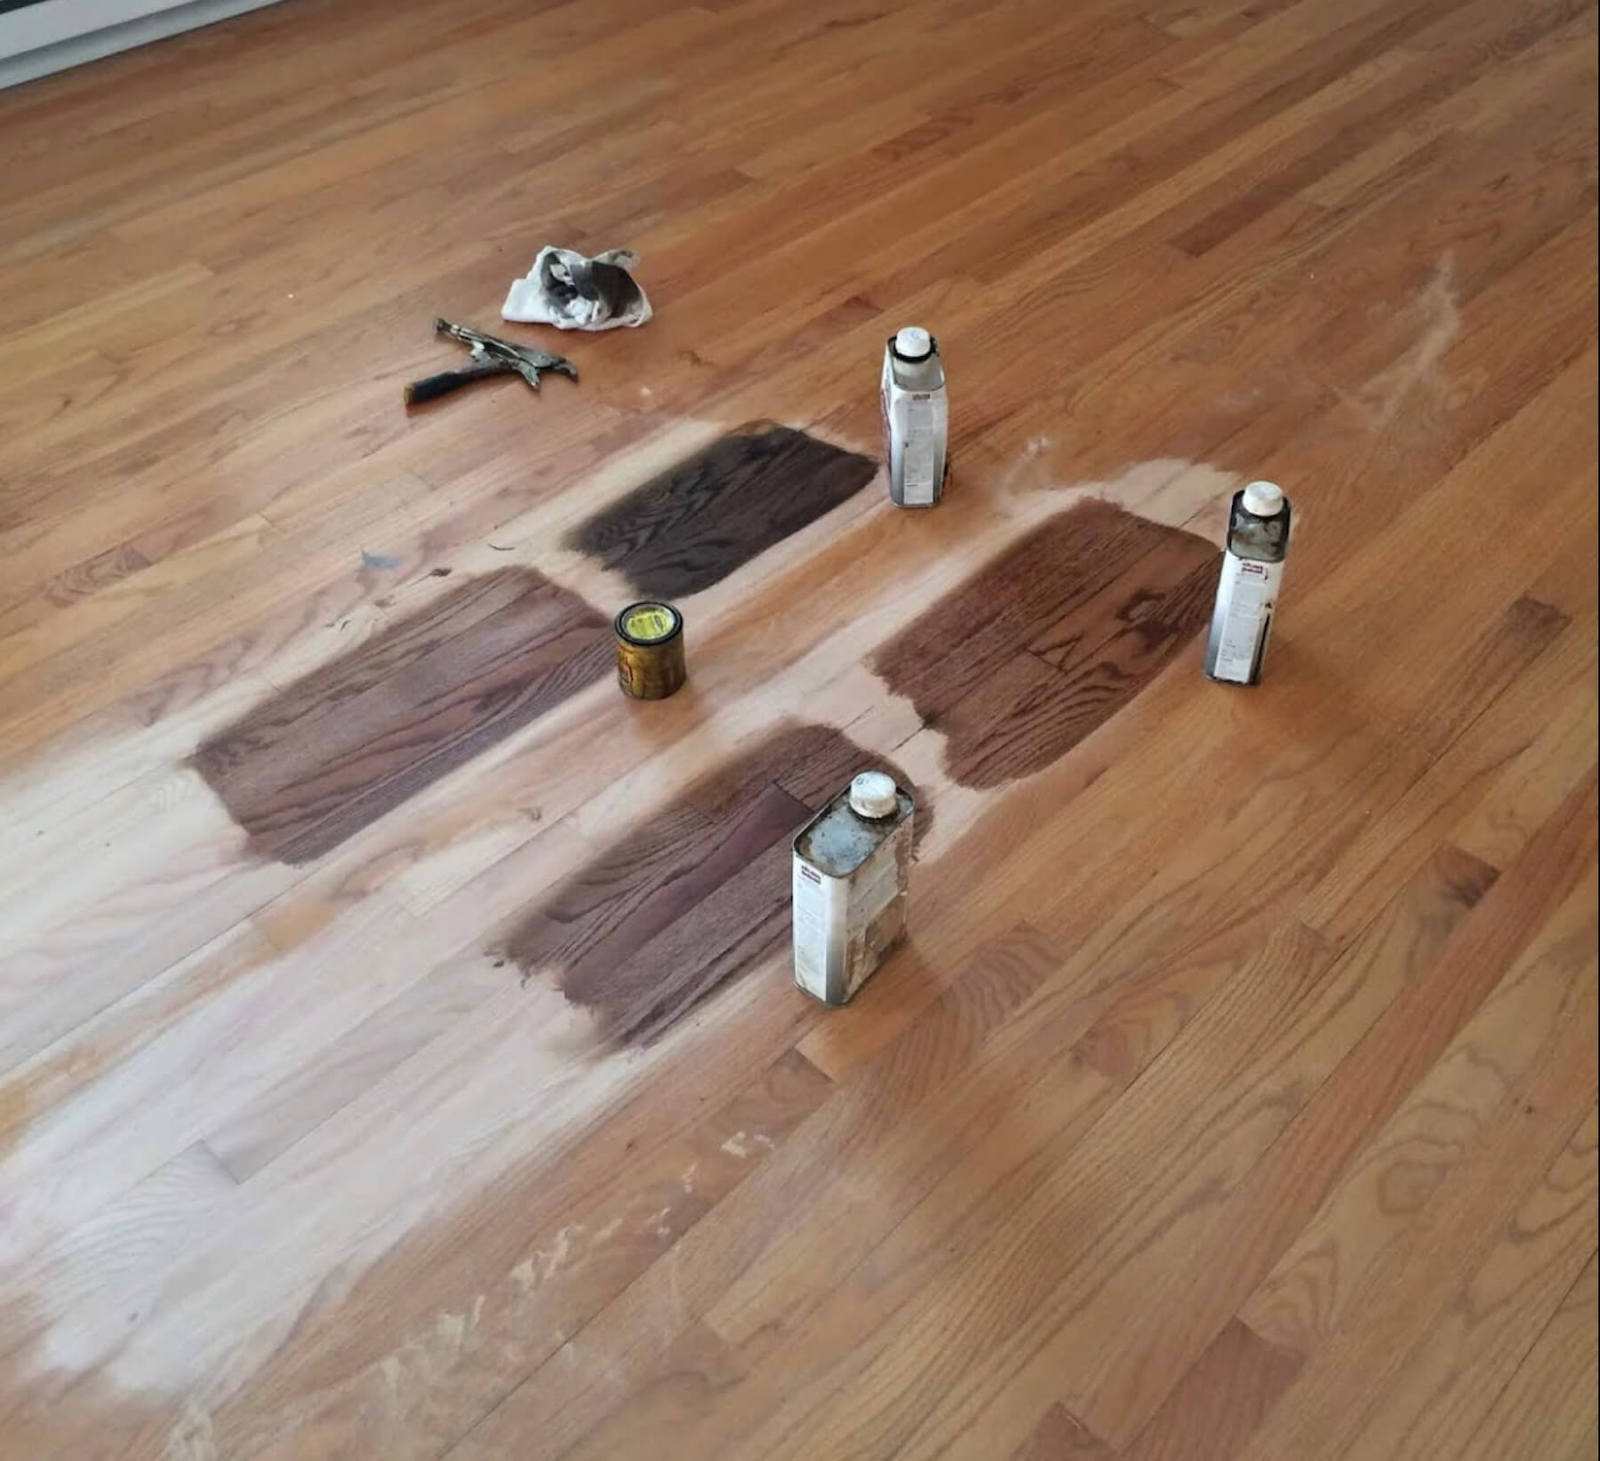
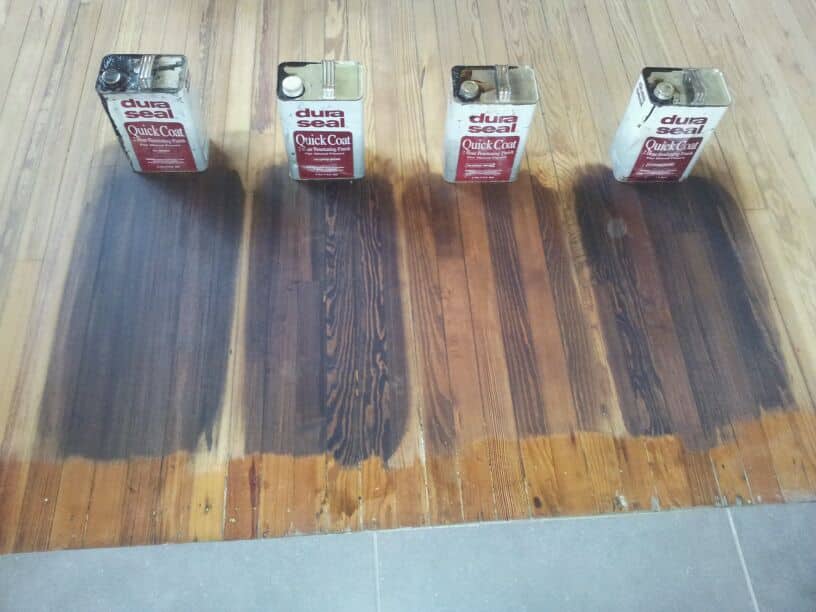
What’s the best way to test stain colors before committing to full application?
Testing stain colors on actual flooring samples provides the most accurate preview of final results. I use sample boards from the same wood species and prepare them identically to the actual floor. Multiple test patches with different application techniques help determine optimal coverage methods. Testing under various lighting conditions reveals how colors appear throughout different times of day. I always test stain and finish combinations together, as finishes can alter stain appearance significantly.
How often do stained hardwood floors need maintenance and refinishing?
Stained hardwood floors typically need refinishing every 7-10 years in residential settings, depending on traffic patterns and maintenance quality. High-traffic areas may show wear sooner, while low-traffic areas can last longer between refinishing cycles. Regular cleaning and prompt attention to damage extend the time between major refinishing projects. I recommend annual inspections to identify potential problems before they require expensive repairs. Quality initial staining and finishing work extends maintenance intervals significantly compared to poor initial work.

Wood Floors stain colors for refinishing hardwood floors Wood

How to pick the BEST wood stain for your floors – Bower Power
Hardwood Floor Stain colors – Hardwood Floor Refinishing New
Related Posts: