When I began my home renovation journey two years ago, I thought installing laminate flooring would be straightforward. However, I quickly learned that the real challenge lay in creating seamless transitions between different rooms and floor types. What seemed like a minor detail turned into one of the most crucial aspects of my flooring project. Through trial, error, and plenty of learning, I discovered that proper transitions can make or break the entire look of your home. My experience taught me valuable lessons about planning, execution, and the importance of getting these details right.
Planning My Transition Strategy
Initially, I underestimated the complexity of transition planning and assumed I could figure it out as I went along. This approach led to several costly mistakes and awkward-looking connections between rooms. I learned that successful transitions require careful measurement, understanding of expansion gaps, and consideration of height differences between various flooring materials throughout the house.
My biggest revelation came when I realized that transitions aren’t just functional, they’re also aesthetic elements that significantly impact the flow between spaces. I spent hours sketching floor plans and marking where each type of transition would be needed. This planning phase helped me identify potential problems before installation and saved considerable time and money later.
The importance of ordering transition pieces early became apparent when I discovered that matching profiles weren’t always in stock. I had to wait three weeks for custom-colored T-molding that matched my laminate perfectly. This delay taught me to plan transitions simultaneously with flooring selection, not as an afterthought during installation.
Understanding Different Transition Types
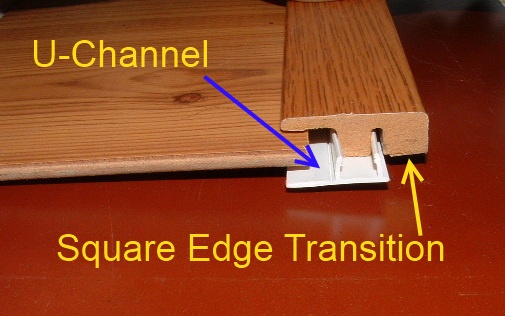
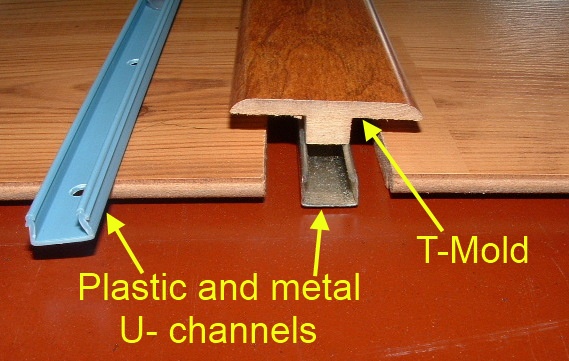
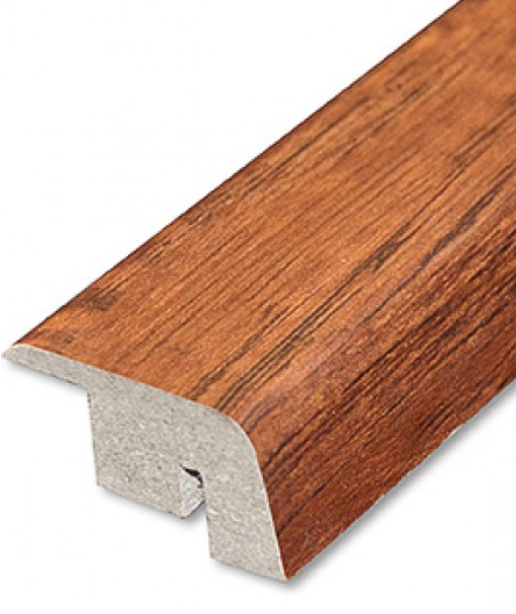
Learning about various transition profiles opened my eyes to solutions I never knew existed. T-molding became my go-to choice for connecting laminate floors of equal height, while reducer strips proved perfect for transitioning from laminate to lower surfaces like vinyl or carpet. Each profile serves specific purposes and height requirements that I had to master.
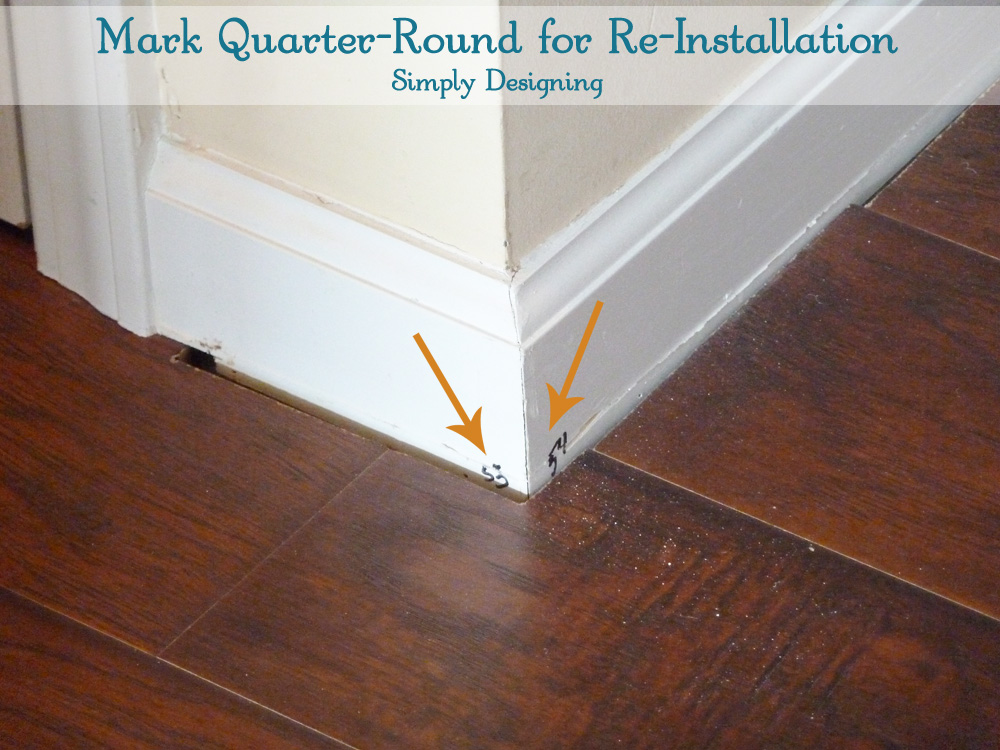
Quarter rounds and shoe molding initially confused me, but I discovered their importance in covering expansion gaps along walls and cabinets. These seemingly minor pieces create professional-looking finishes that hide the necessary gaps required for laminate expansion and contraction. Without them, my beautiful flooring looked unfinished and amateur.
Threshold strips became essential when connecting my laminate to tile in bathrooms and entryways. I learned that these transitions not only accommodate height differences but also provide moisture barriers between different flooring types. Choosing the right material and finish for thresholds requires matching both adjacent floor surfaces for a cohesive appearance.
Installation Challenges I Faced
My first attempt at installing transitions resulted in visible gaps and uneven heights that looked unprofessional. I hadn’t properly measured the height differences between my laminate and existing hardwood floors. This mistake taught me the importance of using proper underlayment thickness to achieve level transitions between different flooring materials.
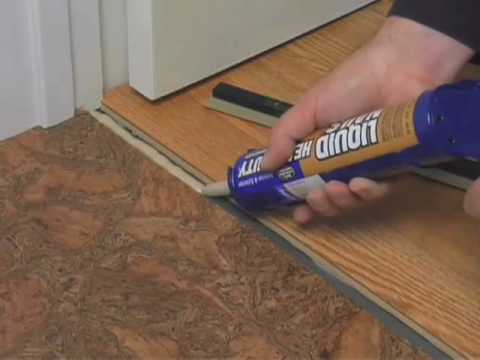
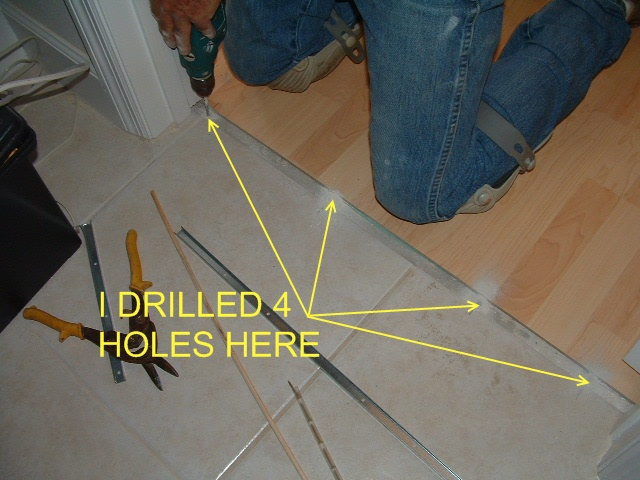
Cutting transition pieces to exact lengths proved more challenging than expected, especially for angled cuts around doorways. I invested in a quality miter saw after ruining several expensive pieces with inadequate tools. Precise measurements and clean cuts are essential for professional-looking results that don’t require caulk or filler to hide imperfections.
The attachment methods for different transition types initially puzzled me. Some profiles require track systems, others use direct screwing, and some simply snap into place. I learned to match installation methods with specific flooring types and subfloor conditions. Reading manufacturer’s instructions carefully prevented several potential installation disasters.
Aesthetic Considerations That Matter
Color matching between laminate flooring and transition pieces requires more attention than I initially realized. Even slight color variations become glaringly obvious once installed, especially in high-traffic areas with good lighting. I learned to order samples and test them in different lighting conditions before making final selections for my project.
The visual flow between rooms dramatically improved when I chose consistent transition styles throughout my home. Mixing different profile types created a disjointed appearance that disrupted the overall design harmony. Establishing a consistent transition strategy early in the planning process creates better aesthetic continuity between spaces.
Transition placement significantly impacts room proportions and traffic flow patterns. I discovered that positioning transitions under doorways creates cleaner sight lines compared to placing them in the middle of openings. This placement also reduces wear patterns and provides more natural breaking points between different flooring materials.

Common Mistakes and Solutions
One of my biggest errors was attempting to install transitions without proper expansion gaps around the laminate perimeter. This oversight caused buckling and gaps that required complete reinstallation in several areas. I learned that expansion gaps are non-negotiable requirements, not suggestions, regardless of how they might initially look.
Using incorrect fastening methods damaged both my subfloor and expensive transition pieces. I discovered that different flooring types require specific attachment techniques to prevent cracking, splitting, or loosening over time. Following manufacturer guidelines exactly, rather than improvising, saves money and ensures long-term performance.
Rushing the installation process led to misaligned transitions that created trip hazards and poor aesthetics. Taking time for proper measurement, marking, and double-checking alignment prevents costly mistakes. I learned that patience during installation pays dividends in final appearance and long-term durability of the finished project.
![]()
Long-Term Performance and Maintenance
After eighteen months of daily use, my properly installed transitions continue to perform flawlessly without loosening, cracking, or showing excessive wear. The key to longevity was using quality materials and following proper installation techniques. Cheap transition pieces false economy that leads to premature failure and replacement costs.
Maintenance requirements vary significantly between different transition materials and finishes. My aluminum transitions simply need occasional cleaning, while wood-grain vinyl pieces require careful attention to prevent scratching. Understanding maintenance needs before selection helps ensure long-term satisfaction with your choices.
Seasonal expansion and contraction affect transitions differently from the main flooring areas. I’ve noticed slight movement during extreme weather changes, but proper installation with adequate expansion gaps prevents any functional problems. Regular inspection helps identify potential issues before they become serious problems requiring repair or replacement.
What’s the most important factor when selecting laminate flooring transitions?
Height compatibility between adjacent flooring surfaces is the most critical selection factor. Measure the exact height difference between your laminate and connecting floors to choose appropriate transition profiles. T-molding works for equal heights, while reducers accommodate height differences up to 3/8 inch. Consider expansion requirements, traffic patterns, and moisture exposure when making final selections. Quality materials cost more initially but provide better long-term performance and appearance.
Can I install laminate flooring transitions myself, or should I hire professionals?
Most homeowners can successfully install basic transitions with proper tools and careful planning. Simple T-molding and quarter-round installations are straightforward DIY projects. However, complex transitions involving height differences, custom cuts, or moisture barriers may require professional expertise. Consider your skill level, available tools, and project complexity. Professional installation ensures warranty compliance and proper expansion gap maintenance for optimal long-term performance.
How do I handle transitions in doorways with heavy foot traffic?
Heavy traffic doorways require durable materials like aluminum or solid wood transitions rather than vinyl alternatives. Install transitions directly under the door when closed to minimize visibility and reduce wear patterns. Use track systems or secure fastening methods that won’t loosen under constant foot traffic. Consider wider profiles that provide better stability and appearance. Regular inspection and maintenance prevent minor issues from becoming major problems in high-traffic areas.
What’s the proper way to maintain expansion gaps around transition pieces?
Maintain 1/4 inch expansion gaps between laminate edges and transition pieces to allow for seasonal movement. Never attach transitions directly to the laminate flooring itself, only to the subfloor. Use appropriate quarter round or shoe molding to cover gaps along walls while allowing movement. Check gaps periodically and remove any debris that might restrict expansion. Proper gap maintenance prevents buckling, cracking, and premature failure of both flooring and transitions.
How do I match transition colors with my laminate flooring?
Order transition samples alongside flooring samples to ensure accurate color matching under your home’s lighting conditions. Natural and artificial light can dramatically affect color perception between different materials. Many manufacturers offer coordinating transition pieces specifically designed to match their flooring lines. When exact matches aren’t available, choose neutral tones that complement rather than clash with your flooring. Test combinations in actual installation locations before purchasing.
What should I do if my transition pieces become loose or damaged over time?
Address loose transitions immediately to prevent further damage and potential safety hazards. Most loosening results from inadequate initial fastening or natural expansion movement. Remove the loose piece, inspect fasteners and subfloor condition, then reinstall with appropriate screws or adhesive. For damaged pieces, replacement is usually more cost-effective than repair. Keep spare transition pieces from the original installation for future repairs and replacements as needed.

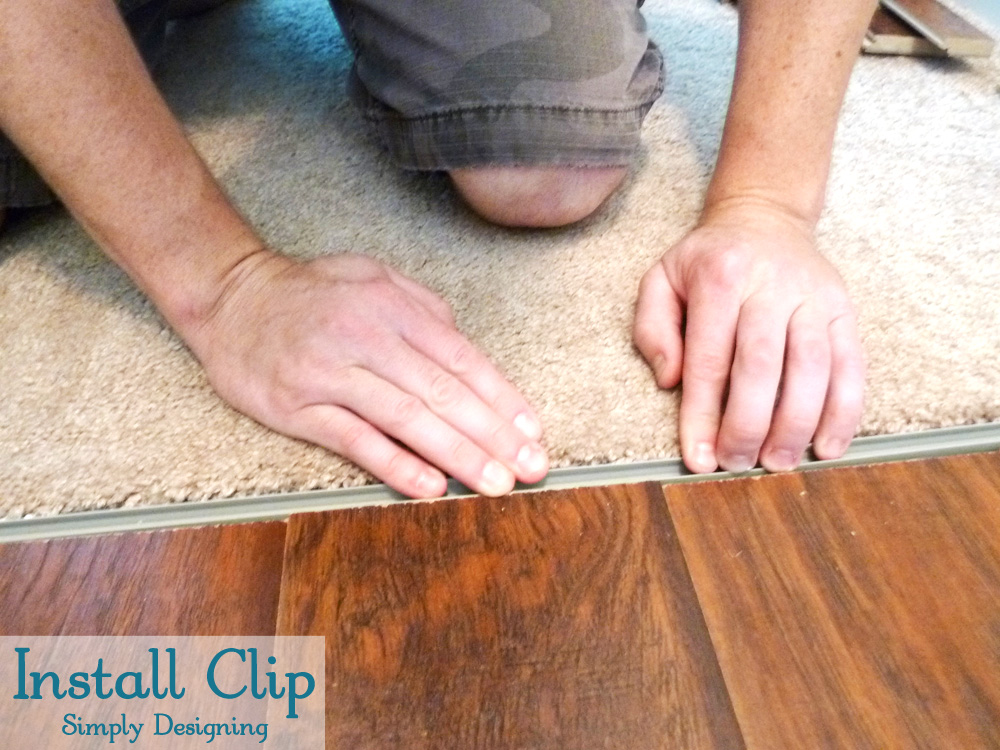
Installing Laminate Transitions, Step by Step Instructions
Installing Laminate Transitions, Step by Step Instructions
![]()
How to install laminate flooring transitions
Laminate flooring transition strips
![]()
Installing Laminate Flooring : Finishing Trim and Choosing
Related Posts: