When I started researching DIY flooring options for my home office renovation, cork kept appearing as the perfect beginner-friendly choice. I was skeptical at first, thinking cork would be too difficult or look cheap, but after successfully installing cork floors in three different rooms over the past two years, I’ve become a total convert. The combination of comfort, affordability, and genuine DIY-friendliness makes cork ideal for anyone willing to invest a weekend. Let me share the creative ideas and practical lessons I learned along the way.
My First Project: Simple Click-Lock Cork Planks
I started with the easiest possible cork installation using click-lock planks in my 10×12 home office. These engineered planks have a cork veneer over an HDF core and literally snap together without any glue or nails. The first row took me almost an hour as I figured out the technique, but by the third row, I was moving quickly. The entire room took just one Saturday, including removing the old carpet and baseboards.
The beauty of click-lock cork is that it’s completely forgiving for beginners. I made several mistakes during installation, like clicking planks together at the wrong angle, but I could simply pull them apart and try again without damaging anything. This floating floor system also meant I didn’t need any special tools beyond a tape measure, utility knife, and rubber mallet. The low barrier to entry made it perfect for building my confidence.
One trick I learned is to stagger the seams by at least six inches between rows for structural integrity and visual appeal. I used the cut-off piece from each row to start the next row, minimizing waste while creating a natural random pattern. The planks came pre-finished with a protective coating, so I could walk on the floor immediately after installation. This instant gratification was incredibly satisfying compared to projects that require days of drying time.
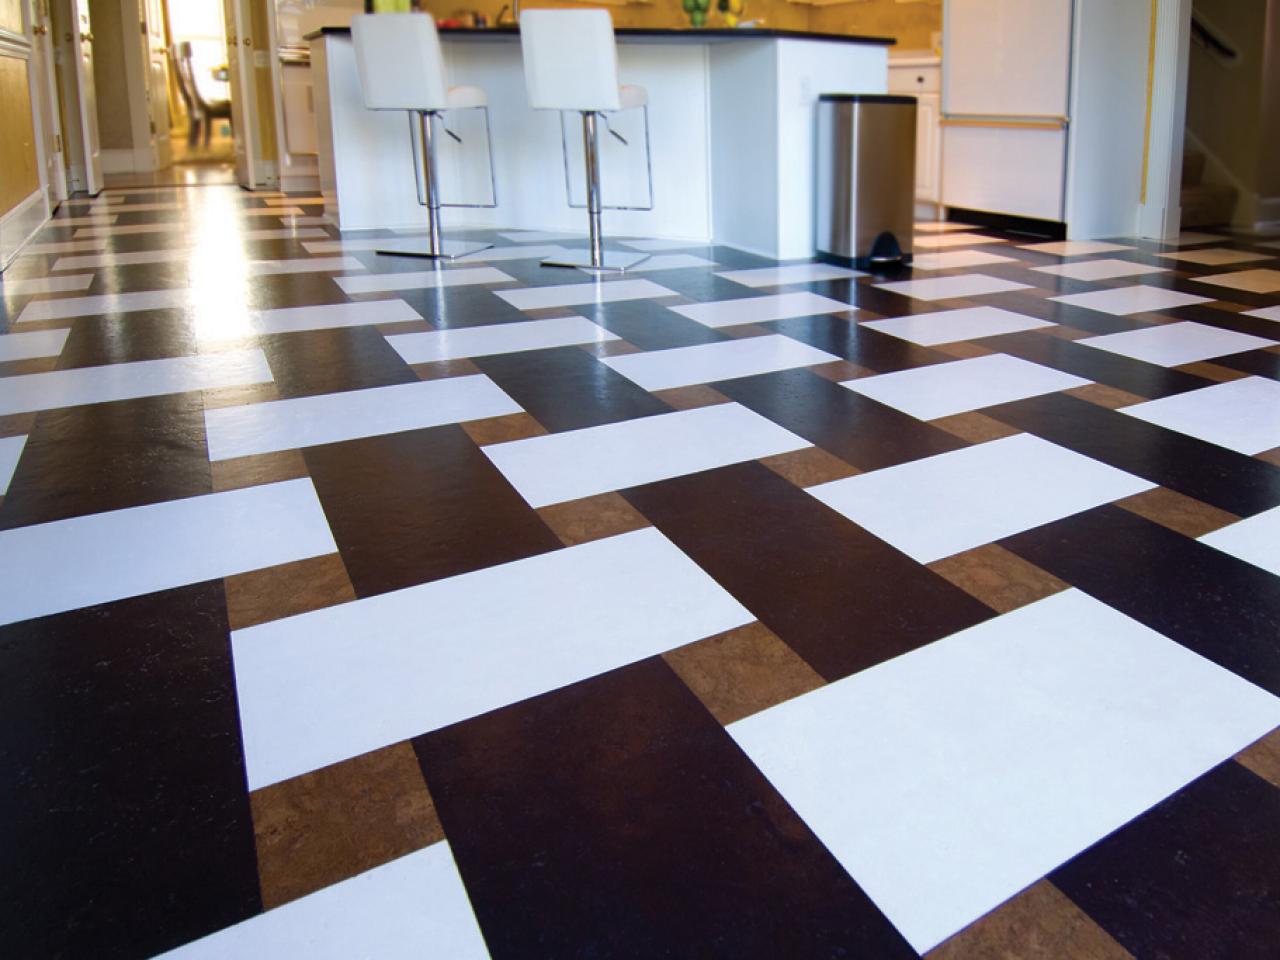
Creating Custom Patterns with Cork Tiles
My second project was more ambitious: a checkerboard pattern using 12×12 natural and dark-stained cork tiles in my mudroom. I bought unfinished tiles and stained half of them myself using wood stain and a foam brush. The tiles absorbed the stain beautifully, creating rich, even color. After the stain dried, I sealed all tiles with three coats of water-based polyurethane before installation.
The glue-down process was messier than click-lock but still manageable. I used a notched trowel to spread contact adhesive on the subfloor in small sections, then pressed each tile firmly into place. Working in three-foot sections prevented the adhesive from drying before I could lay tiles. I rented a 100-pound floor roller from the hardware store to ensure good adhesion, rolling over each section after installation.
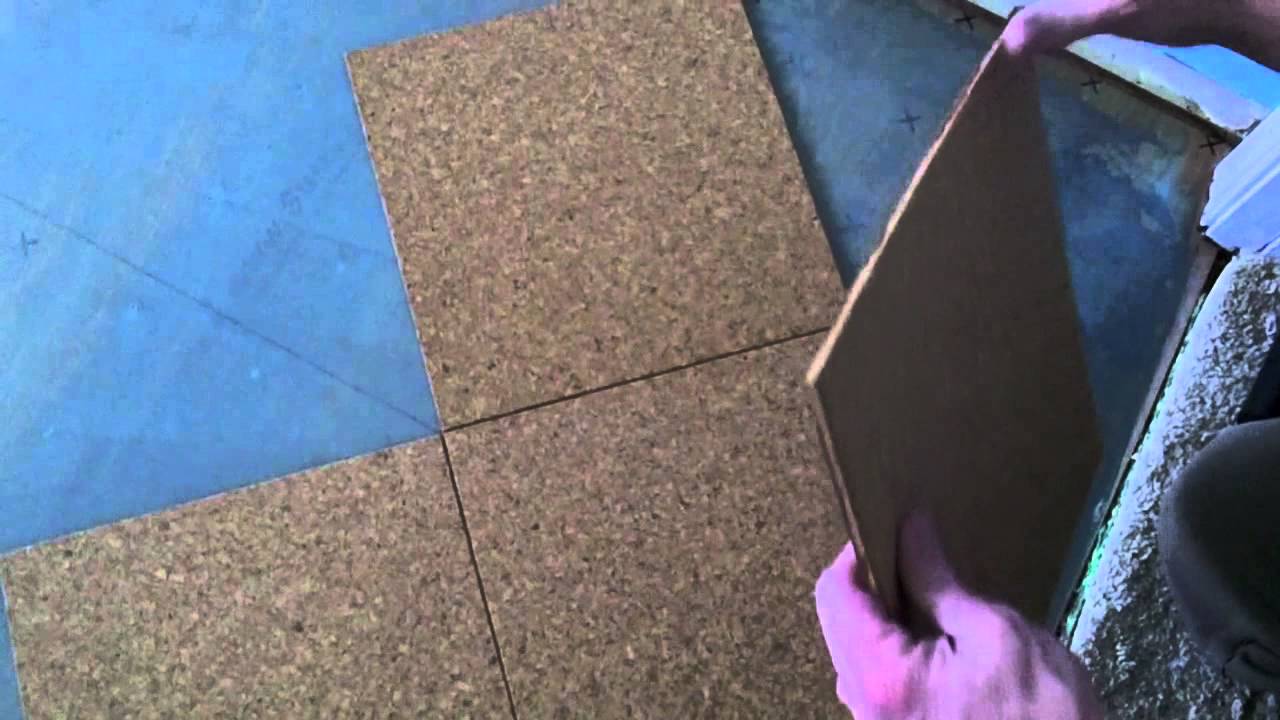
Planning the pattern beforehand was crucial. I dry-laid the entire floor without adhesive first, marking reference lines with chalk to keep everything square. Starting from the room’s center and working outward ensured the pattern stayed symmetrical. The cuts around doorframes were challenging, but I used a cardboard template to trace the exact shape before cutting tiles with a utility knife. The finished checkerboard pattern cost about $200 in materials and looks like it came from a high-end designer.
Budget-Friendly Cork Underlayment as Flooring
I discovered an incredibly affordable DIY option when renovating my craft room: using cork underlayment rolls as the actual flooring surface. Cork underlayment typically goes beneath other flooring, but at just $1-2 per square foot, I decided to try it as a top layer. I unrolled 4-foot-wide sheets, cut them to size with scissors, and glued them down with contact adhesive. The seams are visible but add to the industrial-rustic aesthetic I wanted.
The key to making underlayment work as flooring is proper sealing. I applied five coats of polyurethane, which was necessary because underlayment is more porous than finished cork tiles. Each coat took about two hours to apply and four hours to dry. The extra sealing time was worth it for the dramatic cost savings. My 120-square-foot craft room cost under $300 total for materials.
This approach won’t work in high-traffic formal spaces, but it’s perfect for studios, workshops, playrooms, or any area where you prioritize function and budget over polished aesthetics. The thicker underlayment actually provides more cushioning than standard cork tiles, making it incredibly comfortable to stand on. I’ve had this floor for 18 months with heavy use, and it’s holding up better than I expected.
Hand-Painting Cork for Unique Artistic Floors
My most creative project involved hand-painting cork tiles before installation in my daughter’s bedroom. I bought unfinished 12×12 tiles and painted them with acrylic floor paint in a gradient ombre effect, transitioning from pale pink at one end of the room to deep magenta at the other. Each tile was painted individually, allowed to dry completely, then sealed with polyurethane before installation.
The painting process was surprisingly enjoyable. I set up an assembly line in my garage, painting six tiles at a time in progressive shades. I mixed custom colors by gradually adding more magenta to the pink base, creating smooth color transitions. The porous nature of cork grabs paint beautifully, requiring only two coats for solid coverage. The entire painting phase took three evenings while watching TV.
I also experimented with stenciling geometric patterns on some tiles using painter’s tape and metallic gold paint. These accent tiles are scattered randomly throughout the pink ombre field, adding visual interest and playfulness. The creative freedom with painted cork is limitless, you could create any pattern, mural, or design you can imagine. My daughter’s friends are always amazed when I tell them I made the floor myself for less than $400.
Mixing Cork with Other DIY Materials
In my basement rec room, I combined cork tiles with peel-and-stick vinyl tiles to create a custom area rug effect. I installed vinyl in a rectangular border pattern, then filled the center with natural cork tiles. This creates visual zones in the large open space while keeping costs down, using expensive cork only where comfort matters most. The two materials install at similar heights, making transitions smooth.
The key to mixing materials successfully is planning the layout carefully on graph paper first. I measured the room precisely and sketched different configurations until I found one that maximized whole tiles and minimized cuts. The vinyl border was faster to install than cork, so I laid that first, then filled in the cork center. Using a metal transition strip where the materials meet gives it a finished, intentional look.
I’ve also seen creative DIYers combine cork with river rock borders, tile accents, or even embedded LED strips between cork tiles. The natural texture of cork plays well with other materials, creating interesting contrasts. One friend installed cork in her bathroom but used waterproof luxury vinyl around the toilet and tub for moisture protection. This practical mixing of materials optimizes each area for its specific needs.
Refinishing and Updating Existing Cork Floors
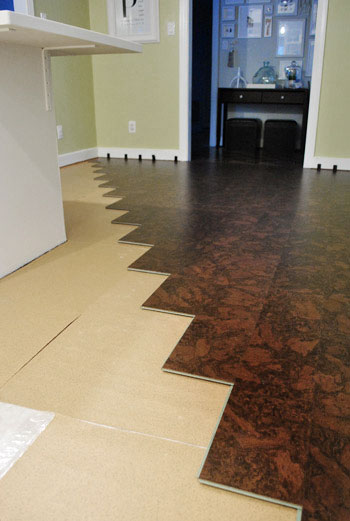
When I bought my current house, the kitchen had old, worn cork flooring that the previous owners had neglected. Rather than replacing it, I decided to refinish it myself, which turned out to be one of my most satisfying projects. I rented a floor sander and carefully removed the old finish and top layer of damaged cork. The sanding revealed fresh, beautiful cork underneath that looked brand new.
After sanding, I had the option to change the color completely. I applied a medium walnut stain that transformed the previously blonde cork into a rich, warm brown that better suited my design vision. The stain absorbed unevenly in some areas, creating interesting variations that added character. Three coats of polyurethane sealed everything and provided durable protection.
The refinishing cost about $150 in materials and tool rental, compared to $2,000+ to replace the floor entirely. The process took a full weekend but saved me thousands while giving me exactly the look I wanted. This project taught me that cork is incredibly forgiving and versatile. Even if you make installation mistakes or inherit damaged cork, you can almost always sand it down and start fresh with new color and finish.

Is cork flooring really DIY-friendly for beginners?
Absolutely. I’d never installed flooring before my first cork project, and click-lock planks were incredibly easy. The learning curve is gentle, mistakes are fixable, and you don’t need expensive specialized tools. Glue-down tiles require more skill but are still manageable with patience. I recommend starting with a small room to build confidence before tackling larger spaces.
How much money can I save by installing cork myself?
I saved about 50-60% by doing it myself. Professional installation costs $3-5 per square foot on top of materials. My DIY office floor cost $450 for 120 square feet including materials and tool rental, versus $1,200+ professionally installed. The savings increase with larger projects, making DIY cork an excellent value proposition.
What tools do I actually need for DIY cork installation?
For click-lock: tape measure, utility knife, rubber mallet, and spacers. For glue-down tiles: add notched trowel, contact adhesive, and floor roller rental. For finishing: paintbrushes or lambswool applicators for polyurethane. I already owned most tools and rented the specialized ones. Total tool investment was under $100, most of which I’ll use on future projects.
Can I install cork over my existing floor?
Sometimes. I installed click-lock cork over old vinyl successfully, but the subfloor must be smooth, level, clean, and structurally sound. I wouldn’t install over carpet, loose tiles, or damaged floors. When in doubt, removing old flooring ensures the best results. Cork’s forgiving nature means minor imperfections won’t ruin your project.
How long does DIY cork installation actually take?
My 120-square-foot office took one full Saturday with click-lock planks. Glue-down tiles are slower, my mudroom took a full weekend including staining and sealing time. Factor in prep work like removing baseboards and old flooring. Realistic timeline: small room in a weekend, larger spaces might need two weekends including finishing.
What’s the biggest mistake to avoid with DIY cork?
Skipping the sealing process or not applying enough coats. I learned this the hard way when my first project absorbed a spill because I’d only applied two coats instead of three. Proper sealing is absolutely critical for durability and water resistance. Don’t rush this step, each coat protects your investment and effort.
Related Posts: